This post uses affiliate links that may earn VistaThink a commission at no additional cost to you. Read more in the Private Policy. Thanks for your support!
A paper helicopter experiment is a fantastic hands-on, and low-budget way for students to explore cause and effect relationships in experimental design. These models offer teachers easy STEM activities with paper and generate authentic data in the classroom. In fact, there are so many paper helicopter materials, lessons, and instructions online, it’s hard to know where to start!

Simple quantifiable scenarios can be examined and several criteria for success can be defined and explored. Paper helicopters provide educators with easy-to-do experiments to help students learn the scientific method.
The ASTC Science World Society concisely explains the many levels of inquiry teachers can offer students when conducting paper helicopter experiments. These levels of investigation range from more structured to less structured which suits various grade levels and abilities.
Paper helicopter lessons with more structure would generally target lower grade levels. More open assignments are suitable for independent students at the higher grade levels where the teacher acts as a facilitator. Teachers of all experience levels can take advantage of the learning opportunities provided by experimenting with paper helicopters.
Paper Helicopter Lesson Outline
The specific paper helicopter lesson outlined in this blog post targets students in upper elementary and middle school. It can be extended above and below these grade levels as well. This lesson covers methods of data gathering and provides teachers with easy-to-use activity resources.
This paper helicopter experiment is a simple introduction to experimental design and will target this testable science question:
Does changing the blade length of a paper helicopter affect how long it stays in the air? (Keep reading, however, this question needs a bit of clarification.)
The NGSS Standards do apply! Examples:
- 3-5-ETS1-3 Engineering Design – Plan and conduct an investigation collaboratively to produce data to serve as the basis for evidence, using fair tests in which variables are controlled and the number of trials considered.
- MS-ETS1-2 Engineering Design – Evaluate competing design solutions using a systematic process to determine how well they meet the criteria and constraints of the problem.
How Does a Helicopter Work?
In basic terms, an actual helicopter is a type of aircraft that creates lift (an upward force of air) with horizontally spinning rotor blades. These rotor blades are sometimes referred to as simply rotors or blades.

The physics of paper helicopters are different from real helicopters. Traditional paper helicopters do not use a power source to spin their blades and create lift. These models are typically created with two blades and dropped from a fixed height and spin as they descend.
Paper helicopters spin because of the earth’s gravity, lift, and configuration of the rotors. When dropped, the helicopter’s mass experiences gravity, and it naturally falls to the floor which causes paper blades to bend slightly upward due to lift. The lift force of the air pushes on each of the blades equally but in opposite directions, horizontally and vertically. As a result of the horizontal equal, opposite, and offset forces, the helicopter spins around as it descends.
The helicopter descends due to unbalanced forces: The weight of the helicopters is greater than the lift force of air.
2BrokeScientists studied the airflow around a helicopter and found that there were high-pressure areas under the blades. This high pressure results in equal and opposite opposing forces that cause the spin.
Framing the analysis in terms of Newton’s Third Law of Motion, a pair of equal and opposite forces acting horizontally under each blade and on the body of the paper helicopter cause rotation.
Simple Paper Helicopter
A simple paper helicopter can be made easily at home or school. Multipurpose U.S. letter-size printer paper (8.5 x 11 inches, 21.6 x 27.9 cm) works well for the model. The design is simple to make with only a few cuts and folds, and its parts can be easily adjusted to examine changes regarding flight behavior. To conduct the paper helicopter experiment, we should know the parts first!
Paper Helicopter Parts
The paper helicopter parts are similar to a real helicopter’s parts. The common paper helicopter with two blades has four major parts:
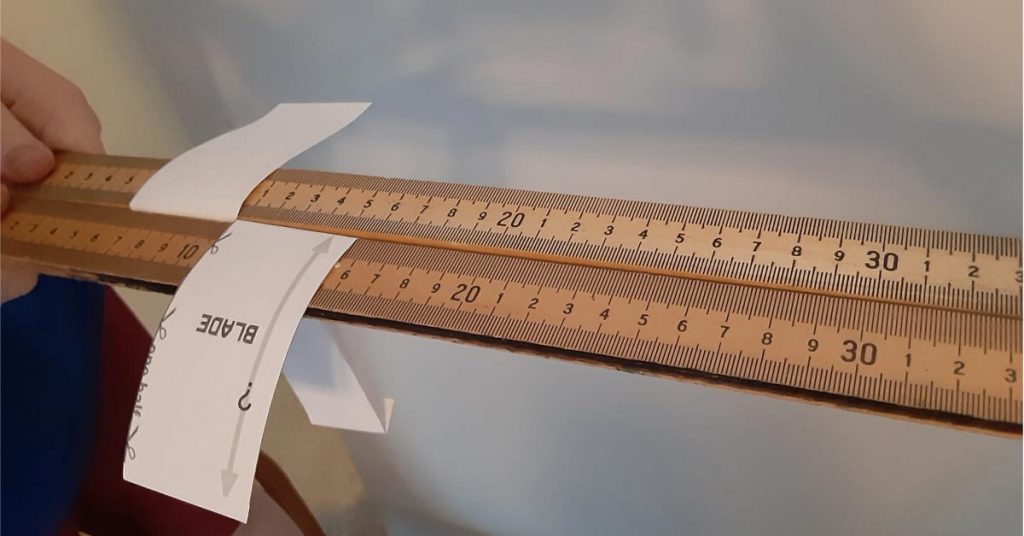
Blades – These two parts are identical rectangles arranged vertically at the top of the helicopter. These parts are sometimes called rotors, blades, rotor blades, wings, or even propellers. The blades provide the lift and are factors that cause the helicopter to spin. The width of the two blades together equals the width of the paper template used to make the helicopter. The thickness of the blades is one layer of paper.
Body – The top of the body of the paper helicopter connects to the blades. The body shape is a rectangle and is perpendicular to the blades. It is located between the blades and the tail. It is as wide as the paper template used to make the helicopter. The thickness of the body is one layer of paper.

Tail – The top of the tail connects to the bottom of the body. The thickness of the tail is three layers of paper. The width of the paper helicopter tail is one-third the width of the template. The tail provides the paper helicopter flight stability.
Stabilizer – The stabilizer is essentially the bottom tip of the tail. A horizontal fold in the tail creates the stabilizer. This fold also provides the paper helicopter flight stability by shifting the model’s center of mass downward.
Independent, Dependent, and Controlled Variables
The paper helicopter experiment requires that you control some variables, change others, and look for cause and effect. A variable is a characteristic or quantity that can be measured or counted in an experiment. Most experiments for this age group account for three kinds of variables: independent, dependent, and controlled.
Independent variables are manipulated by the researcher. These variables are changed and studied to determine if they are the cause in a cause-and-effect relationship. Independent variables are not influenced by other variables. Sometimes independent variables are not manipulated by the researcher but monitored to see how their changes may affect other variables. For example, time (seconds, days, years) is an independent variable that can be tracked to see how it may affect other variables (e.g., the growth of a plant).
Dependent variables are what researchers observe, measure, or count in an experiment. Changes in dependent variables depend on various influences. Independent variables are factors that may change a dependent variable.
Why are Variables Important in an Experiment?
That’s the point of an experiment: To find out what may or may not influence a dependent variable! These types of variables are the “effect” in a cause-and-effect relationship.
Controlled variables are variables that the researcher does not allow to change. The variables are maintained to be constant so that they do not influence any of the dependent variables. Variables that are kept the same for every measurement and test in an experiment, ensure that the dependent variables produce data that are as accurate as possible.
Knowing variables’ roles helps researchers be systematic with their observations, accurately collect relevant data, and be logical with their scientific thinking.
How Do You Make a Paper Helicopter Fall Slower?
A common problem to examine is how to make a paper helicopter fall slower. In other words, many paper helicopter designers want to know how to make a paper helicopter that stays in the air the longest. A simple two-rotor paper helicopter is a good design choice to study this common problem.
The researcher can manipulate any of the four helicopter parts to determine what factors affect the flight time of a paper helicopter. By adjusting a part of the helicopter, researchers are manipulating the independent variable to determine if this change affects the time the helicopter stays in the air (time in the air is the dependent variable). Parts of the helicopter that do not change from a standard model to an adjusted model, are considered control variables.
Paper Helicopter Variables
To ensure that testing is fair so that cause-and-effect data are a reliable source of information, the three types of paper helicopter variables need to be defined. For our paper helicopter experiment example, the independent, dependent, and controlled variables are identified as follows.
Independent Variables:
- blade length (which changes the body height)
- body height (which changes when the rotor blade length is adjusted)
Dependent Variable:
- time aloft
Controlled Variables (Helicopter Parts):
- rotor blade width and thickness
- body width and thickness
- tail length, width, and thickness
- stabilizer length, width and thickness
Controlled Variables (Materials and Conditions):
- paper size and mass
- paper type
- drop height
- drop start time
From a persnickety perspective, there are more variables to control like the angle between the blades and the body. This should be 90 degrees by the way. How deep you go as far as what variables are controlled–what you look at–depends on the students’ age group and experience.
By taking into account the types of variables in an experiment, our actually scientific inquiry question for the paper helicopter experiment is:
Does changing the blade-length-to-body-height ratio
of a paper helicopter affect how long it stays in the air?
It’s important to note that since paper helicopters easily offer many cause-and-effect relationships to explore, students may eagerly start changing parts of the helicopter to see what happens–how flight changes. Once students get their hands on a template, without focused guidance, teachers may see many different configurations, and helicopters being thrown up into the air.
The time to be creative with designs to more freely explore flight dynamics is after a procedural scientific experiment is conducted.
Paper Helicopter Experiment Considerations
If you are conducting the paper helicopter experiment in a classroom, you will need to set up a testing area. Two paper helicopter models are needed as well to explore how to make a paper helicopter fall slower. It may be easiest to refer to each model by their blade lengths: shorter-blade model and longer-blade model.

The student tester usually holds the completed helicopters away from their body and just above their head while standing on a chair. This drop distance is sufficient for comparing two different helicopters. Make sure there is enough clearance between the tester and any objects or observers to not interfere with the paper helicopters’ descent (i.e., to avoid introducing unwanted variables).
Having multiple students drop the two different helicopter types from the same height and at the same time can provide a simple and solid experimental design.
Here’s an example from NASUWT showing three students testing paper helicopters at once:
How Many Trials Should a Good Experiment Have?
What is a trial in a science experiment? A trial is one of many tests that make up the experiment itself. For example, each time you drop the paper helicopter from a fixed height to see if increasing the blade length increases how slowly a paper helicopter falls, you are conducting a trial.
We want a good experiment–one that offers fair testing and produces not only accurate data but lots of accurate data. The more trials we have, the more evidence we have that random factors are not influencing the outcome.
Other ways to think about the role of trials are: How many trials in an experiment should you conduct to get valid results? How many trials are required to validate a hypothesis? We want the results to truly represent what we are investigating.
So, how many trials should a good experiment have? As many as possible. Three trials minimum seems to be a consensus. With easy-to-test paper helicopters, students can conduct many trials in a short period of time. Multiple helicopters can be tested at once as well. With a design such as the aluminum foil boat investigation, fewer trials are possible because it takes more time to prepare and test.
How to Collect Data in a Science Experiment
If you can gather as much good data as possible without too much logistic fuss, do it! For example, provide half of your class with the shorter-blade paper helicopter template. The other half of the class would be given the longer-blade helicopter template.
When ready, the two helicopter groups could be separated, face each other, hold up their models at the same height, and then drop them simultaneously. Repeat as needed. Students should keep their hands and arms as far away from the helicopters as possible, holding the tips of the blades before release.
Videos of the experiment offer easily reviewable data that would offer a more sound determination to see if longer or shorter rotor blades cause a paper helicopter to stay in the air the longest. Each model type should be clearly identified especially if relying on videos for data analysis.
Other Ways to Collect Data
There are other ways to collect data while ensuring a fair test. Establishing a fixed height from the floor (i.e., controlling the distance-flown variable) can be done by hanging a small mass from the classroom ceiling with thread.


One successful set-up I have used has a paper clip on one end of a thread with a piece of blue painter’s tape on the other end. The top end with the paper clip is tucked into the metal drop ceiling frame grid, and the piece of blue paper tape has enough mass to hang down properly and be easily visible. I prefer not to have a paper clip hanging on the lower end because if hit or smacked for “fun” it could hurt someone’s hand, stick in the ceiling, etc.
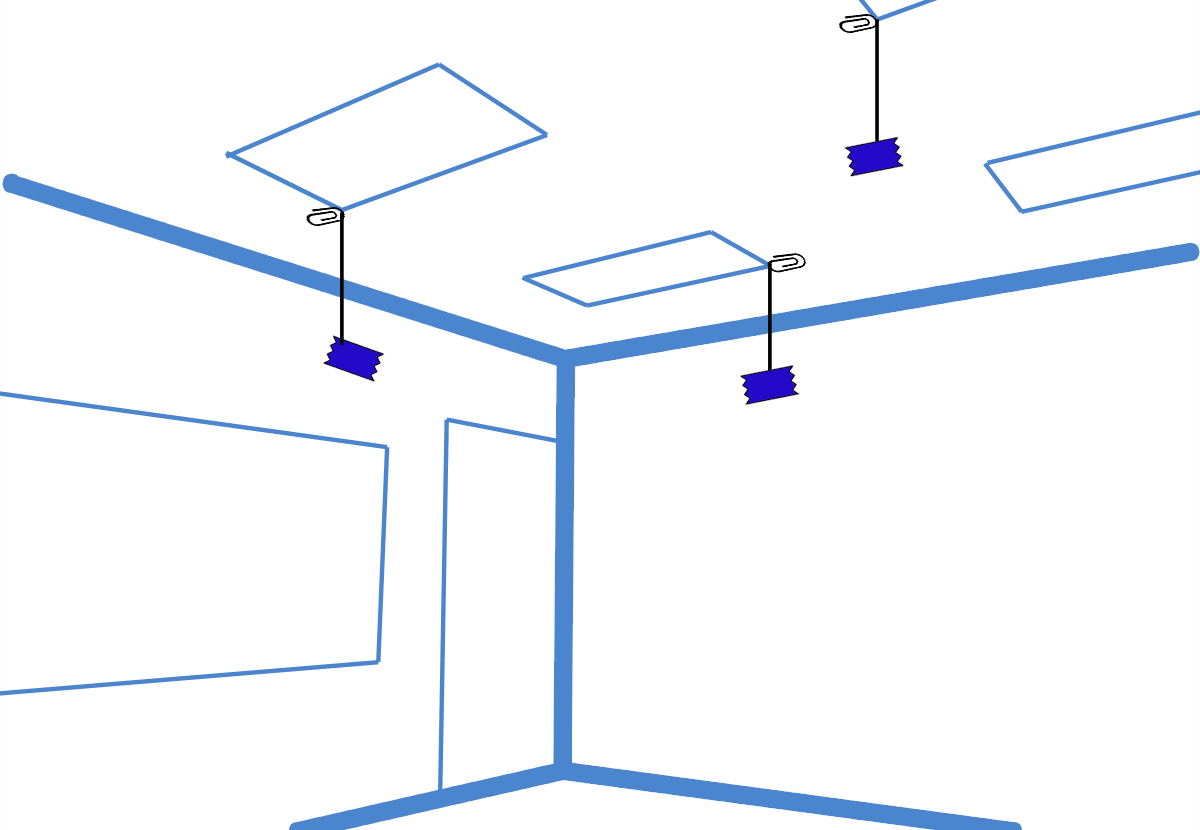
A distance of 200 cm from the tape to the floor is a good distance to establish as a controlled variable for dropping and observing paper helicopters. Place six to eight of these paperclip-thread systems around the classroom to create testing spaces for groups of two to four students.
Paper Helicopter Flight Times
The easiest and quickest way to determine which paper helicopter model falls more slowly may be the aforementioned multi-copter drop method with or without a video recording. So, if you need a quick and easy STEM activity, go this route.
Another way to perform a fair test requires a stopwatch. After setting up the six to eight test stations around the classroom with the paperclip, thread, and blue painter’s tape, each group of students can perform the 200 cm drop and time the helicopter models multiple times.
If students do, say, ten trials for each model they should have sufficient data to minimize random factors. Each group’s ability to time the drops accurately will factor into the integrity of the results. Measuring the paper helicopters’ times over a fixed distance will also produce data that can be analyzed mathematically. Some examples of mathematical analyses are:
- represent and interpret data in a chart or graph
- measures of center (e.g., average time for each model)
- measures of variability (e.g., differences in trial times for each model)
Other Simple Paper Helicopter Launcher Ideas
There are other ways to launch paper helicopters rather than dropping them from your hand. For example, two meter sticks, side-by-side, can launch two to four helicopters at once. Two people are needed to hold the ends of the meter sticks. A bit of practice helps to keep the sticks level at a prescribed height and to separate them at the same time for launching.

With the two-stick method, you can launch even more helicopters at once using longer pieces of wood. Consider using two 1 in. x 2 in. x 8 ft. furring strip boards for launching seven to ten paper helicopters at once with just two people.
Paper Helicopter Experiment Lesson Plan
The focus of this paper helicopter investigation explores how the independent variables of blade length and body height together affect time aloft. Remember that, the blade length cannot be changed without changing the body height (unless we change the mass, which is a variable we are controlling). This means for both types of helicopters:
Blade length (shorter) with body height (taller)
= equals =
Blade length (longer) with body height (shorter)
And, as a reminder, our paper helicopter scientific inquiry question is:
Does changing the blade-length-to-body-height ratio of a paper helicopter affect how long it stays in the air?

Lesson Plan Parts and Documents
Paper Helicopter Template – There are four free printable pdf templates (8.5 x 11 inches, 21.6 x 27.9 cm). Each helicopter template is one page with the two types of helicopters:
- paper helicopter template with instructions and labels
- paper helicopter template with instructions (no labels)
- paper helicopter template with minimal instructions
- paper helicopter template no instruction (just cutting and folding lines)
Choose the template that makes the most sense for your students. Generally, the lower the grade level, the more instruction, and guidance are needed to make a paper helicopter.
Teacher Lesson Plan Outline
Grade Levels
4 – 7 (8 – 10 works too!)
Time
How deep do you want to go? What is the grade level? Are you looking for a quick STEM activity or a long-term stem project? Consider 45 minutes (one class) to 90 minutes (two classes), and keep in mind any extension activities.
Scientific Inquiry Question
Does changing the blade-length-to-body-height ratio of a paper helicopter affect how long it stays in the air?
If you’re working with lower grade levels, or want to simplify the question, pose it like this:
Does changing the blade length of a paper helicopter affect how long it stays in the air?
Standards Connections
Common Core Next Generation Science Standards (NGSS)
Elementary School
Middle School
Materials and Set-Up (for the multi-test station method)
- Scissors
- Stopwatch (can be an online version)
- 8.5 x 11.5-inch paper helicopter template – one per group
- Group of two to four students students
- Six to eight helicopter test stations spaced about the classroom. A testing station consists of a thread hanging from the ceiling vertically that ends with a piece of tape 200 cm above the floor.
Paper Helicopter Experiment Lesson Documents
If you would like additional instructional activities to extend the paper helicopter activity and go deeper into learning, check out the Paper Helicopter Experiment (purchase link) resources at TPT!
You’ll find all the resources shared in this blog post, plus:
- teacher lesson presentation with custom graphics
- paper helicopter experiment report template
- pre/post test
- reading comprehension activity
- thinking routines writing activity
- group member role definitions
- vocabulary definitions for the paper helicopter experiment
- vocabulary definitions for the scientific method
Books about Paper Helicopters and Flight
Check out this captivating collection of books (paid links) that explore the fascinating world of flight. From exploring the mechanics of flight and the similarities between living creatures and machines to unraveling the story of the Wright Brothers, these books provide an immersive experience of the wonders of aviation.
Planes, Jets and Helicopters: Great Paper Airplanes
Make your own fantastic flying paper aircraft! Instructions to fold paper, fly, and troubleshoot paper planes and helicopters from standard 8.5 by 11-inch paper. No glue, scissors, or tape required! Two dozen fold and fly designs with fold-by-fold illustrated instructions.
Science Comics: Flying Machines: How the Wright Brothers Soared
A National Science Teachers Association Best STEM Book Winner in 2017! A delightfully illustrated comic about the history of the Wright brothers told by Katharine Wright Haskell, the younger sister of American aviation pioneers Wilbur and Orville Wright.
Planes, Gliders and Paper Rockets: Simple Flying Things Anyone Can Make–Kites and Copters, Too!
A STEM-oriented book for older students who have access to tools and want to go beyond paper designs. Great for going deep into making hands-on, DIY flying crafts with everyday materials!
Paper Helicopter Experiment Summary
Teachers, are you searching for an engaging and cost-effective STEM activity to foster scientific thinking among your upper elementary and middle school students? High school students as well can benefit from the paper helicopter experiment!
This exciting low-budget DIY activity encourages students to develop essential scientific thinking skills by creating hypotheses, gathering relevant data, and interpreting results to draw conclusions. As a result, they will gain invaluable skills that will serve them well in future studies.
But the benefits don’t stop there! The paper helicopter experiment also allows students to explore various scientific concepts such as gravity, lift, and air resistance. Students will better understand these essential scientific principles by testing different blade sizes.
The paper helicopter experiment’s simplicity and low-cost nature make it an excellent starting point for Year 1 students to learn the MYP Design Cycle. Students can better understand the design process by identifying a problem related to helicopter design, creating a prototype, testing and evaluating their design, and communicating their findings.
To get started, check out the free resources in this blog post and on TPT! The TPT resources offer step-by-step instructions for building a paper helicopter and comprehensive tips for conducting the experiment and analyzing results. So what are you waiting for? Get started on this exciting hands-on STEM activity today!