
I currently teach computer science to K–5 students and love finding easy-to-access materials for hands-on projects. One of the most engaging so far has been a KEVA Block Challenge, an activity that turns abstract STEM ideas into something students can touch, build, and explore. This hands-on project is a fun and engaging example of authentic learning experiences with technology in K–5, where digital tools support deep, creative thinking.
My classroom is located right next to the media center, where I often see students working with KEVA blocks. I’ve watched them stack, balance, and adjust with focus and care. They aren’t just playing. They’re solving problems and thinking like engineers.
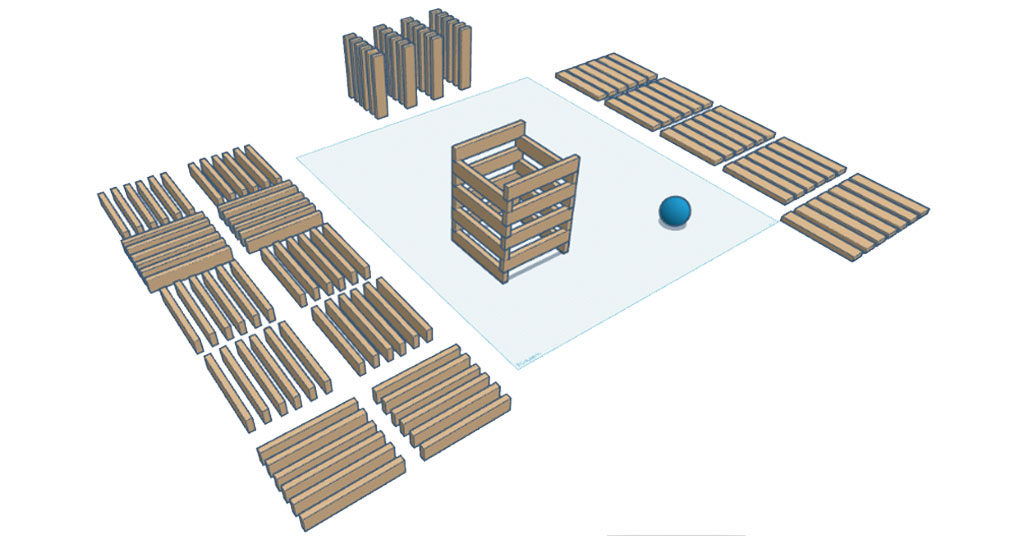
Simple Observation to Engineering Idea
Watching students with the blocks, I saw more than a free-form building. They were solving problems and working together. Their block creations showed patience, communication, and shared decision-making.
What if the KEVA Block Challenge became a guided STEM activity? Could it teach design, teamwork, and persistence? It’s a low-budget, highly engaging opportunity—my favorite kind!
Engineering, Problem-Solving, and Authentic Learning
I enjoy teaching engineering projects and looking for ways to connect problem-solving to computer science. KEVA Block Challenges are a natural fit because they mirror the core practices of computer science such as planning, testing, debugging (improving), and iterating. These challenges give students a physical way to practice the same thinking skills they’ll need when coding or designing digital solutions. The same iterative thinking also aligns with key skills emphasized in MYP Design classrooms.
In this activity, students had a clear goal: keep a ping-pong ball moving for as long as possible. They tested structures, timing, and motion using real engineering practices by making one change at a time. With each attempt, they improved their builds based on the results. The hands-on nature kept them thinking, adjusting, and trying again.
Tinkercad Sim Lab for Design
To add structure, I looked for a digital tool to support planning and testing. If your students are new to Tinkercad, you may want to start with my Teaching Tinkercad (Grades 3–5) guide before introducing Sim Lab. It covers first-time login, basic tools, and three scaffolded design lessons that prepare students for more advanced projects like this one. I had used Tinkercad before, but the Sim Lab really opened things up. It includes a physics engine that allows students to build, test, and revise their designs before interacting with actual KEVA blocks.
In Sim Lab, students can:
- Define materials like steel, plastic, or softwood
- Set blocks as static (stay still) or dynamic (move when hit)
- Adjust environmental conditions like gravity
This setup helps students observe how forces, motion, and structures interact in a controlled digital environment before attempting more messy physical builds.
KEVA Block Challenge Meets Sim Lab
Everything clicked. Students would design in Tinkercad Sim Lab first, then rebuild their design using real KEVA blocks to keep a ping-pong ball moving as long as possible on a small whiteboard.
Tinkercad Sim Lab allowed students to:
- Spot weak designs early
- Change ideas smoothly
- Build confidence before using actual physical blocks
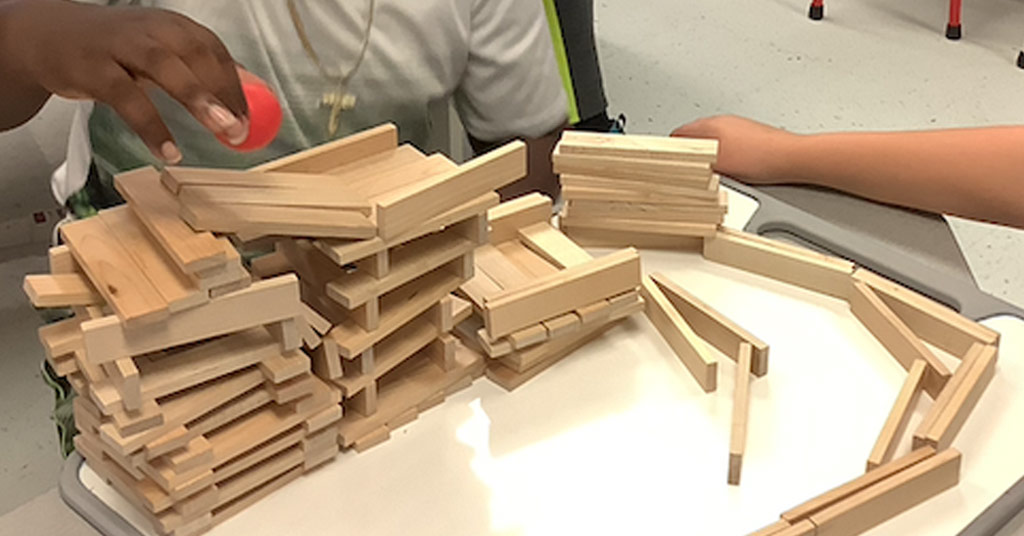
By the time they reached the hands-on stage, they had working plans. Like engineers, they refined designs, solved problems, and kept improving toward the goal.
See the KEVA Block Challenge in Action
Before students built with real KEVA planks, they explored ideas in the Tinkercad Sim Lab. This short video demonstration (1:30) shows digital experiments, prototype ball runs, and design trials used to better understand the materials and engineering constraints before beginning the hands-on challenge.
KEVA Blocks Engineering and Digital Modeling
I was excited to see how my fourth- and fifth-grade students would handle this challenge. Would they apply lessons from Sim Lab to real blocks? What could they design with 130 digital planks? Would they stay committed to testing and refining their designs through multiple iterations?
We began by building digital domino runs in Tinkercad Sim Lab to research and develop ideas. This introductory experience gave students a clear place to start and a visual way to understand cause and effect by:
- Changing materials for different outcomes
- Making some blocks fixed and others movable
These options helped them explore engineering ideas before the physical build.
What Are KEVA Block Challenges?
By the way, KEVA planks is the official name used by the manufacturer (KEVA®). KEVA blocks is a more informal term people use to refer to them, especially in classrooms.
KEVA blocks or planks are simple wooden pieces. In the classroom, they can become a powerful STEM tool. When paired with a challenge, they promote critical thinking, design skills, and hands-on exploration.
How a KEVA Block Challenge Works
Each KEVA Block Challenge sets a clear goal with optional rules. These prompts help students think like engineers. For example, building a spiral tower might take longer than designing a rhombus, but both require planning and testing.
You can find examples like these in the 20 Challenges with 20 Planks post by Kate Meyerhoeffer. Here’s a one-page PDF version of the 20 challenges to print.
You can organize the challenges by subject or design theme. This categorizing can help connect the challenges to core skills in math, art, and science.
KEVA Block Engineering Challenge
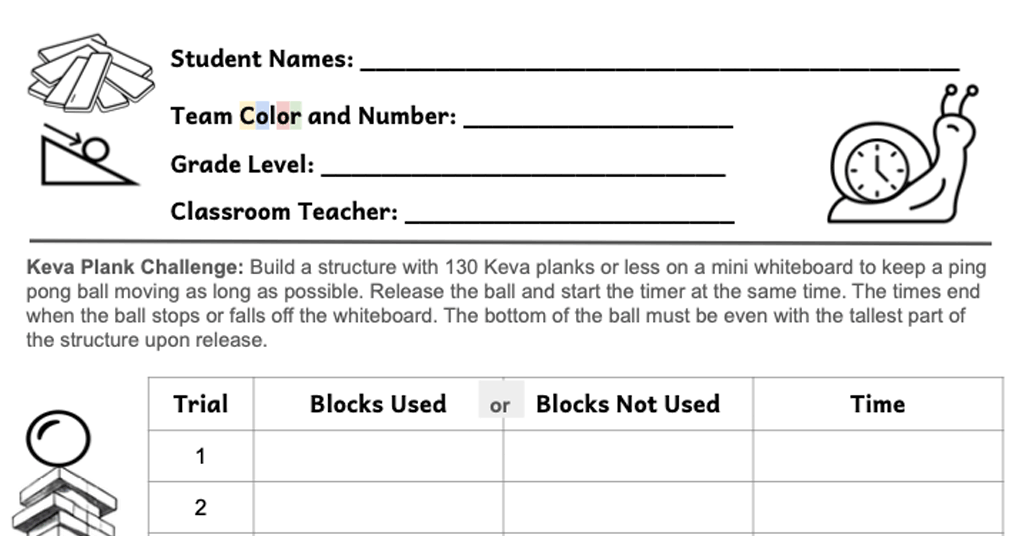
In the data sheet header, the color identifies the station/material set, and the number identifies the team. In our challenge, students used KEVA blocks to build a structure that kept a ping-pong ball moving for as long as possible. Download the data sheet here (PDF).
For the challenge, the students had:
- A small whiteboard for building
- A 130-block limit
- A simple goal with no correct answer (multiple ways to success)
The specific instructions given to the students were:
Build a structure with 130 KEVA planks or less on a mini whiteboard to keep a ping-pong ball moving as long as possible. Release the ball and start the timer at the same time. The times end when the ball stops or falls off the whiteboard. The bottom of the ball must be even with the tallest part of the structure upon release.
They learned to:
- Think logically about design, forces, and motion
- Use space and materials creatively
- Test, fail, adjust, and try again
By working within limits, students discovered that small changes made a big difference. They also saw how teamwork and patience mattered just as much as innovative ideas.
How KEVA Block Challenges Teach Problem-Solving
The KEVA Block Challenge combined digital and physical models. Students used Sim Lab to test ideas and then applied what they learned with real blocks. When a design failed, they changed one thing and tried again. This process built stamina and focus which are skills that support deeper learning across subjects.
I saw Carol Dweck’s growth mindset in action: students embraced trial-and-error and kept improving, even when their designs failed. This approach helps students see value in effort and learn from setbacks.
Reflections from Multiple KEVA Block Challenges
One thing I underestimated was how much longer digital construction took than physical construction. I often tell my students that I tend to make things too difficult when starting out! While simulations make it easy to test ideas, placing and aligning dozens of virtual KEVA planks requires considerable precision. If I teach this lesson again, I’ll schedule more time for the digital modeling so students can focus on engineering decisions rather than feeling rushed.
Over several weeks, I ran a full KEVA Block Challenge cycle with all K–5 grades (about 35 classes in total) for the physical builds. While grades 4 and 5 completed both digital modeling and hands-on construction, grades K–3 focused on hands-on construction. Across all levels, we integrated science discussion and design thinking in age-appropriate ways.
Building the Digital Foundation with Sim Lab
We started with the digital domino run. Students placed a ramp on the workplane, then a ball, and finally, upright blocks to knock over. The ramp had to be set to static, the ball dynamic, and the blocks dynamic as well. Students explored how motion, material types, and angles affect outcomes.
This introductory activity set the tone for engineering rigor and controlling variables. We avoided using “trigger” items (such as flying bananas or golf clubs). Students focused instead on controlled tests. The idea was to teach 4th- and 5th-grade students how to isolate variables and recognize how material properties affect motion and collision.
Virtual KEVA Block Challenge in Sim Lab
Once students were familiar with Sim Lab, I loaded a template into their Tinkercad accounts. Each template included a virtual ping-pong ball (set to behave like polystyrene) and 130 blocks proportionally scaled to resemble KEVA planks. Their challenge was to design a structure that kept the ball in motion for as long as possible, using only those blocks.
Planning Time for the Digital Build
One key constraint was time. We had only 45 minutes, and that simply wasn’t enough for the virtual builds. Students really needed at least two class periods. Creating a detailed KEVA structure in Sim Lab requires careful mouse control, precise placement, and frequent adjustments to individual planks. While the engineering thinking I saw was excellent, the digital construction itself demanded more patience and precision than I had anticipated.
Looking back, I’d still use the activity with fourth- and fifth-graders, but I’d treat it as a multi-day engineering project rather than a single lesson. Older students may also appreciate the level of precision required when designing more complex virtual structures.
We didn’t allow gravity or simulation scale adjustments, which helped keep the test conditions consistent. At first, the ball’s slow, extended drift in the simulation seemed like a flaw. But when we moved to physical builds, we were surprised to see the same thing happen! The virtual behavior turned out to be a surprisingly accurate model of real-world motion.
Testing Designs in the Real World with Physical Builds
In the next lesson, we made the leap from screen to hands-on. Every grade level, even Kindergarten, got to participate in the physical KEVA Block Challenge. Setting up the testing stations took time, but based on how engaged the older students were, I felt confident the younger grades would enjoy it, too.
Students were reminded of their one clear goal: keep a ping-pong ball moving as long as possible on a mini whiteboard using only 130 KEVA planks or less.
I didn’t expect the physical version to match the virtual one so closely. The slow, drifting ball showed up in real life, too. That surprised me!
Fourth- and fifth-graders built on what they had modeled digitally, while younger students jumped straight into physical experimentation. Creating stable ramps proved harder than expected. Too much incline caused the blocks to slip and structures to topple. We quickly learned that tower height, spacing, bumpers, and angles all mattered.
ScratchJr Extension for Younger Students
After watching the fourth- and fifth-graders build ball runs in Tinkercad, the second graders got excited to try digital modeling, too. Since they hadn’t used Tinkercad yet, we decided to use ScratchJr to recreate the physical ball runs they had built.
Some students created basic versions using a single flag to start the animation. Other second graders figured out how to use multiple flags to make the ball appear to roll and change direction more realistically.
What Students Discovered and What I Learned
Students worked in teams of two or three for the physical builds, and nearly every group stayed focused, collaborative, and eager to improve. Out of more than 700 students, only one became noticeably frustrated and we worked through it together. While younger students needed more support with building and pacing, the essential lessons rang true at every grade level:
- A reliable start with a well-angled ramp worked better than launching or tossing the ball
- Testing during the build helped students anticipate how the ball would behave, especially when whiteboards weren’t perfectly level
- Simple, well-thought-out designs outperformed towering structures that toppled
- Calm, communicative teams made more progress than those that rushed or argued
- Waiting patiently for the ball to stop (instead of grabbing it early) became a powerful act of self-control—and often led to longer times
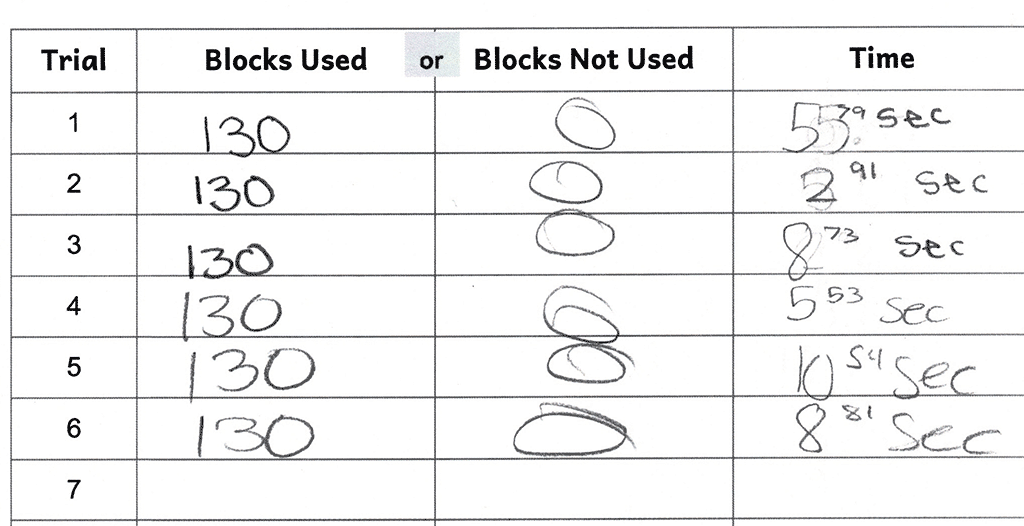
Students faced real design challenges, such as slightly sloped whiteboards, unpredictable bounces, and inconsistent starts. Some proactive teams tested the board’s tilt with the ball before building and adjusted their design to match! That kind of thinking, observing, planning, adjusting, and iterating was a real win in the KEVA Block Challenge. For teachers looking to guide similar learning with a clear, low-cost project-based lesson, here’s an example of how the Engineering Design Process is put into action.
Free KEVA Block Challenge Teaching Resources
Already familiar with Tinkercad? The resources below build on the basic skills introduced in my Teaching Tinkercad (Grades 3–5) lesson series. If your students need an introduction to Tinkercad before using Sim Lab, you’ll find complete beginner lessons there.
Everything below is free to use in your classroom.
Tinkercad Shortcuts & Mouse Moves Guide for PC
A one-page student reference covering the keyboard shortcuts, editing commands, and mouse controls used most often during the challenge. Great for printing or displaying during class.
Download the PDF →
Tinkercad Sim Lab Introduction Presentation
Introduce students to the challenge, engineering constraints, and design goal before they begin building.
Make Your Own Google Slides Copy →
The video referenced near the end is helpful, but note that at around 1:34, Mr. E. says “resistance” instead of “coefficient of restitution.” Also, I am not a fan of throwing random objects while the simulation is running. Some teachers may enjoy the playful approach, but I find it distracting during the introduction.
Tinkercad Sim Lab Dominoes Model
Introduce students to Tinkercad Sim Lab with a simple ball-and-domino activity. Students learn how to set objects as static or dynamic, test a rolling ball, and observe cause and effect before tackling the full KEVA Block Challenge.
Make Your Own Tinkercad Copy →
Tinkercad Sim Lab Challenge Presentation
Guide students through creating a digital prototype in Tinkercad Sim Lab before building with real KEVA planks. Includes teacher notes, discussion questions, and a simulation vs. real-world comparison.
Make Your Own Google Slides Copy →
KEVA Block Challenge Data Sheet
Record the number of KEVA planks used, track trial times, and compare design improvements as students test, revise, and refine their engineering solutions.
Download the PDF →
Tinkercad Sim Lab Challenge Starter Model
Start with a prepared Tinkercad model that includes a mini whiteboard workplane, a KEVA plank model, a ping-pong ball, and an example tower with a ramp, so students can begin designing right away.
Make Your Own Tinkercad Copy →
Tips for Teachers Trying This Challenge
If you want to bring the KEVA Block Challenge to your classroom, here are a few tips I learned with every grade from K to 5:
- Keep group sizes small (2–3 students) to maximize participation for the physical builds
- Use a standardized surfaces (mini whiteboards were excellent)
- Stations (e.g., utility carts) should have locking wheels to prevent movement from bumps
- Emphasize patience: Slow-moving balls = Success
- Avoid distractions like non-Earth gravity or tossed novelty objects in Sim Lab
- Don’t obsess over data sheets with younger students. Focus on an engaging experience
Want to level up the challenge? Introduce physics concepts, such as kinetic and potential energy, or have students track how long the ball moves per block used. These simple metrics can transform the activity into a deeper exploration of efficiency, trade-offs, and what truly makes a design successful.