
The goal of this blog post is to provide educators with a step-by-step engineering design process (EDP) example with a STEM focus. STEM is an acronym for the academic areas of science, technology, engineering, and math. These lesson resources support both virtual and traditional brick-and-mortar learning. The target student group ranges from about fourth grade to seventh.
This example lesson can last several weeks. Teach EDP at the beginning of the school year to explicitly train students in problem-solving!
What is the Engineering Design Process (EDP)?
To begin with, EDP can sometimes be referred to as the “STEM design process” or “engineering design thinking.” In fact, it’s hard to teach EDP without integrating some STEM, but it can be done!
EDP is a problem-solving cycle. It’s a series of specific and logical steps to solve a problem with fidelity. Success is determined by how well the solution meets the established design specifications (the success criteria). By repeating the process/cycle, greater success should be achieved.
Teaching the Engineering Design Process
Many teachers new to EDP and STEM come into the subject area from different educational backgrounds. Also, they may have limited resources or have inherited an array of materials that take time to learn such as Makey Makey packs, Lego Mindstorms, laser cutters, and Arduino or Raspberry Pi kits.
The sequential nature of EDP can help organize novice and veteran teachers with their thinking and planning: EDP provides a coherent framework to integrate teacher knowledge, materials, and standards into a rich learning experience for students.
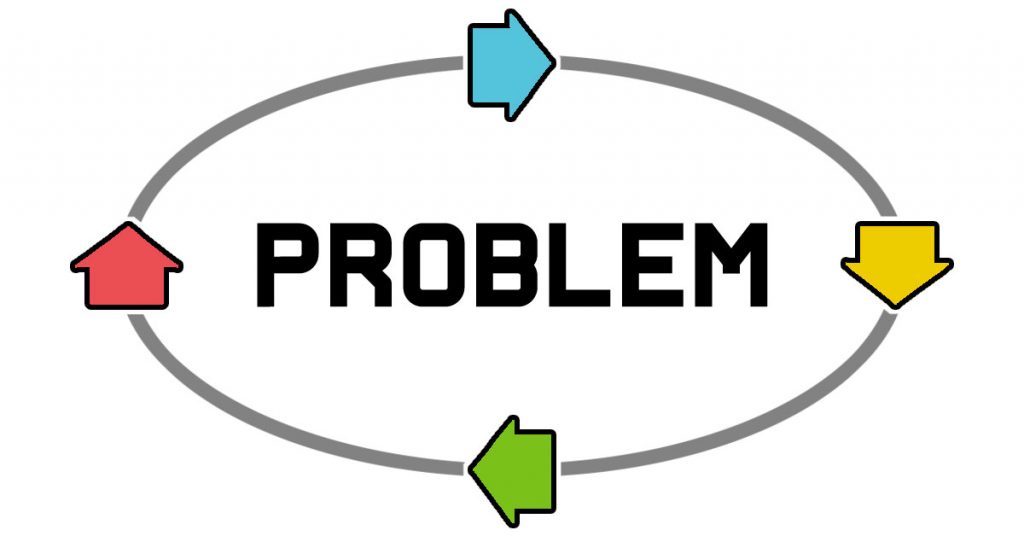
There are many processes or cycles that aim to solve problems and can be used with students in STEM. Some have five steps. Some have six. Others have seven! Essentially, all follow the same pattern. Briefly, the steps are:
- Research a Problem
- Develop Ideas
- Create a Prototype
- Evaluate the Prototype (then repeat to improve)
Why Use the Engineering Design Process?
The sequential nature of EDP is especially helpful for students. It provides them a procedural structure to solve a problem. The intuitive problem-solving steps also guide teachers who have different levels of STEM expertise and different standards to address. Additionally, within this logical progression of steps, teachers can use what they know to teach STEM as they evaluate, learn, and master the resources available to them.
EDP easily offers students deeper learning when strengthened with meaningful connections. Design thinking and the International Baccalaureate’s (IB) Middle Years Program (MYP) Design Program are two cyclic design processes that seek solutions within the larger picture.
Design thinking puts a strong focus on the audience–on the people who are the end-users of the product or service that is solving the problem. MYP Design learning leverages our world as the broadest context for understanding through six global contexts:
- Identities and Relationships
- Orientation in Space and Time
- Personal and Cultural Expression
- Scientific and Technical Innovation
- Globalization and Sustainability
- Fairness and Development
Scenarios can help EDP further enhance learning. EDP becomes more effective when framed within an authentic context. Interdisciplinary project-based learning (PBL) provides meaningful connections and naturally meshes with EDP.
The design process, in general, can facilitate life skills such as a growth mindset. Students take on reasoned design risks and try new ways to solve contextual problems. Some designs will fail, and this failure leads to new understandings. The qualities of being positive in attitude and persistent in effort contribute to a student’s overall success.
Project-based Learning (PBL) and the Engineering Design Process (EDP)
The Edutopia blog post Project-based Learning Research Review by Vanessa Vega summarizes PBL as having the four characteristics:
- Students solve real-world problems
- Students have greater control over their learning as compared to traditional techniques
- Teachers coach and facilitate student inquiry and reflection to go deep into learning
- Students have opportunities to collaborate (sometimes)
Why use project-based learning (PBL) with the engineering design process (EDP)? STEM-based instruction and learning guided by EDP go hand-in-hand with PBL. Students go deeper into concepts and content to enhance their academic learning with a problem-to-be-solved in focus.
PBL also offers learning projects that are more personally meaningful and opens up various opportunities for students to think creatively and share their learning with school stakeholders.
Not All Projects Have Problems
Problem-solving is the focus of EDP and, therefore, problem-based learning can be confused with project-based learning. Both can be referred to as “PBL”. So, it’s worth noting how these methods differ.
John Larmer, in his Edutopia article Project-Based Learning vs. Problem-Based Learning vs. X-BL, classifies problem-based learning as a subset of project-based learning. He also shares with readers a concise comparison chart of the two types of learning.
How Effective is Project-based Learning?
The characteristics of PBL have been shown to promote student achievement in terms of the statistical measure effect size. According to educational researcher John Hattie who has written extensively on instructional strategies that promote student achievement, an effect size of 0.40 is considered to be average for a school year. However, there is some controversy with regard to this metric being a hard average for all students.
Regardless, the Edutopia article, “The Hattie Effect: What’s Essential for Effective PBL? by Suzie Boss, is an efficient and thoughtful summary of effect sizes and their corresponding PBL characteristics.
Before Starting the Engineering Design Process
Teachers should try to provide an authentic context (i.e., establish a reason for solving the problem) before engaging students in a problem-solving process. Project-based learning may require a long-term commitment. Rich and meaningful content will help students stay engaged in the process.
For younger students, the reason to solve a STEM problem through EDP can be more contrived. For older students who come to class with a greater body of knowledge, the context for problem-solving can be broader and more individualized.
Story Time
Fictional stories and historical contexts can serve as the PBL backdrop for STEM learning through EDP. For example, can your students build a house within a defined budget and use alternative materials to withstand the strength of a wolf’s breath? Many STEM stories build on familiar and classic tales such as The Three Little Pigs.
With historical contexts, the MYP Design’s six global contexts can add authenticity to the PBL experience. For example, pioneering Antarctic explorer Ernest Shackleton attempted to reach the South Pole just over 100 years ago.
Shackleton did not reach the pole, lost his ship, and yet became renowned for his remarkable perseverance to survive. The problem could be to redesign his ship to better withstand the harsh elements. A global MYP connection in this scenario relates to scientific and technical innovation.
Authentic Assessment is Within your GRASPS
Educational authors Grant Wiggins and Jay McTighe in their book, Understanding by Design (UbD), outline a framework to add authenticity to a problem. The GRASPS model is an efficient scenario builder to establish a plausible context for EDP-based PBL. The acronym GRASPS stands for:
- Goal (Problem)
- Role
- Audience
- Situation
- Product
- Standards & Criteria for Success

A GRASPS scenario sets the problem-solving stage by outlining an authentic performance task for students.
Tip: When you are about to create an interdisciplinary STEM lesson that uses EDP, write the GRASPS first to frame your thinking!
Steps of the Engineering Design Process
As previously mentioned, the engineering design process can be based on five or more steps. I prefer a process or cycle with four steps for simplicity and mental manageability. Once you’re at five, six, or seven steps the process can begin to feel vague, and the mindset of the problem-solver less focused. This observation may be no biggie, but if you can simplify the process, I recommend doing it.
I will use these four steps that can and should repeat–with the last step informing the research for the first step:
- A. Analyze a Need
- B. Develop Ideas
- C. Create a Prototype
- D. Test and Evaluate
So, if you have a design process of four steps, you have simplicity for student learning. This sequence works for a 20-minute STEM activity. But what about specificity? What if you need your students to go deeper into problem-solving?

Analyze a Need, Develop Ideas, Create a Prototype, Test and Evaluate
Treat the four steps as the primary steps then create substeps. Try to keep the same number of substeps within each step. This symmetry should help to eventually create a predictable and familiar rhythm of sequencing for the teacher and students throughout the process.
The Engineering Design Process PBL Scenario
The engineering design process is based around a core question:
“What is the problem to be solved?”
These three questions capture the minimum amount of context to provide authenticity to the PBL:
- What are you making?
- Who is it for?
- Why are you making it?
As previously mentioned, frame the problem to be solved in the GRASPS model to provide a deeper context and richer meaning for students. The GRASPS model wraps these core questions into a task scenario for greater authenticity and student buy-in.
Ideas for a STEM Project
Where can you find EDP STEM activities for elementary and middle school that can be done face-to-face and virtually? Many places! For example, the list of Science Olympiad Sample K-6 Events can inspire lesson ideas.
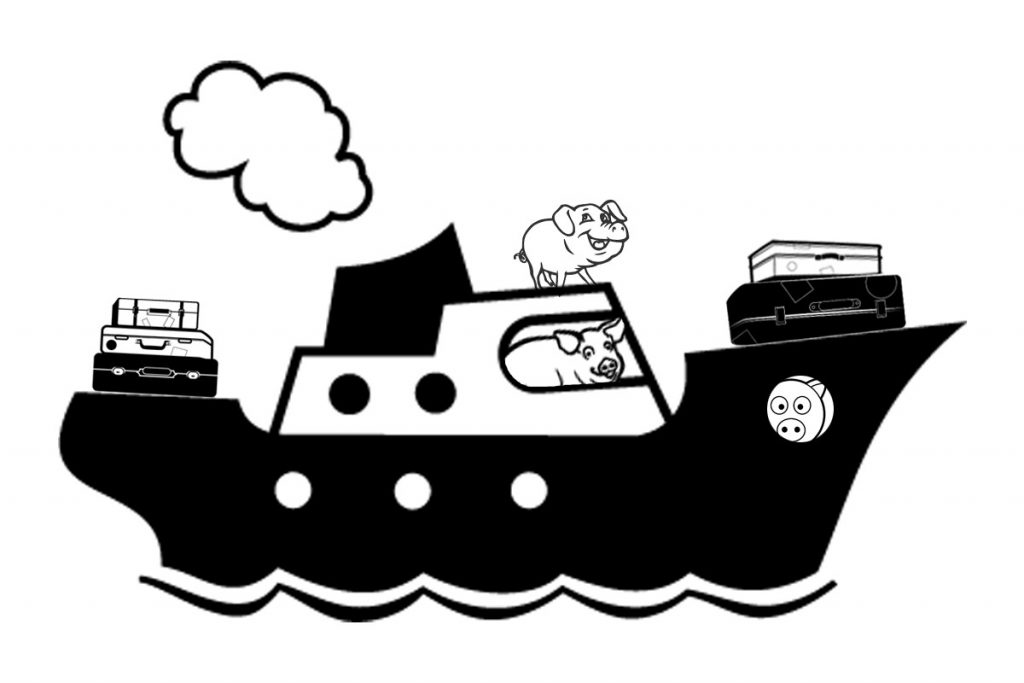
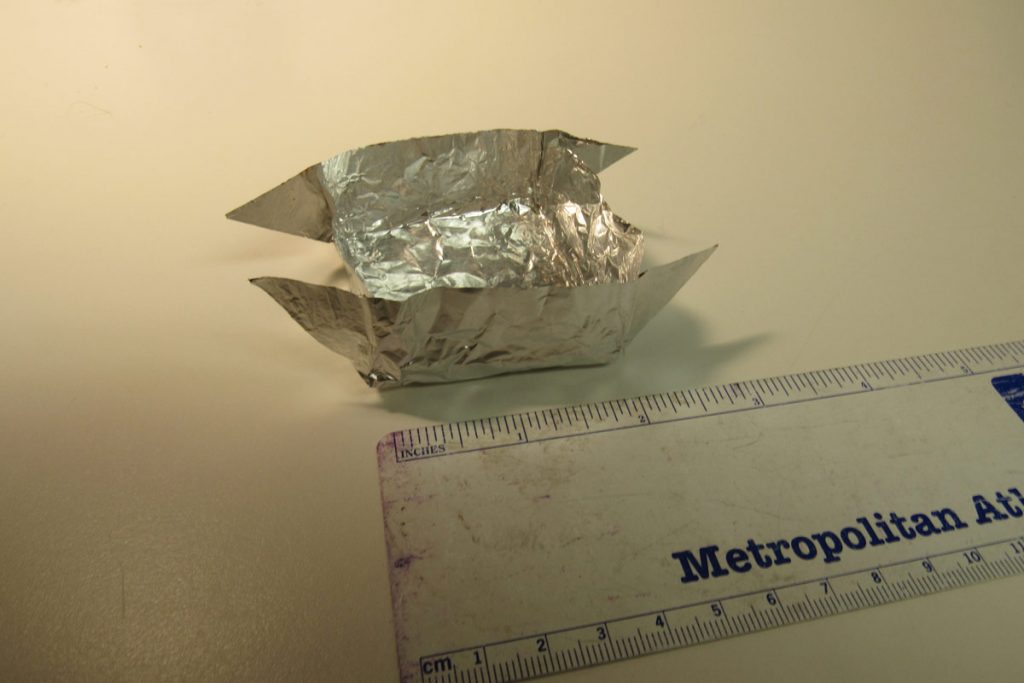
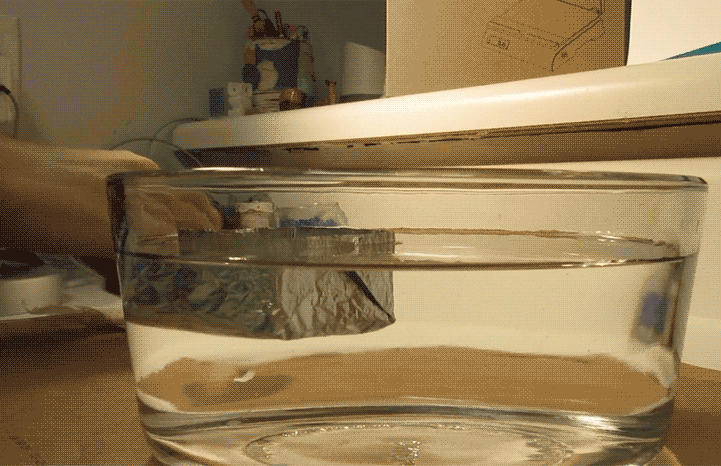
For this engineering design process example, I’ll use the barge building challenge. The story, The Three Little Pigs, will contextualize the problem to be solved.
The GRASPS Scenario Example
Here is the EDP scenario as described via the GRASPS model. It is written in the second person and addresses the students:
Goal
Your goal is to build a prototype of a seaworthy aluminum watercraft to hold as much cargo as possible.
Role
You are an expert boatbuilder specializing in aluminum watercrafts.
Audience (Clients)
The Three Little Pigs.
Situation
The Three Little Pigs recently inherited their mother’s estate and now seek new adventures. They desire to sail the oceans to explore the great wide world. They need a seaworthy vessel!
While two of the pigs occasionally suffered from immaturity and frivolousness, they admired their other brother’s work ethic. All three attempted to make a sturdy watercraft on their own. However, their experimental boat made of bricks sank upon the first launch with zero cargo!
These adventurous piggies need your expertise to start their new lives safely on the ocean in a watercraft of optimal seaworthiness. You will demonstrate your boatbuilding skills to them by making an aluminum foil prototype.
Product
Create an aluminum foil watercraft prototype to hold as much cargo as possible.
Standards & Criteria for Success
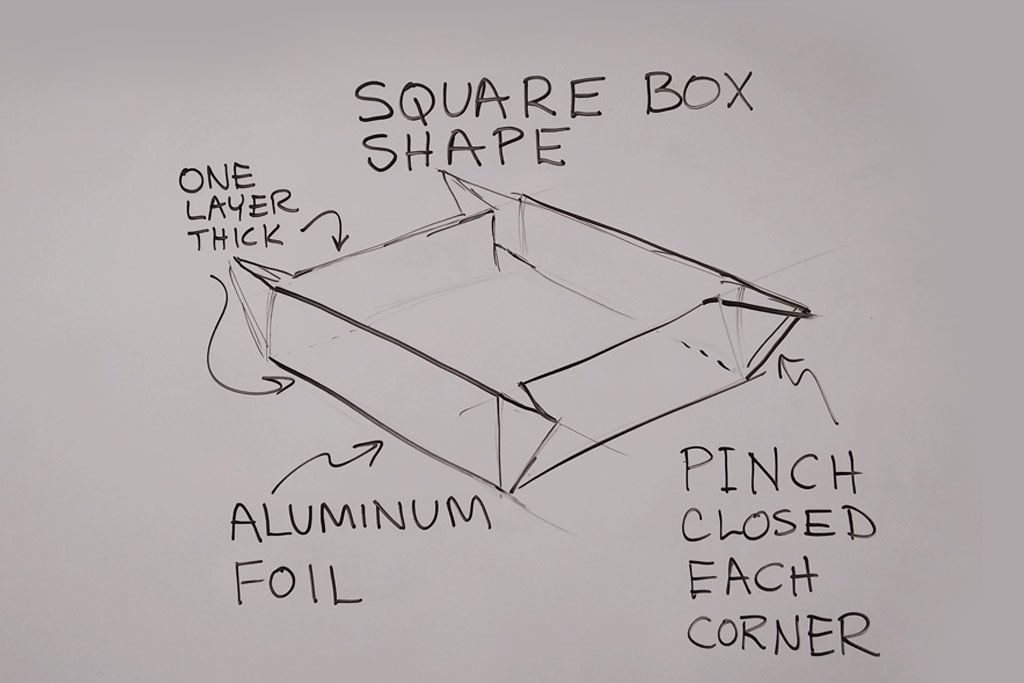
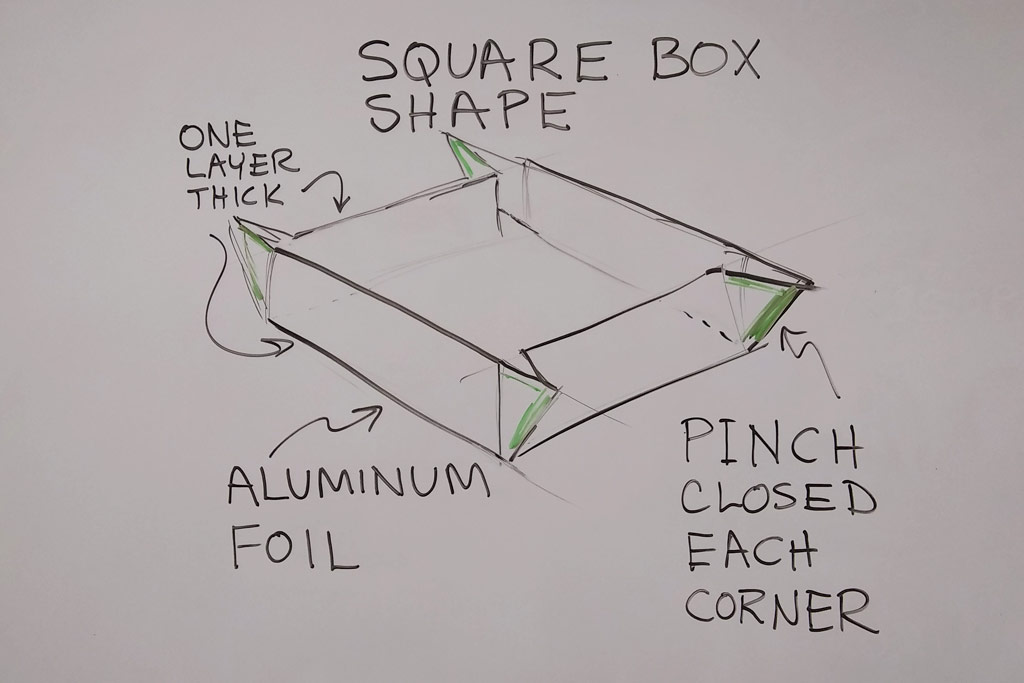
The aluminum foil prototype watercraft shall support as much cargo as possible before failure (i.e., fully sinking into the water). Cargo units shall be measured in U.S. pennies. The foil may be cut, ripped, or folded into any shape. The entire 5-inch square piece of aluminum foil shall be used to make the prototype.
Exceeding a cargo of 15 pennies qualifies as adequate. Exceeding 30 pennies will be considered average. Above 50 pennies of cargo qualifies as the expert boatbuilder. Current data reference: Four 5-inch prototypes were tested. The number of pennies at failure for each were: 11, 17, 36, and 58.
More Data
Eventually, you will have a lot of data from the actual tests of the student watercraft prototypes. At that point, modify the Standards & Criteria for Success of the GRASPS: By using the average penny amount at failure as the adequate point, you can establish a familiar benchmark from which to measure success.
And now begins the engineering design process! Let’s start with the first step or phase…
A – Analyze a Need
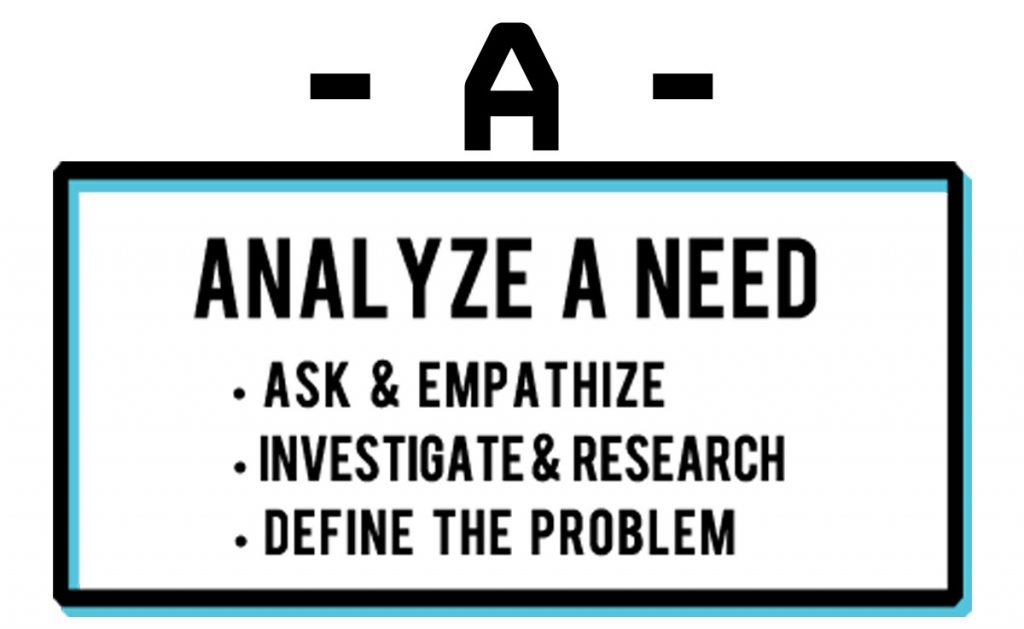
In the 1933 animated short film by Disney, the pigs were named Fifer Pig, Fiddler Pig, and Practical Pig. Can you guess which two were both happy-go-lucky and foolish? Which pig was industrious and purposeful?
To get started, read the short story of The Three Little Pigs as a warm-up. Then present, read, and discuss the GRASPS scenario with your students.
A.1 – Ask and Empathize
Kids can invent and be creative in this first official part of the engineering design process to grow their buy-in. Teachers should pose questions to prompt discussion about the GRASPS. This approach helps students warm up to the lesson and invest in the characters involved. For example:
- Why do the pigs want to travel?
- Why travel by boat and not by plane?
- Was building a brick watercraft a wise idea? Why didn’t they try wood?
- Who is the boatbuilder, and what are his or her skills?
- How might the pigs’ thinking have changed compared to the original story?
If you need to dig deeper for more specific targeting to meet an audience’s or client’s need, try this marketing resource for discussion ideas: Facebook’s ad targeting demographics categories. Rather than present the whole document, however; focus on just a few areas to explore.
A more intuitive way to get to know the characters (audience) would be to have an explicit discussion about them based on their traits. Read Write Think has a handy list of character traits.
A final but more elaborate resource to personalize and grow understanding of the pigs as the clients in the design process could be a feeling wheel. There are many feeling wheels or emotion wheels available online.
Plutchik’s Wheel of Emotions might be worth a look. It lays out eight basic emotions: joy, trust, fear, surprise, sadness, anticipation, anger, and disgust. Opposite emotions are located directly across from each other (e.g., joy is the opposite of sadness). The darker the shade (i.e., those emotions more toward the center), the more intense the emotion.
However, if your students are older and/or you’re short on time, simply read and discuss the GRASPS. Once you have A.1 – Ask and Empathize established, start the A.2 – Investigate and Research substep in conjunction with practicing communicating visually. Which means…
Technical Drawing – Practice Some Basics Right Now!
During this first step of the engineering design process, it is helpful to have students draw objects and products in a technical way. Specifically, if time allows, and you are teaching a multi-week lesson, try to spend up to 25% of class time practicing 3D sketching during this first step of EDP. Even with younger children, construction lines, visible object lines, and even hidden lines can be explored.
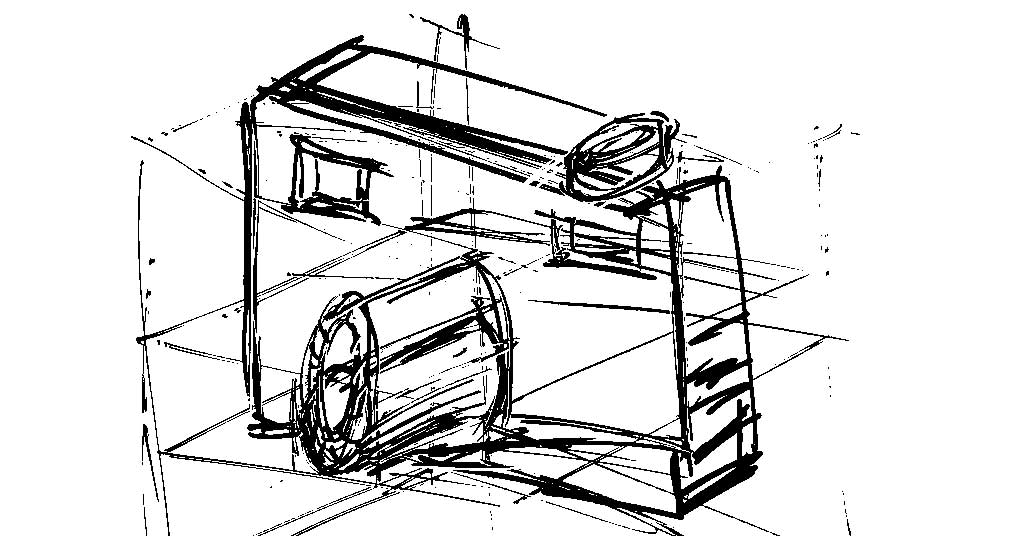
Warm up each class with pencil sketching, emphasize reasonable output, and encourage, but downplay, precision. This mindset keeps stress minimized and technique maximized.
I am not close to being an expert in technical drawing! You may not be either. I recommend exploring short YouTube videos about product sketching by experienced industrial artists. For example, product design sketching master, Anton Ruckman, creates a photo camera with a blue pen. This tutorial is just over three minutes and the process is sped up. These methods can help pencil sketchers as well.
What techniques can help us?
- Establish construction lines (lighter/thinner lines) to visualize the design.
- Rotate the paper to create longer lines as easily as possible.
- Arm movements, not wrist movements help create longer lines accurately.
- Darken/thicken lines at the end to finalize the look of the design.
It’s obvious that the designer has practiced, so we practice!
Video Speed and Volume
Play with tutorial video speeds, looping, and sound for best results. I prefer the sound off. Sometimes I speed up the tutorial with looping on. Presenting techniques this way can prompt students to just sketch and not think too much about making mistakes.
Why practice so much technical sketching now? At the end of the next step, B- Developing Ideas, students will create the official sketches of their best watercraft ideas.
For other types of lessons that require digital prototyping, this sketching practice could be creating objects in Tinkercad, drawing in Inkscape, or photo editing with Adobe Photoshop–it depends on which skills may be needed to represent the best idea to solve the problem.
A.2 – Investigate and Research the Problem
Consider the research part as the actual study of the problem: How shall the boatbuilder make a watercraft prototype from a 5-inch square of aluminum foil to hold as much cargo (i.e., U.S. pennies) as possible?
Students should examine existing watercraft and any previous test data. Since this is a common engineering challenge, actual aluminum boat designs are abundant online. A general (i.e., text), image, or video search like aluminum foil boats with pennies will provide many insights.
Make the investigation a hands-on, rapid prototyping session to keep student interest high, provide an opportunity for experience, and generate some personalized benchmark data.
Avoid using the five-inch square size so as not to give the impression that indeed this is the actual prototype build. For example, use a three- or four-inch square aluminum sheet for students to investigate the problem.
This hands-on investigation serves as a way for students to get to know the materials–how they function when stressed or explored but not officially tested. The experience can inspire well-reasoned ideas and serves as primary research as well.
Investigation and Research Equal Rapid Prototyping?
This substep can sometimes provide rapid prototyping opportunities that are worth exploring. That is, you can capture an abbreviated mini-design cycle experience within the engineering design process.
For example, with paper airplanes that need to fly far and straight, students can set up launchers at their tables or desks. They then repeatedly try different designs (investigation) and adjust these designs based on flight outcomes (research). With the aluminum watercraft, the testing is slower because of the careful penny placement, so rapid prototyping is not as feasible.
A.3 – Define the Problem
In this brief substep, students summarize the purpose of their role as the boat builder to wrap up the research phase. The summary can be a short paragraph consisting of the previously mentioned core questions:
- What are you making?
- Who is it for?
- Why are you making it?
The answers are found in the GRASPS, and the why question tends to be the most challenging. These questions get at the heart of the problem and are synonymous with a design brief.
Students should try to define the problem without being too specific (i.e., don’t give away any ideas yet–don’t constrain the designer), but teachers should play this by ear. The younger the student, the greater the chance they may state their exact idea at that moment.
If some of these questions were already explored and answered in A.1 – Ask and Empathize, that’s okay. The purpose of the EDP is reinforced, and your students are beginning the first phase of the engineering design process, so any redundancy is probably reinforcing.
Summary of Step A – Analyze a Need
Students first identify a need—a problem to solve—through the GRASPS scenario model. They also get to know the beneficiaries of the solution to the problem through open-ended questions and discussion. Investigation and research build expertise to solve the problem. Students conclude this introductory step with a focused summary of the purpose of their role in the engineering design process.
My experience with 11-to-12-year old students is that they do not prefer this research step (as compared to C – Create a Prototype). The hands-on investigation helps engagement, but overall, it can be a bit of a checkbox for kids.
B – Develop Ideas
Officially, ideas are developed in this step. It is worth noting that the MYP Design Cycle is similar to the engineering design process steps. For example, although MYP Design Criterion B – Developing Ideas has four sequential criteria, it guides students from brainstorming ideas through criteria and constraints (i.e., design specifications) to their best ideas to solve the problem.
B.1 – Imagine Possibilities
Start with brainstorming activities that support an anything-goes approach. I used to start B – Develop Ideas by specifying requirements, but it wasn’t the best approach with younger students. Why put a damper on creativity, especially with kids? Students are bursting with ideas at this point after researching, investigating, and defining the problem.
Brainstorming to Solve the Watercraft Problem for the Three Little Pigs
Quick pencil sketches of the watercrafts, then a gallery walk to share among classmates, is one way to grow ideas. Look over part B.1.1 in the MYP unit, Water Tank Engineering with Newspaper, for an example of brainstorming.
B.2 – Specify Requirements
Here is where you can begin to focus kids toward their best idea that meets the standards and criteria for success as outlined in the GRASPS. Additional design specifications frame the scope of the problem to guide students as well. Check out the Criterion B document of the Water Tank Engineering with Newspaper unit for examples. You can see how some design specifications are both already established to guide students and some need to be written by students.
It’s important to caution students that they should try to meet all of the design specifications—both those already established, and those that they create. However, they should also be reassured that if their design does not meet the established criteria for success, it’s not equivalent to a failing grade. In substep, D.2 – Evaluate the Results, students should explore the degree to which the design specifications were achieved.
Design specifications should be as explicit as possible and categorized into logical chunks. The ACCESS FM Framework can guide teachers to sort and identify these criteria and constraints. State the category and describe the specification requirement. For example, the aluminum watercraft for the pig clients might look like this:
- Identification – The watercraft prototype’s name
- Success – Number of pennies at failure?
- Compliance – Was the entire five-inch square of foil used (it was supposed to be)?
- Integrity – Leaks before failure? Y or N
- Construction – Layers of foil used to make the watercraft?
- Construction – Was the foil cut or torn? Y or N
- Design – Which 2D shape best describes the watercraft’s base?
- Design – Side and base relationship (e.g., perpendicular)?
- Dimensions – Maximum height of the craft?
- Dimensions – Minimum height of the craft?
- Dimensions – Area of the watercraft’s base?
In this substep as well, you might want to stipulate safety procedures, and not-easily-quantifiable considerations such as:
- Aesthetics – Is it obvious which part is the hull (bottom) and which part receives the pennies (top)?
- Safety – Is the watercraft free from sharp edges?
- Customer Satisfaction – What is the intended emotional response by the clients after testing?
- Environment – How shall the watercraft be managed after testing? Showcase, recycle, trash?
B.3 – Represent the Best Idea
In this substep, students communicate their best idea visually as an annotated 3D design. Annotations should be few. They should list the key features that help the design meet the goal as defined in the GRASPS.
At 4:54 of the video, What is a Robot, check out the simple and clear annotated 3D line sketch of a Roomba vacuum cleaner. The context (corner of the room) and work path (dashed line) are intuitive and helpful to easily understand the robot’s function.
Annotated student sketches of the aluminum watercraft prototype might look like these four examples:
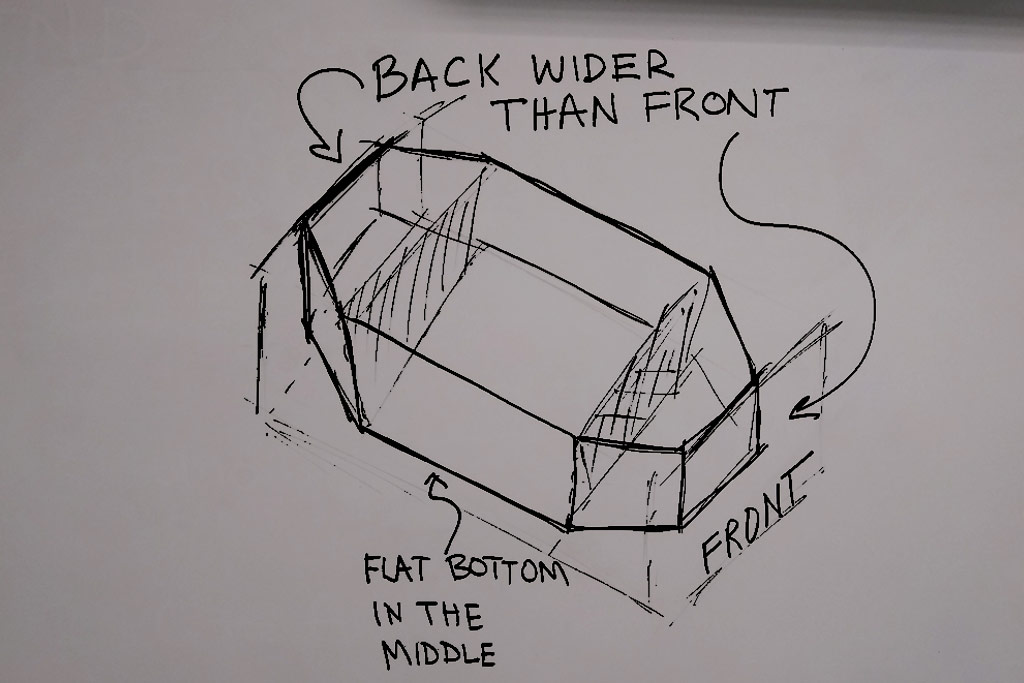
A little bit of color can make the pencil line sketch pop a bit visually. Consider it. Too much color can distract from the visualization of the idea.

What about dimensions? Should dimensions be indicated in the 3D sketches? Consider putting major dimensions on the 3D sketches if you’re not going to create orthographic projection sketches (i.e., 2D views of top, front, and side).
However, 3D views could become cluttered with many annotations and dimensions. If possible, split up the labeling into two types of sketches. For example, have students create 3D sketches with annotations. In a separate sketch, they create orthographic projections (top, front, and side) with dimensions.
Could this representation of the best idea via sketching be the “A” in STEAM? Is this a STEAM lesson too? Yes! Product sketching is certainly an art commonly found in industrial design programs.
Summary of Step B – Develop Ideas
Although ideas spring forth all the time, in this step, students formally develop their best idea into a feasible design. Rich ideas are explored and then refined through design specifications. Students conclude this second step with a visual representation of their leading idea to solve the problem.
Congratulations! You are halfway through the Engineering Design Process. Skip to the Engineering Design Process Example Summary section at the bottom for a quicker read and the essential lesson documents.
Ready to move from planning to prototyping? Continue to Engineering Design Process Example – Part 2. Create and evaluate your prototype!