
Introduction to MYP Design Criterion B
The focus of this post targets Year 1 (grade 6) designers. The MYP Design Criterion B information below can be applied to other grades as well. Year 1 students are those new to MYP Design. They start the school year as 11-year olds and finish as 12-year olds.
If you’re here and didn’t come from my Criterion A post, take a moment to look it over. In that post, I go into detail about each strand (or step). Additionally, I explain one way to start building lessons for MYP Design. This approach offers a helpful thought process for unit planning. After all, there are many moving parts in the IB!
For Year 1 students beginning Criterion B, the Middle Years Programme Design Guide (by the International Baccalaureate Organization, 2014-15) states that students first develop success criteria for the solution. The next strand would be to come up with ideas to solve the problem established in Criterion A. The third strand requires students to present their best idea in some form. This idea is usually what is created in Criterion C. Finally, to wrap up Criterion B, students create visual diagrams to identify their best idea’s essential characteristics.

Start with the MYP Design Guide
The guide states that the first strand of Criterion B calls out for the following:
- Year 1 (grade 6) – “Develop a list of success criteria for the solution.”
- Year 3 (grade 8) – “Develop a design specification, which outlines the success criteria for the design of a solution based on the data collected.”
- Year 5 (grade 10) – “Develop a design specification, which clearly states the success criteria for the design of a solution.”
I learned that writing the success criteria to start Criterion B was not helpful for the age group. After about two weeks of research to complete Criterion A (i.e., roughly six classes), my students were ready, willing, and bursting with ideas. Therefore, the time was ripe to capture as many ideas as possible regardless of their plausibility. It was not the time to add rules (specifications) and limit design ideas to begin Criterion B.
So, how do you solve this problem to honor students’ ideas? Basically, I switched the first two strands in the MYP Design Cycle. By developing ideas first and then developing design specifications next, engagement and enthusiasm grew, and more ideas became available.

Students started Criterion B with brainstorming activities to get as many ideas as possible ideas out on the table first. What a relief!
What is another benefit of generating ideas before establishing specifications? Students are willing to take more risks with their thinking. Fewer rules mean: Why not go for it? At this beginning point in Criterion B, any possible constraints (i.e. specifications) are those few listed under Standards and Criteria for Success in the GRASPS.
Strand B.1 – Develop Design Ideas
Brainstorming activities should not be limited to what you may find on educational websites. What’s great about teaching MYP Design is the applicability of Design Thinking resources and marketing resources freely available on the Internet. For example, check out this post by TechnologyAdvice about Brainstorming. How could a teacher modify or use this list of nine brainstorming activities to help their students generate ideas?
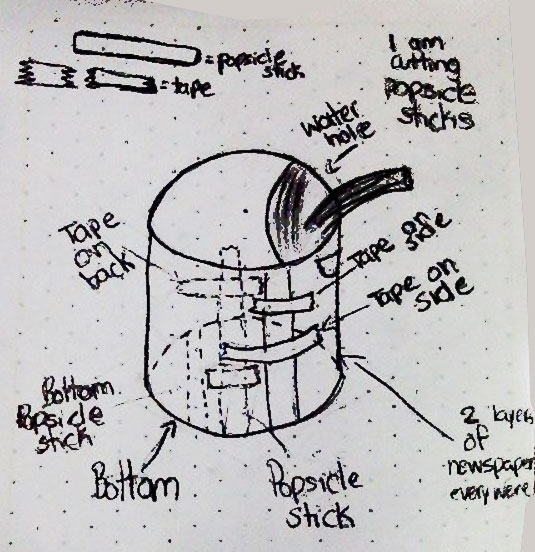
Here’s a low-budget technique that has worked for my design classes: Students anonymously and quickly generate as many idea sketches as possible. The teacher collects, randomizes, and redistributes the sketches (try to share sketches across different classes). Students identify which design ideas show promise. Finally, students justify their idea choices. This method can be seen in Water Tank Engineering with Newspaper, Criterion B.

At this point, a few students probably will have commented the following,” I already know what I am going to make.” Be ready for it. Here’s one technique that may help you help them: Ask the students to be open to new ideas. That is, to be open to change. If that doesn’t work, ask your students to pretend to be open to new ideas and see what happens. By just being open–or pretending to be open–they can better relax into the developing ideas process.
Strand B.2 – Develop Design Specifications
For this strand, the language of the MYP Design Guide states that for Year 3 and Year 5 students, they “develop a specification” which lists the success criteria. Why is “specification” singular? The MYP Design Cycle states “develop a design specification” as well for all students. This terminology can be a bit confusing.
The glossary defines a design specification like this: “A detailed description of the conditions, requirements, and restrictions with which a design must comply. This is a precise and accurate list of facts, such as conditions, dimensions, materials, process, and methods, that are important for the designer and for the user. All appropriate solutions will need to comply with the design specification.”
Similar to the glossary, the difficult-to-find and helpful MYP Design Teacher Support Material (IB login required) resource by the IB clarifies that, for all students, a (singular) design specification is “a set of considerations, constraints and requirements for a solution: what the solution must or must not have to be successful.”
Design Language
Possibly the plural-singular issue is due to the difference between American and British English, and maybe it’s no biggie. I think the plural “design specifications” is clearer, so I have used it. I have also found it helpful to not distinguish between “a list of success criteria” (i.e., what the MYP Design Guide states in this strand for Year 1 students) and “design specifications”. Year 1 students understand and benefit from defining and evaluating their designs in terms of design specifications (plural).
Finally, rather than use “must” and “will” for compliance verbs, I prefer “shall” since this term encourages a greater commitment to the specification. A greater commitment promotes increased specificity rather than less which is beneficial for evaluating the success of the solution in Criterion D.
How to Write Design Specifications for MYP Design Criterion B
For MYP Criterion B, I organized the design specifications into logical chunks. The ACCESSFM framework can also comprehensively guide the creation of product design specifications. Learn more about it under Strand A.3 in MYP Design Criterion A – Inquiring and Analyzing.

The MYP Design Teacher Support Material suggests the following categories to consider when creating design specifications:
- Aesthetics
- Cost
- Customer
- Environmental considerations
- Function
- Manufacturing
- Materials
- Safety
Generally, I would write a few specifications with my students, then ask them to complete the missing ones. Some completed design specifications were already written by me as well (these examples served as mentor text). I recommended that students finish the easiest first unless they had a better strategy. I do recall one of my students wanting to complete the most difficult specifications first, just because!
Overcoming Design Anxiety in MYP Design Criterion B
“What if I don’t meet the product design specifications? Will I fail?” This was a common concern, even during the last unit of the school year. I think this fear led to some specifications to be written in a vague manner.
Many of my students expressed concerns about not meeting the design specifications, and this “failure” would result in a poor grade. Students at this age (11- to 12-years old) need reassurance that designs that may not meet the design specifications do not necessarily equate to a failing grade. As long as each specification was as precise and relevant as possible, the learning would be evident; and the grade would take care of itself.
Live Long and Write like a Vulcan
Design specifications need to be written with precise, economical language. Ask your students: How would a Vulcan like Spock from Star Trek write a product design specification? What about an extremely logical robot? How would they write a design specification?
Optimal student design specification writing facilitates the testing to be completed in Criterion D. Students develop a complete list of design specifications for the solution that can be precisely and easily measured during testing.
Strand B.3 – Present and Justify the Chosen Design
At this point, most students have a solid idea of their design. They should know more or less what they will create to solve the problem introduced in Criterion A. But the idea still may change! In any event, the question at this point is: How will they present and justify their current best design idea?
From the IB Design Guide, Strand B.3 – Present and Justify the Chosen Design is defined as follows:
- Year 1 (grade 6) – “Present the chosen design.”
- Year 3 (grade 8) – “Present the chosen design and outline the reasons for its selection.”
- Year 5 (grade 10) – “Present the chosen design and justify its selection.”


It’s not clear from the IB Design Guide, what this presentation should look like. A poster? A slide show? An oral presentation? For my 11- and 12-year-old students, the presentation of the chosen design looked like this for the units I taught:
- Unit 1 – Engineering a Paper Water Tank – 3D sketch and justification paragraph
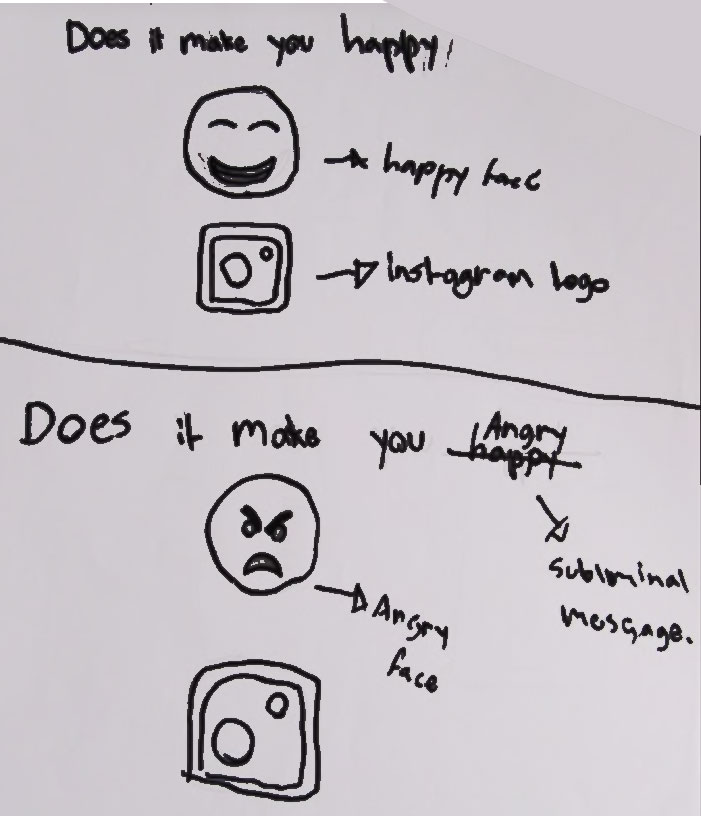
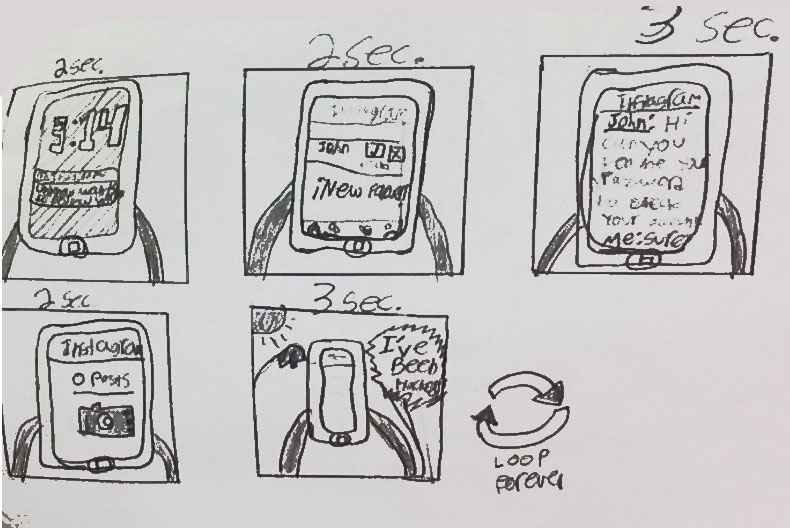
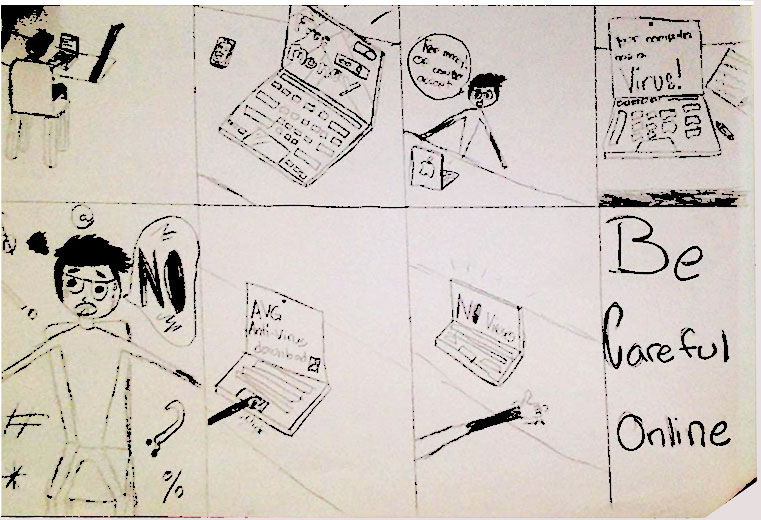
- Unit 2 – Cybersafety PSA (Animation) – 2D sketch of the animation frames
- Unit 3 – Upcycled Plastic Gift – Analysis of the best three ideas against the design specifications and a justification paragraph
- Unit 4 – 3D Digital Robot – Analysis of the best idea against the design specifications
I prefer technical sketching with pencils on paper. As such, students developed and refined their do-anywhere, fundamental visual communication skills. At relevant times in this strand as well, students “presented” their competing ideas against the design specifications. These internal “presentations” provided analytical insights into the best solution to solve the problem.
Presentation Considerations
In Strand B.3 – Present and Justify the Chosen Design, I avoided having students actually present to a small group, the class, or to parents. Why? With the rich array of digital tools available such as Flipgrid and Seesaw, why not showcase students’ creative and pragmatic problem-solving insights right now?
Two reasons: First of all, our academic class time was always tight. The middle school schedule provided three MYP Design classes a week for a total of 190 minutes. It felt like not enough time to honor traditional student presentation efforts.
The second and more important reason had to do with student stamina and lesson timing. By making the presentation of the idea highly showcased, this strand could feel like a final project. As such, students would run the risk of not developing their ideas fully.
For the age group in MYP Design, developing an idea–even during Criterion C –should be encouraged (within reason). Finally, a premature idea presentation in Criterion B also might lead to a loss of energy and enthusiasm for Criteria C and D.
Strand B.4 – Develop Planning Sketches
This MYP Design Criterion B – Developing Ideas strand ends with sketching the best idea. The requirement in this strand is generally the same for Year 1, 3, and 5 students. To the greatest extent possible, students create planning drawings/diagrams, which thoroughly and clearly communicate the main details for making the chosen solution.

If there’s already sketching to be done in Strand B.3, why require it again in Strand B.4? First of all, for the units I taught, Strand B.4’s planning sketches looked like this:
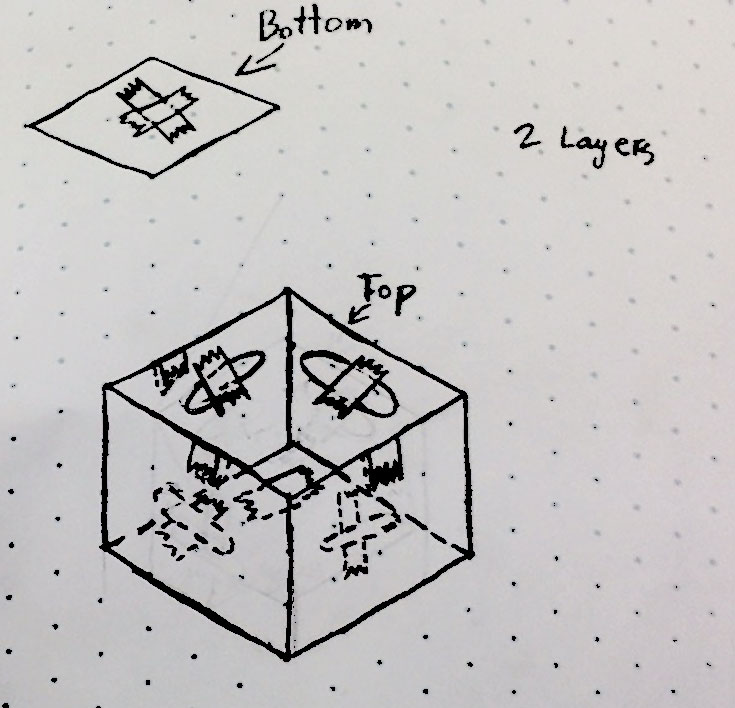
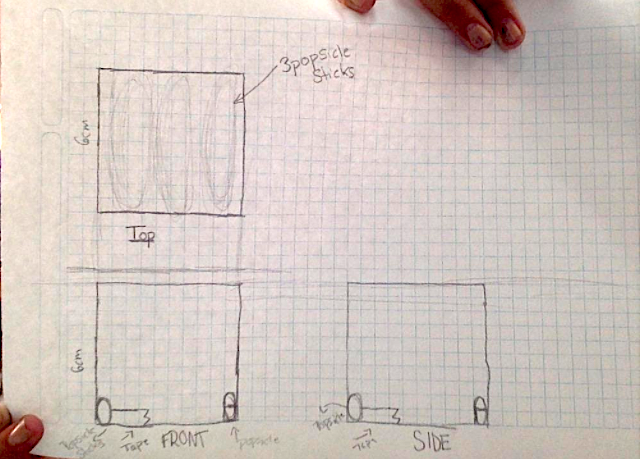
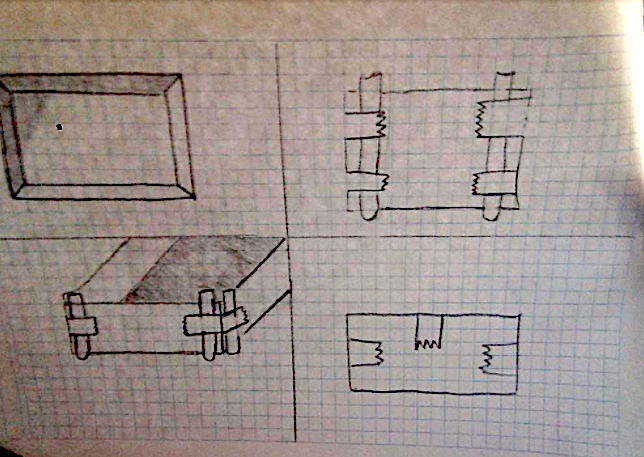
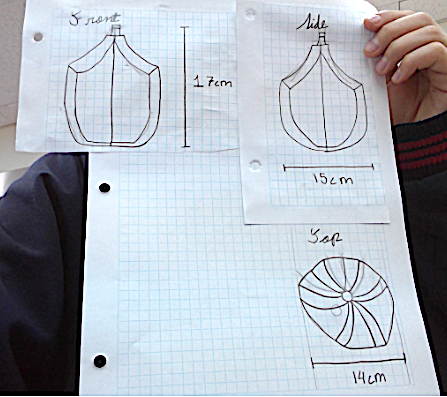
- Unit 1 – Engineering a Paper Water Tank – Top, front, and side sketches of the best tank idea.
- Unit 2 Cybersafety PSA (Animation) – Screenshots of basic elements of a cybersafety PSA animation in Photoshop. This work may or may not have continued into Criterion C – Creating the Solution.
- Unit 3 – Upcycled Plastic Gift – Top, front, and side sketches of the best gift idea.
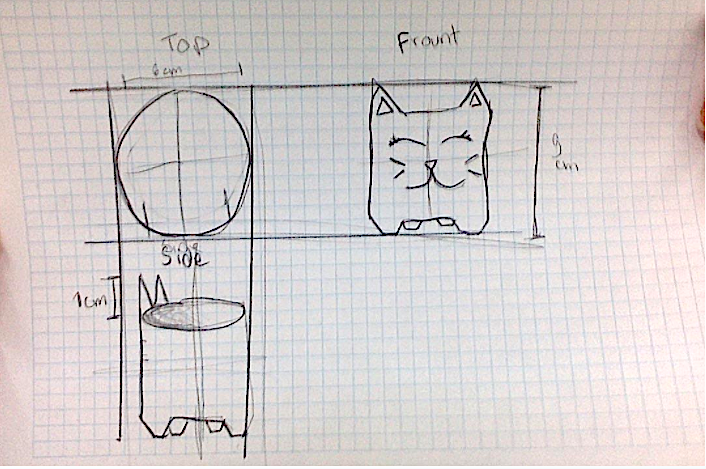
- Unit 4 – 3D Digital Robot – Top, front, side, and 3D sketches of the best robot idea.
The sketching in Strand B.3 was in 3D and less technical, although students were gently encouraged to use isometric graph paper (i.e., 3D graphing paper). Many “fought” against the grid lines and preferred blank paper to sketch ideas in 3D.
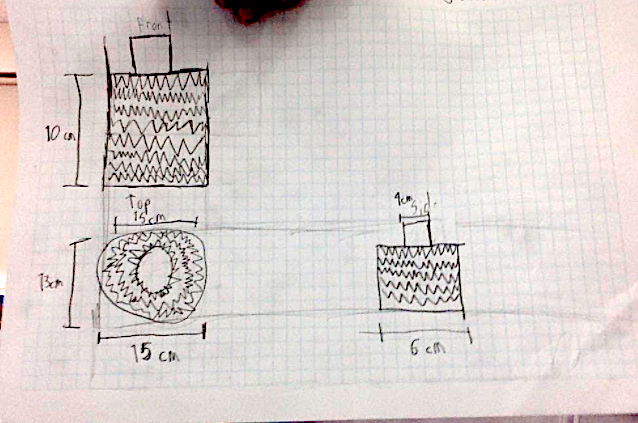
In Strand B.4 – Develop Planning Sketches, the sketching of an object’s top, front, and side views (i.e., orthographic sketching) is more technical. Here, the idea that is sketched in 3D needs to be represented by three, 2D drawings that align.
Sketching Ideas and Timing
As I mentioned before, idea development throughout Criterion B should be encouraged. If an idea changed for a student from Strand B.3 to B.4 and there was sketching in both strands (e.g., the paper water tank), sometimes the sketches in B.3 compared to B.4 looked different. That was okay!
In both Strands B.3 and B.4, students sketched officially (i.e., for a summative grade). For this reason, there was frequent practice sketching during the Criteria A phase. At this point in the MYP Design Cycle as well, many of my students were reaching sketching burn-out and were eager and ready to create in Criterion C.
Pencil Sketching Alternative
The second unit of the year required learning animation software (to create a cybersafety PSA) which required quite a bit of practice. Students learned and used Adobe Photoshop to animate their public service announcements. The unit was a bit unusual in that the digital idea work developed in B.4 might have continued on as the solution created in Criterion C.
MYP Design Criterion B – Developing Ideas Wrap Up

Criterion B provides Year 1 student designers real opportunities to explore their creativity and develop analytical skills. By brainstorming ideas before developing design specifications, student creativity is prioritized, leveraged, and celebrated. Technical sketching skills go deep and showcase ideas in both two and three dimensions.
Ideas developed in Criterion B may still be developing in Criterion C. By encouraging the improvement of ideas, students learn that design is an evolving process.
Assessment should put a focus on all four strands, although Strand B.1 should be more lightly weighted. Download the grading rubric for MYP Design Criterion B. It is on a 0-7 scale and uses assessment language adjusted for the 11- to 12-year old age group.
Ready to learn about creating solutions to solve problems with Year 1 design students? Check out the next criterion: MYP Design Criterion C – Creating the Solution!