KEVA Block Challenge: Hands-On STEM with Tinkercad

I currently teach computer science to K–5 students and love finding easy-to-access materials for hands-on projects. One of the most engaging so far has been a KEVA Block Challenge, an activity that turns abstract STEM ideas into something students can touch, build, and explore. This hands-on project is a fun and engaging example of authentic learning experiences with technology in K–5, where digital tools support deep, creative thinking.

My classroom is located right next to the media center, where I often see students working with KEVA blocks. I’ve watched them stack, balance, and adjust with focus and care. They aren’t just playing. They’re solving problems and thinking like engineers.

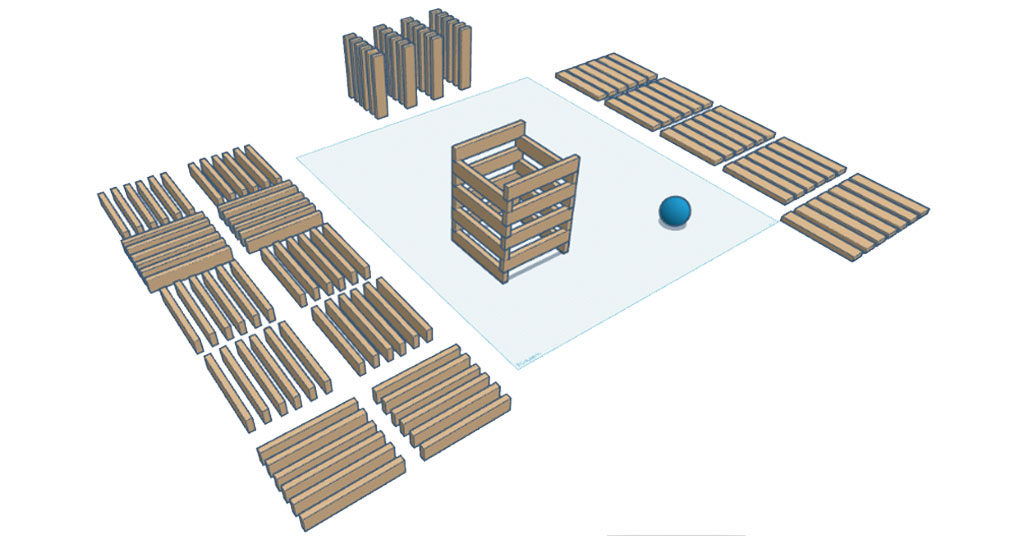
Digital model of a Keva Block Challenge built in Tinkercad Sim Lab to test motion before hands-on building
Tinkercad Sim Lab KEVA Block Template with One Tower

Simple Observation to Engineering Idea

Watching students with the blocks, I saw more than a free-form building. They were solving problems and working together. Their block creations showed patience, communication, and shared decision-making.

What if the KEVA Block Challenge became a guided STEM activity? Could it teach design, teamwork, and persistence? It’s a low-budget, highly engaging opportunity—my favorite kind!

Engineering, Problem-Solving, and Authentic Learning

I enjoy teaching engineering projects and looking for ways to connect problem-solving to computer science. KEVA Block Challenges are a natural fit because they mirror the core practices of computer science such as planning, testing, debugging (improving), and iterating. These challenges give students a physical way to practice the same thinking skills they’ll need when coding or designing digital solutions. The same iterative thinking also aligns with key skills emphasized in MYP Design classrooms.

In this activity, students had a clear goal: keep a ping pong ball moving for as long as possible. They tested structures, timing, and motion using real engineering practices by making one change at a time. With each attempt, they improved their builds based on the results. The hands-on nature kept them thinking, adjusting, and trying again.

Tinkercad Sim Lab for Design

To add structure, I looked for a digital tool to support planning and testing. I had used Tinkercad before, but the Sim Lab really opened things up. It includes a physics engine that allows students to build, test, and revise their designs before interacting with actual KEVA blocks.

In Sim Lab, students can:

  • Define materials like steel, plastic, or softwood
  • Set blocks as static (stay still) or dynamic (move when hit)
  • Adjust environmental conditions like gravity

This setup helps students observe how forces, motion, and structures interact in a controlled digital environment before attempting more messy physical builds.

KEVA Block Challenge Meets Sim Lab

Everything clicked. Students would design in Tinkercad Sim Lab first, then rebuild their design using real KEVA blocks to keep a ping pong ball moving as long as possible on a small whiteboard.

Tinkercad Sim Lab allowed students to:

  • Spot weak designs early
  • Change ideas smoothly
  • Build confidence before using actual physical blocks
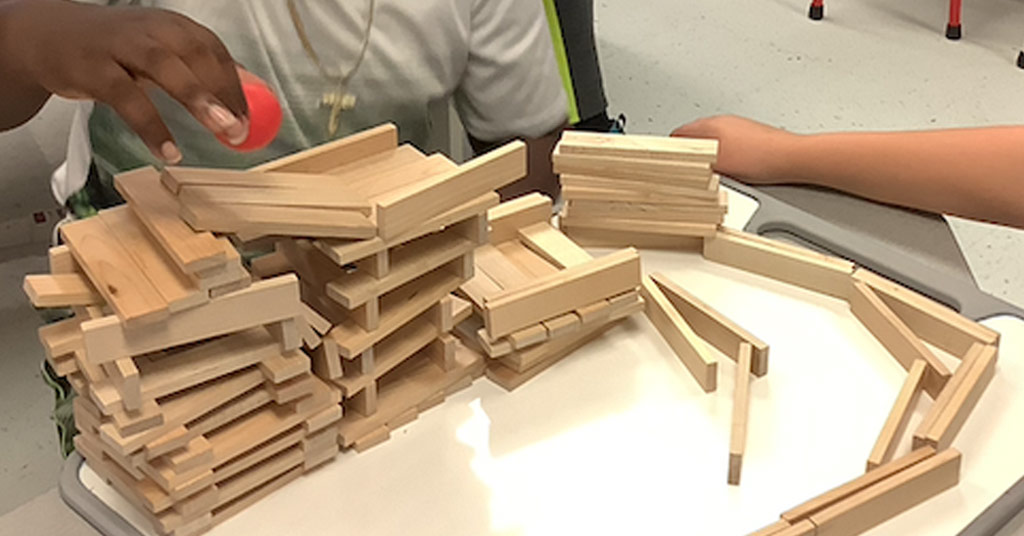
Student building a Keva Block Challenge structure on a whiteboard using wooden planks and a ping pong ball
Real Classroom KEVA Block Challenge Build

By the time they reached the hands-on stage, they had working plans. Like engineers, they refined designs, solved problems, and kept improving toward the goal.

KEVA Blocks Engineering and Digital Modeling

I was excited to see how my fourth- and fifth-grade students would handle this challenge. Would they apply lessons from Sim Lab to real blocks? What could they design with 130 digital planks? Would they stay committed to testing and refining their designs through multiple iterations?

We began by building digital domino runs in Tinkercad Sim Lab to research and develop ideas. This introductory experience gave students a clear place to start and a visual way to understand cause and effect by:

  • Changing materials for different outcomes
  • Making some blocks fixed and others movable

These options helped them explore engineering ideas before the physical build.

What Are KEVA Block Challenges?

By the way, KEVA planks is the official name used by the manufacturer (KEVA®). KEVA blocks is a more informal term people use to refer to them, especially in classrooms.
KEVA blocks or planks are simple wooden pieces. In the classroom, they can become a powerful STEM tool. When paired with a challenge, they promote critical thinking, design skills, and hands-on exploration.

How a KEVA Block Challenge Works

Each KEVA Block Challenge sets a clear goal with optional rules. These prompts help students think like engineers. For example, building a spiral tower might take longer than designing a rhombus, but both require planning and testing.

You can find examples like these in the 20 Challenges with 20 Planks post by Kate Meyerhoeffer.

You can organize the challenges by subject or design theme. This categorizing can help connect the challenges to core skills in math, art, and science. Download a categorized PDF example [here].

KEVA Block Engineering Challenge

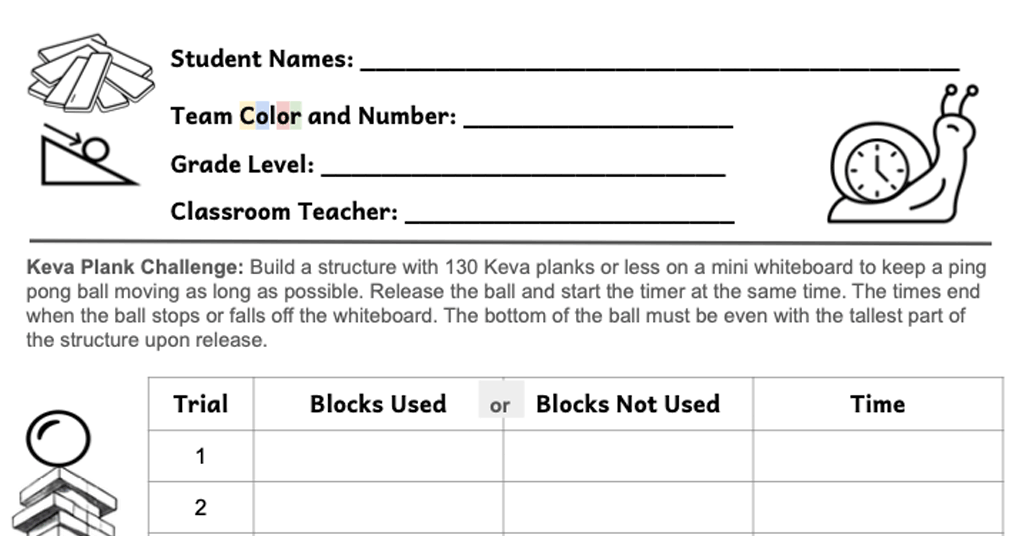
Keva Block Challenge student data sheet with trial numbers, block counts, and timing columns
KEVA Block Challenge Data Sheet for Recording Trials

In our challenge, students used KEVA blocks to build a structure that kept a ping pong ball moving for as long as possible. Download the data sheet here (pdf). For the challenge, the students had:

  • A small whiteboard for building
  • A 130-block limit
  • A simple goal with no correct answer (multiple ways to success)

The specific instructions given to the students were:

Build a structure with 130 KEVA planks or less on a mini whiteboard to keep a ping pong ball moving as long as possible. Release the ball and start the timer at the same time. The times end when the ball stops or falls off the whiteboard. The bottom of the ball must be even with the tallest part of the structure upon release.

They learned to:

  • Think logically about design, forces, and motion
  • Use space and materials creatively
  • Test, fail, adjust, and try again

By working within limits, students discovered that small changes made a big difference. They also saw how teamwork and patience mattered just as much as innovative ideas.

How KEVA Block Challenges Teach Problem-Solving

The KEVA Block Challenge combined digital and physical models. Students used Sim Lab to test ideas and then applied what they learned with real blocks. When a design failed, they changed one thing and tried again. This process built stamina and focus which are skills that support deeper learning across subjects.

I saw Carol Dweck’s growth mindset in action: students embraced trial-and-error and kept improving, even when their designs failed. This approach helps students see value in effort and learn from setbacks.

Reflections from Multiple KEVA Block Challenges

Over several weeks, I ran a full KEVA Block Challenge cycle with all K–5 grades—about 35 classes in total for the physical builds. What began as a simple idea evolved into a layered experience. While grades 4 and 5 completed both digital modeling and hands-on construction, grades K–3 focused on the physical builds. Across all levels, we integrated science discussion and design thinking in age-appropriate ways.

Building the Digital Foundation with Sim Lab

We started with the digital domino run. Students placed a ramp on the workplane, then a ball, and finally, upright blocks to knock over. The ramp had to be set to static, the ball dynamic, and the blocks dynamic as well. Students explored how motion, material types, and angles affect outcomes.

This introductory activity set the tone for engineering rigor and controlling variables. We avoided using “trigger” items (such as flying bananas or golf clubs). Students focused instead on controlled tests. The idea was to teach 4th- and 5th-grade students how to isolate variables and recognize how material properties affect motion and collision.

Tinkercad Sim Lab Domino Chain Reaction in Progress

Virtual KEVA Block Challenge in Sim Lab

Once students were familiar with Sim Lab, I loaded a template into their Tinkercad accounts. Each template included a virtual ping pong ball (set to behave like polystyrene) and 130 blocks proportionally scaled to resemble KEVA planks. Their challenge was to design a structure that kept the ball in motion for as long as possible, using only those blocks.

One key constraint was that they had only 45 minutes. That’s not enough time. Students really needed two lessons for the virtual builds. Creating precise structures with proper stacking (especially in Sim Lab) requires time, patience, and some tricky workplane manipulation.

Student Template for Sim Lab KEVA Block Challenge with Ramps on Towers (Unfinished)

We didn’t allow gravity or simulation scale adjustments, which helped keep the test conditions consistent. At first, the ball’s slow, extended drift in the simulation seemed like a flaw. But when we moved to physical builds, we were surprised to see the same thing happen! The virtual behavior turned out to be a surprisingly accurate model of real-world motion.

Testing Designs in the Real World with Physical Builds

In the next lesson, we made the leap from screen to hands-on. Every grade level, even Kindergarten, got to participate in the physical KEVA Block Challenge. Setting up the testing stations took time, but based on how engaged the older students were, I felt confident the younger grades would enjoy it, too.

Real Classroom Build and Test During the KEVA Block Challenge

Students were reminded of their one clear goal: keep a ping pong ball moving as long as possible on a mini whiteboard using only 130 KEVA planks or less.

I didn’t expect the physical version to match the virtual one so closely. The slow, drifting ball showed up in real life, too. That surprised me!

Fourth- and fifth-graders built on what they had modeled digitally, while younger students jumped straight into physical experimentation. Creating stable ramps proved harder than expected. Too much incline caused the blocks to slip and structures to topple. We quickly learned that tower height, spacing, bumpers, and angles all mattered.

ScratchJr Extension for Younger Students

After watching the fourth- and fifth-graders build ball runs in Tinkercad, the second graders got excited to try digital modeling, too. Since they hadn’t used Tinkercad yet, we decided to use ScratchJr to recreate the physical ball runs they had built.

Basic Model of the KEVA Block Ball Run in ScratchJr

Some students created basic versions using a single flag to start the animation. Other second graders figured out how to use multiple flags to make the ball appear to roll and change direction more realistically.

Advanced Model of the KEVA Block Ball Run in ScratchJr

What Students Discovered and What I Learned

Students worked in teams of two or three for the physical builds, and nearly every group stayed focused, collaborative, and eager to improve. Out of more than 700 students, only one became noticeably frustrated and we worked through it together. While younger students needed more support with building and pacing, the essential lessons rang true at every grade level:

  • A reliable start with a well-angled ramp worked better than launching or tossing the ball
  • Testing during the build helped students anticipate how the ball would behave, especially when whiteboards weren’t perfectly level
  • Simple, well-thought-out designs outperformed towering structures that toppled
  • Calm, communicative teams made more progress than those that rushed or argued
  • Waiting patiently for the ball to stop (instead of grabbing it early) became a powerful act of self-control—and often led to longer times
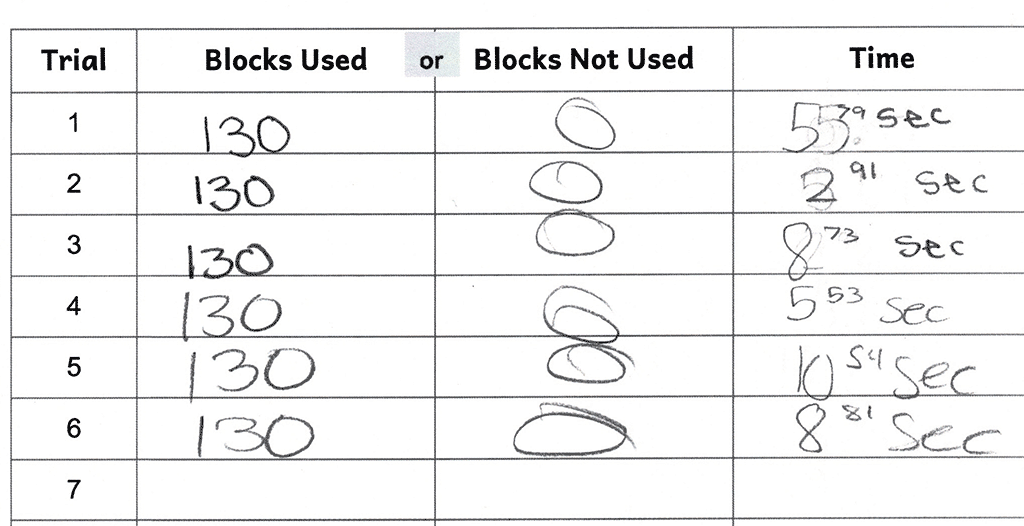
Data sheet for Keva Block Challenge showing ping pong ball timing
5th Grade Students’ Recording of Trial Times During the KEVA Block Challenge

Students faced real design challenges, such as slightly sloped whiteboards, unpredictable bounces, and inconsistent starts. Some proactive teams tested the board’s tilt with the ball before building and adjusted their design to match! That kind of thinking, observing, planning, adjusting, and iterating was a real win in the KEVA Block Challenge. For teachers looking to guide similar learning with a clear, low-cost project-based lesson, here’s an example of how the Engineering Design Process is put into action.

Free STEM Resources for Your Keva Block Challenge

Tinkercad Sim Lab Introduction (23 Slides)
[Click Here to Make a Copy of the Google Slides Presentation]
This slide deck introduces students to the basics of Tinkercad Sim Lab through simple visuals, animations, and guided questions.

This slide deck introduces students to the basics of Tinkercad Sim Lab through simple visuals, animations, and guided questions. Early slides review shapes and object names before introducing static and dynamic objects. Students learn that all objects are dynamic by default and that some, such as ramps, must be changed to static so they stay fixed during the simulation.

The presentation may be a bit much for some upper elementary classes, so feel free to skip or shorten sections as needed. I’ve used it many times with grades 3–5 and adjust the depth based on the audience.

Students also explore material properties by comparing steel, hardwood, concrete, and polystyrene while observing how the ball moves. Later slides introduce STEM vocabulary such as coefficient of friction (COF), coefficient of restitution (COR), and density using student-friendly examples.

Tinkercad Sim Lab Video

The video referenced near the end is helpful, but note that at around 1:34, Mr. E. says “resistance” instead of “coefficient of restitution.” Also, I am not a fan of throwing random objects while the simulation is running. Some teachers may enjoy the playful approach, but I find it distracting during the introduction.

The final slides guide students into their first simulation challenge. Students build a domino setup with a rolling-ball start, keeping Earth’s gravity constant to keep the simulation realistic and fair. The presentation also includes speaker notes for teachers.

Tips for Teachers Trying This Challenge

If you want to bring the KEVA Block Challenge to your classroom, here are a few tips I learned with every grade from K to 5:

  • Keep group sizes small (2–3 students) to maximize participation for the physical builds
  • Use a standardized surfaces (mini whiteboards were excellent)
  • Stations (e.g., utility carts) should have locking wheels to prevent movement from bumps
  • Emphasize patience: Slow-moving balls = Success
  • Avoid distractions like non-Earth gravity or tossed novelty objects in Sim Lab
  • Don’t obsess over data sheets with younger students. Focus on an engaging experience

Want to level up the challenge? Introduce physics concepts, such as kinetic and potential energy, or have students track how long the ball moves per block used. These simple metrics can transform the activity into a deeper exploration of efficiency, trade-offs, and what truly makes a design successful.

Authentic Learning Experiences with Technology in K-5

Like most teachers, I believe connected experiences help students find meaning in what they learn. I want kids to think deeply and understand why learning matters. As a K–5 public school technology teacher who teaches every student, I often face a challenge: creating relevant, engaging lessons that feel real. What does authentic learning with technology look like?

Block Coding with Scratch Offer Opportunities to Solve Problems for Others

My experience teaching MYP Design has shown me the power of real-world learning in my classes. More importantly, I’ve realized that students experience substantial growth when they solve problems with empathy. Although it sometimes takes work to fit meaningful problem-solving into our limited class time, every student can benefit from this approach.

This post will show how I use the free block-based coding app Scratch to create coding experiences for K-5 technology classes. These activities I’ve done in class focus on empathy and help students build problem-solving and critical-thinking skills.

What is MYP Design?

First, a little about MYP Design. The MYP Design course, part of the International Baccalaureate (IB), may not be well-known outside the IB program. This course can inspire all teachers, whether or not they are part of the IB, by showing how solving problems with empathy and real-world thinking can lead to deeper and more meaningful learning experiences for students.

MYP Design projects can be digital or physical. Digital projects include creating a Scratch game to address a real issue or designing a mobile app interface using Figma. Physical projects would involve building a mechanical toy for a child or upcycling materials into new products as gifts.

The Gift of Design

MYP Design has taught me that I don’t need to be a technical expert in everything. The focus on solving problems for others allows me to push past any self-doubt about not knowing enough. I often tell my students that they might know more than I do about Scratch, and they seem to appreciate that honesty. Sometimes, they ask, “How can you teach coding if you don’t know it all?” It’s a fair question! I usually respond with a sports analogy: a coach doesn’t need to play every position on the field, but they know enough about strategy, people, and the game to lead the team to success.

What Makes Learning Authentic?

Using technology for authentic learning in K-5 classrooms connects concepts to real-world applications. Social-emotional learning (SEL) helps create meaningful connections in this process.

Social Emotional Learning

Research from Empathy Driven Social Emotional Learning (SEL): Unraveling the Role of the Teacher Through Nexus Analysis shows that authentic learning improves when SEL is part of daily classroom activities. Empathy-driven experiences help students connect emotionally with their learning and apply knowledge to real-life situations.

Meaningful Technology Integration

Integrating technology into traditional subjects helps create authentic learning environments. The study Becoming Core: Curriculum Planning Tools for Integrating Computer Science (CS) into K-5 Content Areas shows that combining computer science with other subjects makes learning more relevant. Students use technology to solve problems and collaborate, engaging in hands-on activities that reflect real-world challenges.

The research Getting Unstuck Together: Creating Personally Authentic Programming Projects in a 4th Grade Classroom (2024) highlights the value of self-directed projects. Students explore their interests through programming, making learning more meaningful and engaging.

Scratch Coding Interface with Block-based Commands for Moving and Animating the Scratch Cat

What is Scratch Coding?

Scratch, developed by the MIT Media Lab, is a free programming language with an online community where users can create interactive stories, games, and animations. It was first released in 2007! Scratch uses a visual coding interface that lets users snap code blocks together. This setup makes it easy for beginners to teach and learn. Students see immediate results by dragging and dropping blocks, which helps them understand coding concepts quickly.

Students can use Scratch to work on projects that solve real problems, like creating animations to explain science concepts (e.g., projectile motion) or developing stories to share personal experiences. Scratch helps students show their understanding in creative and meaningful ways.

Why Scratch is Ideal for K-5 Classrooms

Scratch uses a drag-and-drop interface to teach skills like sequencing, problem-solving, and debugging without using text-based code. Students can create projects such as stories, games, or animations, allowing them to explore skills connected to their interests.

The tutorials and extensions unique to Scratch make it easy for students to explore and learn within the platform. Students can take their projects even further by incorporating external tools, such as BeepBox for creating audio and Canva for designing AI-generated sprites.

Media files are easily imported into Scratch, allowing students to merge resources from multiple apps. This process sparks creativity and builds essential productivity skills like downloading, uploading, and organizing files. Combining the strengths of different tools with Scratch’s features helps students apply STEAM concepts while personalizing their projects in meaningful ways.

Scratch Coding Options

At my school, the official website for Scratch is blocked. The online version has many fantastic user-made projects that can inspire and, unfortunately, branch into inappropriate games (e.g., shooter games with blood). When it was not blocked at my school a couple of years ago, I had to deal with a social component I could not fully lock down, resulting in some inappropriate language not being filtered out. There is a downloadable offline app that can eliminate online problems as well.

My school district partners with CodeHS. The company offers Scratch lessons for different grade levels and a teacher management dashboard. Schools can use CodeHS for free or pay for extra features.

The free version of CodeHS includes the core curriculum, progress tracking, and essential grading tools. The paid version adds advanced subjects like cybersecurity and game design, better teacher tools, and detailed student performance tracking.

Scratch block coding maze example: Guide the cat to the fish without touching the maze walls—authentic learning with technology example.
Authentic Learning with Technology: Scratch Maze Teaches Coding, Problem-solving

Create a Maze Game to Develop Mouse Skills

Teaching each grade level once a week makes it hard to cover concepts and build skills consistently. I used Scratch coding to increase engagement in technology lessons and maximize this limited time. My upper elementary students, who had more experience with Scratch, taught me a lot. They helped me see how Scratch supports hands-on learning. Looking back, I wish I had started using Scratch earlier in my teaching career. It gives students real opportunities to explore, create, and learn.

Working across grade levels, I noticed that kindergarten and first-grade students needed better mouse skills. This need became clear during our technology activities. To address this, I helped older students design Scratch maze games. These games allowed younger students to practice and improve their mouse control.

Study Mazes Before Drawing

Before students create their own mazes, provide examples to study. Discuss the importance of size, path spacing, and complexity for younger students. Without this preparation, mazes may be too small, overly complicated, or too simple to challenge young learners. Help students aim for designs that balance branching paths and straightforward navigation.

Scratch Maze Design

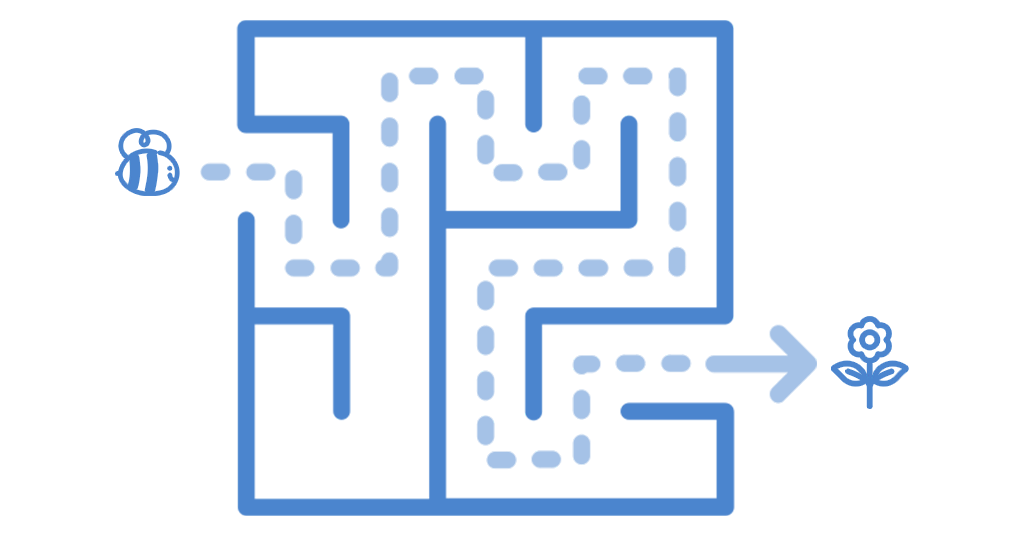
Start left and finish right to reinforce left-to-right analysis of content (e.g., reading text). Adding a top-to-bottom layout might be beneficial as well. Most students intuitively design mazes starting left and finishing right within a rectangular-shaped maze.

A blue maze featuring a bee navigating toward a flower, illustrating a Scratch coding activity for authentic learning with technology.
A Simple Scratch Maze Where a Bee Navigates to a Flower, Demonstrating Authentic Learning With Technology

Thicker Maze Lines for Younger Students

Students often draw maze paths that are too thin, making it difficult for younger students to navigate. Teach them to use thicker lines (with the paintbrush or line tool) and ensure the maze paths strongly contrast with the background for better visibility. This simple adjustment supports authentic learning with technology by enhancing accessibility and creating a more user-friendly experience for younger learners.

Grade-Level Recommendations

This maze-building activity is appropriately challenging for fourth and fifth graders. For third graders, evaluate their ability to follow instructions and maintain focus. If they exhibit these skills, they can successfully engage in the activity and benefit from the problem-solving and critical-thinking opportunities to help others.

Scratch Maze Code Example for Students

The goal in the example is to guide a character, such as a cat, through a maze to a target. Students use the computer mouse to move the character without touching the walls. If the character touches a wall, the program resets it to the starting point. This challenge gives students immediate feedback and improves their control.

Some Scratch maze tutorials use keyboard controls, which don’t help with building mouse skills. Plus, mazes with fast-moving parts can be too stimulating for younger students, making it harder for them to focus on mouse control.

Master Conditional Loops for Interactivity

The conditional loop block is essential for creating interactive and intuitive designs. For beginners, sprite-touching activation (e.g., “if touching Sprite”) may be more reliable than color-touching activation, minimizing potential issues.

Clicking the flag activates the code, and pressing the space bar stops the activity and resets the game to the beginning.

Building Steps

The steps to build a simple maze are roughly:

  1. Choose a character (sprite) to be guided through the maze with the computer mouse.
  2. Choose the goal (sprite) for the character to go to.
  3. Draw a maze (sprite).
  4. Code the character with four functional groups of code blocks: movement, penalty (touching the maze), reward (touching the goal), and reset the game.

If the Scratch project does not load from scratch.mit.edu, it may be blocked at your school. Use the computer mouse training demonstration project available on CodeHS instead.

The specific blocks of code for activating this project’s character include:

  • Glide to Mouse Pointer: This motion block tracks the mouse. It makes the cat sprite follow the cursor as the player moves through the maze. A 1.5-second wait outside the forever loop gives the player time to position the cursor over the cat before starting.
  • Conditional Loop for a Penalty: This loop checks if the cat touches the maze walls. If it does, the code triggers a penalty. The cat plays a sound and returns to the starting point. This feedback encourages precise movements.
  • Conditional Loop for a Reward: This loop activates when the cat reaches the finish. The code plays a celebratory sound and changes to a “party” backdrop, marking the challenge’s successful completion.

This use of penalties and rewards keeps the game engaging and instructional. Older students learned to code clear feedback for the player. This design helps younger students learn through trial and error. The structure supports skill development and makes learning fun!

Note: There is a minor bug in the training example, and some students may spot it. Treat this hiccup as a teaching moment regarding trade-offs. Here’s an opportunity to discuss if debugging is the next step or getting the project ready to share with the computer mouse trainees.

Conditional Blocks in Scratch

Before making a Scratch maze, students should practice with an orange conditional block. For example, if a wandering flapping bat bumps into a pumpkin, the pumpkin changes briefly to a jack-o-lantern.

Scratch coding example with a conditional block: The bat flaps and flies around randomly; when it collides with the pumpkin, the pumpkin briefly changes to a jack-o-lantern.

Conditional blocks in Scratch make coding exciting by adding decision-making, enabling students to create dynamic, interactive projects. In games, these blocks power features like scorekeeping, collision detection, and player feedback.

Two conditional blocks are used in the cat-fish maze example to detect collisions between sprites. When the cat collides with the maze, it’s penalized. The cat is sent back to the start as a gentle error sound plays. When the cat reaches the fish, a “ta-da” sound triggers, and the backdrop switches to celebratory balloons, making the game engaging and rewarding for younger players.

Fine-Tuning Projects Through Play Testing

Upper-grade students should test Scratch projects to improve usability. To ensure an accessible experience, students should use their non-dominant hand during testing. Be ready for some noise during this testing! This approach simulates younger students’ challenges, such as developing fine motor skills. Key areas to check include:

  • Maze Path Width: Are the paths wide enough for younger users?
  • Character Response Delay: Is there a lag between mouse movements and the character’s actions?
  • Start Timing: Does the character begin following the mouse too quickly, or is the wait time appropriate for younger learners?

Using the non-dominant hand identifies usability issues and builds empathy, a vital skill for creating user-centered designs. Empathy helps upper-grade students understand the frustrations their younger peers might experience.

Research based on role-taking theory shows that empathy, developed through activities that help students see things from others’ perspectives, is linked to better social understanding and kindness toward others. This skill improves school teamwork and helps create designs that meet different people’s needs.

Simplifying Project Sharing Across Grades

Teachers can collect project URLs from students using a Google Form. Students submit their project links, and teachers organize them into a shared list or on Google Sites for younger students to access easily. This method is quick and ensures smooth sharing across grades.

Export and Import for Controlled Access

To maintain consistency and prevent unexpected changes, have students export their completed mazes and import them into a teacher’s account before sharing them with younger students. This step ensures a stable version for teaching mouse skills. Exporting in Scratch is done by navigating to File → Save to Your Computer. I usually export, fine-tune settings if needed, and import into my Scratch account after reviewing the projects.

Teacher showing her class how to use a mouse. Authentic learning with technology.

Tips for Managing Scratch Coding Projects

The following practices help coding projects go more smoothly and help students stay on track better:

  • Start with Consistency: Use the green flag to start the game and the space bar to reset. This consistency helps standardize the mouse training games for younger students, minimizing confusion.
  • Group Code in Logical Sections: Organize code into sections to make it easy to read and fix. I used reset, movement, reward, and penalty sections in the Cat-fish maze example. This approach keeps related functions together, making it easy for students and teachers to find, debug, and change specific parts. Grouping also prevents confusion in larger projects by clearly showing each function’s purpose (e.g., reset with the space bar).
  • Remove Stray Blocks. This tip relates to the logical grouping of code into functions. Stray, single blocks, or groups of blocks not performing a function make visual understanding and debugging more difficult.
  • Build a Reset Set of Code Blocks to return all sprites and settings to their starting positions. ScratchJr has one block for this ( the blue Go Home block). Students build reset code in Scratch based on how the sprites change (e.g., position, size, color). This practice simplifies debugging and helps students approach coding with a structured, problem-solving mindset.
  • Add Comments: Students annotate their blocks of code with concise notes explaining each section’s purpose. This dedication to documentation helps students and teachers understand code group functions quickly and helps with peer review.
  • Descriptive Naming for Sprites: Scratch’s built-in sprites come with clear, descriptive names, but student-created sprites often default to generic names like “Sprite1” or “Sprite2.” Encourage students to rename their sprites with descriptive titles to make their projects more straightforward to navigate and debug.
  • Add Sounds Last: Scratch has many fun sounds that are easy to explore and get lost in. So, save sound effects for the final step to minimize distractions while coding. I often joke with my older students that working with sound is like venturing into a black hole. It has a way of consuming far more time than you expect.
  • Effective Sound Feedback: Clear and deliberate sounds indicate errors, such as bumping into maze walls. These sounds should be short and easily identifiable by younger students. Conversely, positive feedback sounds can be longer and celebratory to signify success and completion of a goal. Thoughtful use of sound reinforces authentic learning with technology by providing engaging and age-appropriate feedback.

Scratch Games to Make Beyond the Maze

As my students and I progressed in the project, new types of games emerged to promote skillful mouse use. For example, one style is a pong-based game: a sprite acting like a paddle bounces another sprite. Mouse control is developed through steady horizontal or vertical control.

Pong-based Scratch Example

In this annotated example, the player supports Dot the Space Dog on her mission: She should not fall into the cloud. Click the green flag to start and the spacebar to stop and reset.

Here is the same Pong-based Computer Mouse Trainer with Dot the Dog project hosted at CodeHS.

Teach Intuitive Coding Practices

Focus on projects that group blocks logically and use intuitive commands. For example, in the Pong-based Mouse Trainer with Dot the Dog project explain how a sensing block (“mouse x”) embedded in a motion block (“set x to”) locks a paddle’s movement to the horizontal axis. At first glance, this configuration of blocks may not be intuitive. Show how the forever loop continuously updates the sprite’s X position, keeping mouse movement fixed on a horizontal line.

This pong-based game is more complex than the cat-maze game and might benefit and challenge gifted students, those who enjoy math, or those fluent in Scratch coding. It uses a variable to count the successful bounces and an imported Canva image (made with the AI-powered app PaintSplash).

Authentic Learning with Technology: Start Small and Make Connections

Scratch maze games offer an engaging way for younger students to develop essential mouse skills while challenging older students to sharpen their critical thinking and coding abilities. By designing these games with empathy for others, students experience purposeful learning and discover how technology projects can build connections and foster collaboration among peers.

Small, manageable coding projects are ideal for introducing authentic learning with technology. Here are a few ideas:

  • Simple Animations: Animate science concepts or classroom rules to explain them in engaging ways.
  • Basic Games: Design games that reinforce math facts or vocabulary, making practice interactive.
  • Digital Storytelling: Help students create short, interactive stories, such as a character overcoming challenges to reach a goal or an autobiography. These projects can captivate younger students and make learning fun.

These activities promote creativity and problem-solving and show students how we use technology to engage and support others. The Keva Block Challenge is another great way to engage in digital modeling in a meaningful way.

Take Action: Bring Authentic Learning into Your Classroom

Try to incorporate Scratch into your classroom! Basic block coding alone can create meaningful learning experiences for your students. Use free tutorials and resources on Scratch’s website to plan projects that meet your students’ needs or explore new ideas.

Projects like maze games (especially when designed to help others) can transform how students approach technology. It’s a great way to turn screen time into authentic learning.

Teaching MYP Design: A Practical Guide for Educators

This post supports teachers new to MYP Design, especially those from a U.S. public education background. MYP stands for Middle Years Programme, an integral part of the International Baccalaureate (IB) curriculum, a globally recognized educational framework.

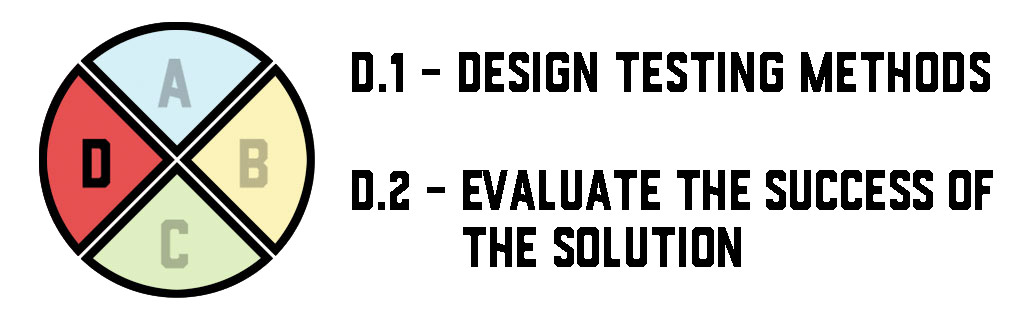
MYP Design Cycle Outline. Criteria A, B, C, & D
The MYP Design Cycle with Four Criteria

The IB’s philosophy centers on developing inquiring, knowledgeable, and caring young people motivated to succeed and contribute in a globalizing world. Basically, in the IB, teachers want to ensure that kids have abundant opportunities to explore their curiosities, develop their smarts, embrace empathy, and be excited to do well and make a difference in our big, connected world. The MYP curriculum challenges students aged 11 to 16 to excel academically and grow personally, ethically, and emotionally.

The transition from the Middle Years Programme (MYP) to the Diploma Programme (DP) is designed within the International Baccalaureate (IB) framework to ensure a cohesive and comprehensive educational journey. The MYP experience offers a foundation in critical thinking and independent learning that prepares students for the DP’s rigor.

My first experience in the MYP was as an MYP Design teacher with Year 1 and Year 3 students (6th and 8th grades). Before the MYP, I taught in a traditional American curriculum in U.S. public and international private schools. I learned that teaching MYP Design involves a hands-on approach that blends creative and pragmatic problem-solving with real-world applications.

I enjoy newcomers, so working with Year 1 students was a good fit for me. Being very procedural and sequential within the MYP Design Cycle benefitted me as a teacher new to design and my students.

MYP Design Resources from the IB

The primary MYP Design resource for teaching MYP Design is the 67-page Middle Years Programme Design Guide (Sep. 2014 – Jan. 2015). It is an essential resource every new teacher in MYP Design should have readily available. This 14-15 MYP Design Guide differs slightly from the 62-page 2014 MYP Design Guide. The former has more details about supporting Year 5 students and the MYP eAssessment.

MYP Design Resources

The Middle Years Programme Design Guide provides a comprehensive framework for teaching design in the MYP. It begins with an overview of design in the MYP and discusses design’s role across the IB continuum, its aims, objectives, and planning for learning progression. The guide details the invaluable MYP design cycle, interdisciplinary learning, and curriculum requirements.

Design Teacher Support Material

The Design Teacher Support Material (TSM) goes hand in hand with the MYP Design Guide. This design educator resource provides detailed examples of digital and product units with authentic and assessed student work. It’s set up more as a web page with navigational links rather than a full PDF like the MYP Design Guide. It used to be easier to access without needing to log in.

To ensure you have the latest MYP Design guidance from the IB, make an account first (free) and then wait a bit for your account confirmation. After confirmation and logging in, head to the tricky-to-find MYP Design Teaching Material area (another login maybe required). If this link doesn’t work, you may need to register for an IB role, then search under My IB. In addition to the 14-15 MYP Design Guide and TSM, you will find additional MYP resources here as well.

For answers to specific questions (e.g., MYP unit ideas, assessment strategies, helpful documents), check out the active and helpful MYP Design Teachers Facebook group.

Embracing the MYP Design Methodology

Switching to MYP Design from a traditional U.S. public school way of teaching (or another non-IB environment) might initially seem like a giant leap. Is it a whole new way of doing things? Our typical U.S. classrooms in public education usually focus on one subject at a time. But in MYP Design, many elements naturally mix and connect meaningfully via rich inquiry questions and connections to global contexts. If you appreciate making connections across disciplines in authentic ways and solving problems for others, then MYP Design should be a rewarding experience for you!

Project-Based Learning in Action

The project-based nature of MYP Design, with its focus on authentic problem-solving, can turn learning into an exciting adventure where students can discover and apply their creativity to solve real-world problems. Especially in the upper grades, it’s about doing and making an impact. Students get the chance to work on projects that can genuinely help others, making their educational journey educational, rewarding, and fun.

All areas of the MYP go beyond traditional academic boundaries. The curriculum is designed to encourage students to make practical connections between their studies and the real world, preparing them for success in further education and life beyond school.

Connecting Curriculums

I have found that MYP curriculum closely resembles the gifted curriculum in U.S. public education. The MYP philosophy, similar to typical U.S. gifted curriculums, emphasizes personalized, inquiry-based learning, critical thinking, and fostering creativity. Both areas share a constructivist approach, aiming to cater to students’ diverse intellectual and personal development needs.

Connecting Curriculums

Also, integrating STEAM (Science, Technology, Engineering, Arts, and Mathematics) learning into the MYP Design framework shows how flexible the MYP Design curriculum is and how well it fits with forward-thinking ways of teaching and learning. Just like STEAM, MYP Design encourages an interdisciplinary approach, bringing together various fields of study to approach problem-solving with creativity and innovation.

This methodology enhances students’ understanding and application of knowledge across different subjects and prepares them for the complexities of real-world challenges. The emphasis on design thinking in MYP mirrors the core of STEAM education, where students are empowered to think like designers and engineers, blending artistic creativity with scientific inquiry to create holistic solutions.

Core Principles of Teaching MYP Design

Central to the MYP Design philosophy is inquiry-based learning. This approach encourages students to ask questions, explore, and investigate–to go deep with their learning. As an educator, you facilitate this exploration, guiding students to discover and understand design concepts through their experiences and curiosity. Be prepared to explore lots of open-ended questions!

Navigating the MYP Design Cycle

The MYP Design Cycle is pivotal. It guides teachers and grounds students in the problem-solving process, which is at the heart of design. The cycle addresses design problems through:

These four steps (called criteria) teach students to think like empathetic designers, approaching problems systematically and creatively.

Animated MYP Design Cycle - Criteria A, B, C, and D
The MYP Design Cycle – Criteria A, B, C, and D

Your task is to help students navigate each step, ensuring they understand the importance of the design process in bringing their best ideas to fruition. Year 1 students especially need to be grounded in the 16 strands that comprise the four criteria.

Communication in the Design Process

It probably goes without saying that effective communication and teamwork are vital in MYP Design. Students collaborate, share ideas, and give and receive peer feedback. This practice enriches their thinking and leads to the best solutions. As a teacher, fostering a classroom environment that encourages open communication and teamwork is crucial, and things can get noisy!

Open and continual communication in the classroom encourages exploring various possibilities instead of focusing on a single correct answer. This approach is fundamental for inquiry-based learning. Open dialogue helps in advancing a broader understanding and improvement in big-picture thinking.

Inquiry invites exploration, which may result in tasks or projects that may seem unfinished–and that’s okay since design is a process. The MYP Design Cycle does help corral this richness of thinking and put it toward purposeful problem-solving.

Theoretical Knowledge to Real-World Challenges

MYP Design combines theoretical knowledge with real-world problems. This principle helps bridge the gap between classroom learning and the outside world, making the learning experience more meaningful and engaging for students. Year 5 students are often given more opportunities for independent learning and self-directed projects because they have developed more advanced research, critical thinking, and project management skills. Although Year 1 students may design in more contrived learning experiences, a well-conceived problem-solving scenario or the GRASPS model can provide students with an authentic context for learning.

Reflection in Learning and Design

Reflection is a critical component of MYP Design with a significant focus in Criterion D, which concludes a cycle in design. Students mindfully examine on their learning processes, choices, and project outcomes. This reflective practice deepens their understanding and helps them become more self-aware and responsible learners.

Reflection - MYP Design

Because the MYP Design process is naturally reflective, thanks partly to the inquiry questions that drive and expand thinking and learning, each step in the design cycle offers opportunities for self-examination. Much of this introspection can be in the form of writing, which, in excess, can diminish the energy put into reflecting.

Writing in MYP Design

With her one-pager approach, Lenny Dutton took on the problem of writing in MYP Design (which can be a creativity killer and design should be fun, right?). In MYP Design, students often feel overwhelmed by the extensive writing required for each strand, leading to less time for creative exploration and improvement through exploration and trial and error. One solution is introducing “One-Pagers,” which encourage students to distill their formative work and critical ideas into a concise, impactful page for each criterion, enhancing focus, fun, and efficiency.

Adaptable and Flexible Mindset

The dynamic nature of MYP Design requires educators to be adaptable and flexible. A solution to a problem can nearly always be improved if given enough time and resources, so does designing ever really end? With regard to students, beginners benefit more from a deliberate and sequential process through every strand of the design cycle. More experienced students already grounded in the design process may need to jump around to find the best ideas and solutions more efficiently and intuitively.

Be prepared to alter your teaching methods based on student needs, inquiry explorations, project requirements, and the ever-evolving nature of design and technology.

Grading Systems: From U.S. Public Schools to IB

Generally, the US public school grades range from A (excellent, 90-100%, GPA 4.0) to F (failing, below 60%, GPA 0.0). The B, C, and D grades represent above-average, average, and below-average performances. Each has corresponding percentage ranges and GPAs. Variations like A- or B+ may be used for more specific grading.

Grading Systems - MYP Design

The Diploma Programme (DP) uses a 1-7 grading scale that offers distinct achievement levels, resembling the A- F system and providing clear performance distinctions. Unlike the A-F grades, the IB scale uses criterion-referenced assessment, focusing on specific achievement criteria, not relative performance. This approach makes it a globally recognized academic performance measure especially useful for university assessments. Learn more about what IB Diploma Programme grades mean by Dr Matt Glanville.

MYP Grade Scale

The MYP uses a unique 1-8 grading scale called achievement levels or grade descriptors. These are called achievement bands when grouped in pairs (e.g., level 5-6 or 7-8). These milestones help show how well a student is doing and their progress over time. The idea is to make it easier to compare student performance across different countries–IB schools are worldwide. The scale helps to motivate students by acknowledging even minor improvements in their learning. It also supports teachers in giving detailed feedback to students, which can guide them on what they need to do to improve.

Go to page 32 in the MYP Design Guide to see the achievement band descriptions for Criteria A, B, C, and D for Years 1, 3, and 5.

Teaching MYP Design and Giving Feedback

In all MYP subjects, teachers must assess every strand of all four criteria at least twice each school year. This specific requirement ensures that students receive comprehensive feedback across all areas of the subject criteria, which is fundamental to the IB’s approach to assessment and learning. Figure 5 on page 30 of the MYP Design Guide shows how focusing teaching on each strand of the MYP Design Cycle will align with required assessment targets.

Feedback - MYP Design

Diverse and engaging assessment methods offer constructive feedback, encourage self-regulation, and deepen understanding. Feedback-oriented assessments that provide regular, constructive insights help students identify their strengths and improvement areas.

Sometimes, giving feedback in MYP Design can feel like a lot of work–especially providing formative feedback in a timely way to support students with meaningful guidance for their summative projects. School schedules can be a factor in providing adequate time to teach. Year 5 student schedules might warrant more time in MYP Design in a week than Year 1 students in a school; however, educators may have little say in how often and for how long they see their students. The teaching of the entire design cycle, including inquiry and extensive writing, adds to this challenge.

Formative Feedback Ideas

Balancing the demands of providing timely formative feedback so that the summative can be the best it can be is always a challenge. Class schedules and students’ willingness to submit work on time are difficult to control.

Teachers can impact learning and honor feedback best practices via exit tickets, short quizzes, one-on-one quick conferences, notes on design portfolios, and verbal discussions for each criterion. These techniques stress the value of immediate feedback in targeting student learning needs and guiding their design journey.

Give lots of formative feedback early in the criterion assessment cycle. Year 1 students starting MYP Design especially need rich, specific feedback early on in Criterion A to understand the assessment-instruction relationship and help their focus. Since Criterion A starts the design process, formative feedback at this stage is critical.

For practical, project-based activities, particularly Criteria B and C, feedback can be most effective when given in real-time as students work. For Criteria A and D, more extensive written feedback on students’ work before final submission can be beneficial.

Showing students clear teacher-made examples and past student work helps them understand the design process better. It also shows them exactly what different scores, such as a “5,” look like, so they can improve their own work.

Documentation might be required for an IB audit of formative feedback since it supports the requirement that every strand of all four criteria be at least twice each school year. Two ideas are recording yourself giving verbal feedback and screenshots of your comments on a student’s portfolio documents. Utilizing semi-standardized canned responses for common errors and leveraging digital tools for efficient feedback delivery can help maintain high-quality feedback practices as well. These strategies support student learning, ensure compliance with IB standards, and promote educational best practices.

MYP Design Portfolio

Research highlights performance-based and project-based assessments as engaging ways for students to apply their knowledge in real-world scenarios, thereby making learning meaningful. MYP Design is naturally project-based.

Project-based learning with design portfolios allows students to showcase their understanding in various formats. The portfolio serves as a comprehensive record of a student’s progress and achievements in MYP Design, highlighting their skills, knowledge, and growth as designers over time.

Have students create and grow a design portfolio (sometimes called a design folder). This portfolio should capture evidence for the 16 strands in the MYP Design Cycle. In addition to writing, screenshots, photos, sketches, videos, audio files, etc., can document a student’s level of mastery per strand.

For example, a Google document can be set up for each criterion, explicitly addressing each strand for feedback and assessment within each. Four Google Documents for each criterion would comprise the portfolio in each MYP Design unit.

An MYP Design Cycle template can help focus teaching, learning, and assessment compliance. Adopting such strategies can help educators meet MYP assessment requirements without being overwhelmed.

MYP Design Unit

An MYP Design unit refers to a specific curriculum segment designed to teach students particular skills and knowledge within the MYP Design framework. Each unit is centered around a central concept or theme and incorporates the MYP Design Cycle—Inquiring and Analyzing, Developing Ideas, Creating the Solution, and Evaluating.

MYP Design Word Cloud

A very basic unit may consist of inquiry questions and the four criteria (with four strands each) as activities. A more comprehensive and compliant unit suitable for institutional memory purposes and IB evaluation processes is listed on pages 1 and 2 of the Evaluating MYP Unit Planners guide:

  • Names of the teacher(s) involved
  • Identification of the MYP subject group and the specific discipline; for integrated courses, detail the combined subjects or disciplines, and for modular courses, specify the discipline focus.
  • The unit title, which could be framed as a question, topic, significant idea, or content requirement
  • The total number of guided learning hours anticipated
  • The primary key concept for the unit
  • Any related concepts to be explored
  • The global context and specific exploration guiding the unit
  • The objectives for the subject group and the strands relevant to those objectives
  • Task-specific clarifications, including how students are guided to understand the criteria and level descriptors
  • Content details, including topics covered and how they align with local or national standards
  • Descriptions of learning experiences, teaching strategies, plans for differentiation, and formative assessment approaches
  • Resources required for the unit
  • Reflections compiled before, during, and after the implementation of the unit

In the context of MYP Design, this framework underscores the importance of addressing differentiation and teaching strategies. It emphasizes the necessity of documenting interdisciplinary learning, which, while vital, might not be explicitly outlined in all MYP Design templates.

Students must engage with and discuss key concepts, related concepts, and global contexts. These aspects enrich learning by forging meaningful connections. Although these facets are generally not directly assessed within the MYP Design Cycle’s criteria, they can be seamlessly integrated into Criterion A (Inquiring and Analyzing) and Criterion D (Evaluating), where opportunities for research and critical evaluation naturally intertwine with these conceptual elements.

Product Design and Digital Design

According to the MYP Design Guide, teaching product and digital design together is possible and encouraged under certain circumstances. The guide outlines options for organizing design in schools, suggesting that design courses can be offered as distinct digital or product design courses, as a series of distinct courses, or as a single course combining digital and product design elements.

This flexibility allows for integrating digital and product design, enabling students to benefit from a comprehensive design education covering various skills and concepts. This broader experience setup is my preference. I taught four MYP Design units in a school year structured like this for Year 1 students:

  1. Semester 1 – product design (less complex)
  2. Semester 1 – digital design (less complex)
  3. Semester 2 – product design (more complex)
  4. Semester 2 – digital design (more complex)

Complexity is scaffolded to support the best-developing designers as time progresses. Since product design requires more preparation and clean-up time with more significant safety risks (e.g., glue guns and box cutters), I plan these units at the beginning of semesters when students are more inclined to follow instructions (i.e., they are less distracted by the siren song of approaching vacation time).

For more advanced students, a single MYP Design unit can combine digital and product design. This approach allows students to develop solutions that include physical and digital components. A combined unit could be something like a robotics kit that merges digital and product design, offering a hands-on learning experience that fosters creativity and problem-solving skills. Students would gain insights into programming and mechanical engineering by assembling physical components according to the design’s goal.

MYP Interdisciplinary Unit Planning

MYP Design is naturally interdisciplinary. Solving a problem for a target audience blends art, science, and humanities, emphasizing creativity, technical skills, and cultural insights. Focusing on diverse audiences drives interdisciplinary, culturally sensitive solutions that are both innovative and practical.

True interdisciplinary MYP units (IDUs) require deep preparation and planning. For more information, Check out Diane Smith‘s YouTube video about the what, why, and how of IDUs.

ATLs and Command Terms

By comparing and contrasting ATLs (approaches to learning) and command terms, teachers can better understand how they serve students in the MYP.

ATLs and command terms are related in that they guide students in their learning and tasks. Command terms are specific instructions that tell students what they are expected to do to demonstrate their understanding and skills in an assessment context (e.g., “analyze,” “describe,” and “evaluate”). In fact, each strand in the MYP Design Cycle begins with a command term. ATLs, on the other hand, are the skills students need to carry out these commands effectively.

For instance, when a task asks students to “analyze” (a command term), they may need to apply critical thinking skills (an ATL under “thinking skills”) to break down information into parts to understand its meaning. If a task requires students to “collaborate” (implicit in command terms like “discuss”), they will use social skills from the ATL framework to work effectively with others.

ATLs - Approaches to Learning - MYP Design

It may feel that ATLs and command terms state the obvious regarding good teaching, and this guidance could feel overprescribed. ATLs and command terms add even more required ‘stuff’ to account for in the MYP Design curriculum. Aren’t teachers naturally applying Bloom’s taxonomy to task requirements and supporting them with the necessary skills? Probably!

Regardless, a poster of MYP common concepts and terms in a classroom is a fantastic reference for building academic vocabulary and sentence- frames for rich discussion–especially for English Language Learners. By asking, “What’s the best way to ______ ? Teachers and students will focus on the ATLs to navigate and excel in each strand within the MYP Design Cycle.

The Benefits of MYP Design

MYP Design has been a fantastic experience that has elevated my planning and teaching for my students. I used to consider STEAM learning, with some constructivism, to promote engagement as an optimal learning experience.

I currently teach K-5 computer science in a U.S. public school and had fifth graders create Scratch-based mazes to help kindergarteners develop their mouse skills. Without an MYP Design teaching experience, I probably would have had students create a project in Scratch to learn coding skills. Maybe we would have added some Canva-made sprites to differentiate, but that’s about it.

Solving a tangible problem (mouse skills) for an audience (kindergarten) helped my fifth graders immerse themselves in a real-world context, making their learning experiences more authentic and engaging.

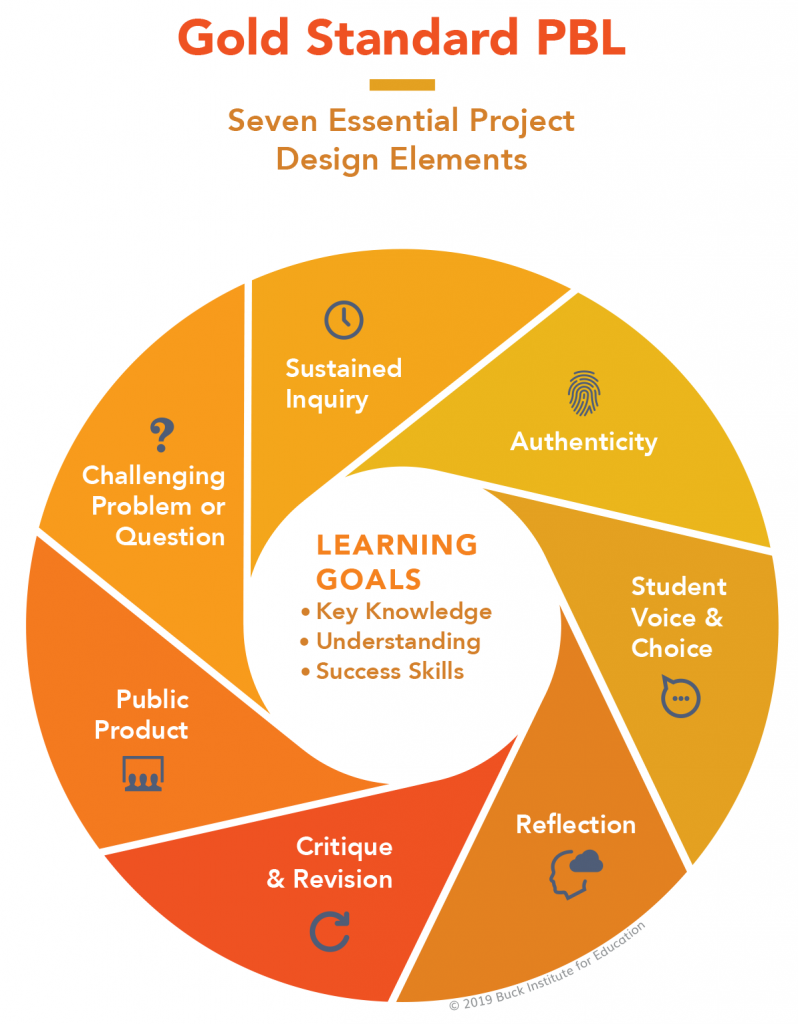
PBLWorks Gold Standard

Authenticity is a hallmark of MYP Design and is supported by the Buck Institute for Education’s PBLWorks Gold Standard.

Gold Standard Project Based Learning (PBL) Seven Essential Project Design Elements
Gold Standard Project Based Learning (PBL) – Seven Essential Project Design Elements by PBLWorks is licensed under CC BY-NC-ND 4.0.

Much of MYP Design is in tune with their research-informed model of project-based learning (PBL). The Gold Standard for PBL from PBLWorks outlines seven essential project design elements:

  • Challenging Problem or Question
  • Sustained Inquiry
  • Authenticity
  • Student Voice & Choice
  • Reflection
  • Critique & Revision
  • Public Product

These elements ensure projects are engaging, meaningful, and rigorous.

The PBL Gold stand elements align well with MYP Design’s emphasis on inquiry, action, and reflection within real-world contexts. MYP Design projects often involve identifying real-world problems and developing viable solutions that resonate with the Authenticity and Challenging Problem or Question elements of PBL.

Hattie’s Effect Sizes and Design

Effect size measures the impact of educational interventions, with Dr. Hattie suggesting 0.4 as an average effect over a school year.

Effect Size - Hattie - MYP Design

In MYP Design, certain high-impact practices identified by Hattie enhance student achievement, highlighting the program’s alignment with effective educational strategies. Here are a few MYP-Design-related practices that stand out:

Feedback (effect size 0.75): MYP Design emphasizes iterative design and feedback cycles, where students refine their projects based on critiques through the four criteria. This practice mirrors Hattie’s findings on the powerful impact of feedback. As mentioned in this post, formative feedback is essential for students to experience the greatest success possible in their summative work.

Self-reported Grades (effect size 1.44): Encouraging students to assess their work in MYP Design fosters self-reflection and self-regulation, aligning with the significant benefits of self-assessment highlighted by Hattie.

Metacognitive Strategies (effect size 0.69): In MYP Design, students are tasked with planning, monitoring, and evaluating their work as part of the design cycle. This approach aligns with Hattie’s identification of metacognitive strategies as highly effective for enhancing learning outcomes.

Teaching MYP Design – Summary

MYP Design, within the IB framework, enhances students’ educational experiences and prepares them for a world that values critical thinking, interdisciplinary connections, and creative problem-solving. It has many moving parts for teachers and students, but the benefits are worth it!

The holistic and comprehensive approach to learning fosters a deeper understanding of academic content across various disciplines. The MYP Design program is also fantastic for cultivating essential life skills such as empathy, collaboration, and self-reflection.

In closing, here are five practical tips to summarize the power and promise of MYP Design:

Leverage the Design Cycle

Familiarize yourself and your students with the four phases of the MYP Design Cycle: Inquiring and Analyzing, Developing Ideas, Creating the Solution, and Evaluating.

MYP Design Cycle Summary in Four Criteria with A, B, C, and D Template Icons

This structured approach helps you stay on target and focuses students to address design challenges and learn to think like designers systematically.

Embrace Inquiry-Based Learning

Use the MYP Design Cycle to encourage students to ask questions, explore, and investigate deeply. This approach enhances understanding of design concepts and fosters critical thinking and creativity, crucial for solving real-world problems. A culture of inquiry will nurture resilience, allowing students to navigate design setbacks without giving up.

Foster an Interdisciplinary Approach

Design is everywhere! It’s an essential aspect of nearly every part of our daily lives, often without us even noticing.

Encourage students to make connections across different subjects. MYP Design naturally integrates with other disciplines, providing a richer educational experience. Highlighting these connections helps students understand the relevance of their learning and how it applies in various contexts.

Provide Timely and Constructive Feedback

Use various formative assessment techniques to provide students with immediate feedback. This best practice could include exit tickets, quick quizzes, and peer reviews. Effective feedback helps students understand their strengths and areas for improvement, guiding them toward better project performance.

Focus on Authentic Problem-Solving

Engage students with real-world problems that require tangible solutions. This approach makes learning more engaging and relevant and helps students develop empathy and understand the impact of their work on others.

Shaping Tomorrow’s Learning

The path of MYP Design teaching is rich with opportunities for educators and students to grow, innovate, and solve meaningful problems. As you apply these strategies in your classroom, you’re not just teaching design; you’re inspiring a new generation of thinkers and creators. Continue to explore, question, and challenge!

STEM Teaching Tools

When I search for STEM teaching tools, I expect to find STEM activities and lessons. These are helpful tools that I can implement in the classroom in a short period of time. I want intuitive resources to help me teach science, technology, engineering, and math in an awesome way. Not just STEM stuff, but STEAM stuff, too!

STEM Teaching Tools desktop with a mouse, keyboard and notebook

This post aims to bring together all the free STEM, STEAM, and MYP Design resources on VistaThink so you, the teacher, can access them in one place. These free STEM resources are mainly for upper elementary and middle school students, but even high school students can find them helpful.

Skip directly to the Free STEM Education Resources section for all of the STEM teaching tools shared on VistaThink.

I will update this post with STEM-related teaching resources as I add new content to VistaThink.

What are STEM Teaching Tools?

These STEM teaching tools are free educational resources in the form of PDF documents and Google documents that cover STEM, STEAM, and MYP Design–nearly all are designed for printing. You will find a variety of materials, such as activity sheets, teacher instructional materials, project guides, and more. Teachers will find materials that align with different age groups, learning levels, and subjects within the STEM field.

I like to get the most out of what I have, and that’s how I design lessons. So, you’ll find lots of low-budget and zero-budget content. When students do experiments or create solutions using regular things, they start seeing how these things can do cool and interesting stuff to solve problems. Constraints produce innovations, and many teachers need and enjoy DIY, budget-friendly materials!

These STEM teaching tools encourage students to think creatively, like inventors. Plus, they learn something big – that even the simplest things can teach us important stuff. An appreciation for what we already have builds gratitude. Also, you’ll notice that these resources do not reference a lot of STEM apps–they are not screen-centric.

What are the 4 Components of STEM?

STEM goes beyond just science, technology, engineering, and math. The STEM components work like a team where all the parts function together to facilitate some improvement.

Science commits to an objective way of investigating and making sense of the world called the scientific method. Math’s ability to quantify physical phenomena creates measurable summaries of understandings. Using both domains can lead to practical problem-solving.

Tall Construction Cranes
Engineering Construction Cranes

Now, engineering and technology? They’re all about finding the best solutions to simple and tricky problems. I like to think of STEM as looking through an engineering lens. Why? Because engineering brings together the most promising power of science, math, and technology–its sole purpose is to solve problems.

Engineering leverages the other STEM as needed components to improve our world.

What are the 4 Cs of STEM Learning?

The 4 Cs of STEM refer to critical thinking, communication, collaboration, and creativity. These Cs can be confused with the four components of STEM. Teachers generally don’t assess the four Cs but should implement them during STEM projects. These areas combine skills and abilities students can develop and enhance over time to become creative, competent, and empathetic problem solvers.

Critical Thinking

Critical thinking is a commitment to asking questions, investigating problems, and finding solutions. When students think critically, they analyze information, weigh different options, and make well-informed decisions. Critical thinking is essential to be a better problem identifier, problem solver, and decision-maker.

Communication

Communication goes beyond speaking. It is the key to sharing ideas, thoughts, and discoveries with others in multiple ways. Good communication can be done through speaking, writing, visual media, cultural awareness–via various means.

In STEM, good communication helps students share and collaborate effectively. Skilled communicators empathize with others through active listening, resulting in a more impactful and meaningful exchange of ideas.

Collaboration

Communication and collaboration go hand-in-hand. Parts of the STEM process should involve rich discussion. For example, when working in a small group, students can brainstorm ideas to solve a STEM problem. A final evaluation of a STEM solution during field trials or performance testing should prompt collaborative discussion for improvement.

Creativity

Creativity is crucial in helping STEM students tackle problems. After researching a problem, brainstorming becomes a vital part of developing creative ideas using STEM resources. However, it’s essential to be mindful of constraints while brainstorming. These limitations can provide focus and direction to student ideas but might also limit the free flow of creative thoughts.

How is STEM used in Teaching?

STEM is used in teaching by solving problems. The problems can be challenge-oriented and short (e.g., one class period). Even better are long-term STEM projects that offer rich, authentic, interdisciplinary experiences. Integrating STEM into your curriculum can create engaging activities that challenge students to think about how science, technology, engineering, and mathematics work together in the real world.

What Does a STEM Classroom Need?

Almost any class can be a STEM classroom. STEM learning is a mindset committed to purposeful problem-solving by skillfully using resources. Every element of STEM does not need to be present for every learning moment, phase, or lesson. A dedicated STEM classroom may not even have a budget!

For example, newspaper and cardboard can be used to prototype models, make STEM-related posters, or create structural components for towers. Used office paper can be folded to build helicopters and airplanes. Rubber bands and used CDs can power up DIY toy cars.

It’s worth repeating: Even when your classroom is well-equipped with STEM resources, it’s essential to recognize the value of low-budget STEM projects. Using everyday items for STEM activities teaches us a crucial lesson: problem-solving does not require fancy equipment.

This cost-effective and innovative approach with STEM teaching tools helps students appreciate what they have and empowers them, especially those from backgrounds with limited resources. For example, students from high-poverty backgrounds can gain confidence knowing they can make a positive impact by using materials readily available in their homes and neighborhoods. It’s an important reminder that innovation and creativity don’t always depend on having a lot of money.

The Critical Sensitivity to Design Questions by Harvard’s Project Zero can be a starting point to help STEM learners slow down and see the value in everyday materials to solve problems.

How Do You Teach STEM Effectively?

Teaching STEM effectively can be a challenging task! However, the right strategies and techniques can be an enjoyable and fulfilling experience for the students and the teacher. STEM learning and problem-solving are inseparable. Even synonymous.

Teaching STEM effectively means there is a commitment to problem-solving. A sequential design process or engineering design cycle can successfully guide and support students through STEM learning experiences. These procedural steps can be an educator’s friend when starting STEM teaching or planning a long-term STEM lesson.

Engineering Design Process Example for Students- Specific Four-step Design Process
The Engineering Design Process

Make STEM Authentic

Authentic STEM challenges captivate students by giving them a role in solving real-world problems. Who benefits from their solutions? What professional shoes are they filling? Why is this problem significant to tackle?

Setting clear, attainable goals helps students understand what success looks like in STEM projects. It’s essential, however, to highlight that success is about more than just the end product working perfectly to solve the problem.

Real learning happens when students understand that successes and setbacks are valuable outcomes–these are essential steps in the process. For example, a paper helicopter that plummets too soon or is way off target (or both) isn’t a misstep—it’s a stepping stone toward figuring out how to keep it aloft as long as possible and descend as straight as possible.

Early success is a terrible teacher. You’re essentially being rewarded for a lack of preparation, so when you find yourself in a situation where you must prepare, you can’t do it. You don’t know how.

― Chris Hadfield

When students view failure as constructive feedback, they are provided opportunities to embrace the growth mindset necessary for systematic problem-solving and innovation. By documenting their journey through note-taking, videos, and photos, they create a portfolio of learning experiences. These crucial events in the STEM learning process showcase progress and provide landmarks to measure and showcase improvements.

STEM projects are not a collection of successful experiments. Effective STEM teaching embraces critical thinking, communication, collaboration, and creativity–the four Cs of STEM. It teaches students that progress—rather than perfection—is the hallmark of valuable learning in STEM.

Free STEM Education Resources

This collection of STEM teaching tools reflects my journey in creating and sharing educational content, a journey I’m excited to share with you!

Check out these free STEM, STEAM, and MYP Design resources for your students. Available as user-friendly PDFs and Google documents, they include activity sheets, teacher instructional materials, and project guides to engage students across various age groups, learning levels, and STEM subjects.

This collection will evolve and grow as I continue exploring and blogging about new ideas in STEM, STEAM, and design education.

If you find these resources helpful and wish to support their ongoing development, I would love a cup of coffee (donation). Newest resources are first!

KEVA Block Challenge: Hands-On STEM with Tinkercad

This classroom-tested STEM lesson combines physical KEVA Block builds with digital modeling in Tinkercad Sim Lab. Students explore motion, friction, stability, and engineering design by trying to keep a ping pong ball moving as long as possible within a fixed space and with a fixed number of blocks. The post includes reflections from more than 35 K–5 classes, free Google Slides lessons, data sheets, and practical tips for managing hands-on STEM challenges in real classrooms.

The Power of Storytelling in STEM

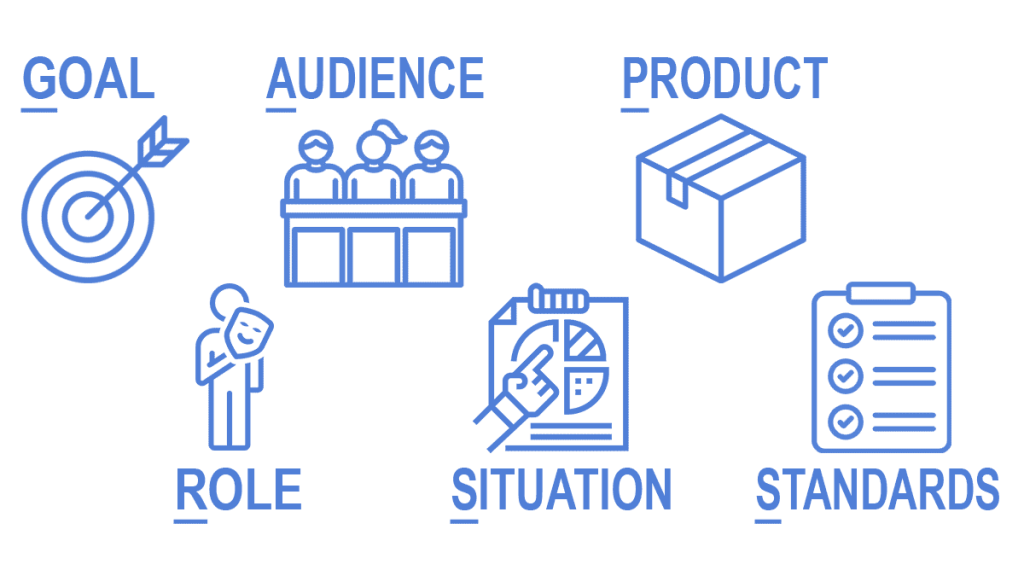
This post emphasizes storytelling to enhance STEM education. It highlights the GRASPS model (Goal, Role, Audience, Situation, Product, Standards for Success) for framing engaging, student-centered STEM activities. After reading Charlotte’s Web, students are tasked with designing and building parachutes to safely transport the baby spiders away from Charlotte and deliver them directly to Wilbur.

MYP Digital Design

MYP Digital Design explores solving a community problem by focusing on 3D robot design in Peruvian culture. The unit covers each criterion of the MYP Design Cycle using tools like Tinkercad and Google Slides.

  • MYP Digital Design GRASPS Scenario (PDF) (Google Doc)
  • MYP Digital Design Help Resources (PDF) (Google Doc)
  • Typography and Cultura Chicha Fonts (PDF) (Google Doc)
  • Cultura Chicha Colors (PDF) (Google Doc)
  • Mitsuku Chatbot Example Conversation (PDF)
  • Concepts and Inquiry Statements and Questions (PDF) (Google Doc)
  • Criterion A – Inquiring and Analyzing Student Document (PDF) (Google Doc)
  • Criterion B – Developing Ideas Student Document (PDF) (Google Doc)
  • Robot Prototype Dimensions (PDF)
  • Robot Promotional Poster Example with Photoshop (PDF)
  • Robot Promotional Poster Example with Google Draw (PDF)
  • Criterion C – Creating the Solution Student Document (PDF) (Google Doc)
  • Student Presentation Template (PDF) (Google Slides)
  • Criterion D – Evaluation Student Document (PDF) (Google Doc)
  • Criterion D Evaluator Notes (4 per page; PDF) (Google Doc)
  • Presentation Logistics Example for 20 Students (PDF) (Google Doc)
  • Evaluation Data Help – What is an Outlier? (PDF)

Upcycling Ideas for Students

How can students creatively reuse materials to make new products that add value? The message here emphasizes the educational value of noticing and seeing the value around us. The GRASPS model frames the purpose of the project. Upcycling fosters environmental awareness and creativity among students through hands-on activities.

MYP Design Cycle Summary in Four Criteria with A, B, C, and D Template Icons
MYP Design Criteria A, B, C, and D

MYP Design Cycle Template

Teachers needing help with MYP Design can benefit by starting with an MYP Design Cycle Template as part of their unit planning. This post provides insights on constructing effective performance task scenarios using GRASPS, designing criteria documents using CRAP principles, and includes examples and practical tips for MYP Design teachers.

MYP Design Project Ideas from Science

This blog post guides teachers on integrating science with the Middle Years Program (MYP) Design Cycle. This information is great for teachers new to MYP Design and explains how the scientific method and design process are similar and different. It provides tips for creating MYP design projects using science experiments.

Paper Helicopter Experiment Template Technical Diagram
Paper Helicopter Template Technical Diagram

Paper Helicopter Experiment

Have you ever wondered how to turn simple paper materials into a fascinating science lesson? The Paper Helicopter Experiment blog post uses everyday materials to teach students about gravity, lift, and air resistance. These free resources include various types of paper helicopter templates. The complete Paper Helicopter Experiment lesson (purchase link) is available on Teacher Pay Teachers. Perfect for educators looking to engage students with easy hands-on STEM activities! Each document is one page in size.

Engineering Design Process Example

Are you looking for a way to introduce the Engineering Design Process (EDP) in your STEM classroom? The blog post Engineering Design Process Example breaks down the EDP into easy-to-understand steps, offering practical instructions for classroom implementation and project-based learning. Ideal for educators new to EDP or STEM, this guide helps engage students in hands-on, low-budget problem-solving activities.

Water Tank Engineering with Newspaper (Part 1 and Part 2)

The Water Tank Engineering with Newspaper (Part 1 and Part 2) blog post details a hands-on MYP Design unit, which involves creating water tanks made from newspapers. The process goes through each criterion of the MYP Design Cycle, focusing on research, brainstorming, prototyping, and evaluating. These complete lesson resources benefit teachers looking to integrate practical engineering and problem-solving skills into their curriculum with an MYP approach. It’s a great way to start the school year with Year 1 students who are new to MYP Design.

Effective Habits of Learning

The Effective Habits of Learning blog post offers teachers strategies for developing students’ non-academic skills, essential for academic and personal growth. It focuses on the Middle Years Program (MYP) and covers crucial habits like time management, independent and active learning, inquiry-based learning, reflection, effective communication, and cultural awareness. These free resources are helpful for teachers who want to foster lifelong learning skills in their students, equipping them for success in an ever-evolving world.

Paper Airplane Design, Data, and Discovery

Have you ever wondered how a simple paper airplane can turn into a fascinating science lesson or a warm-up to MYP Design? The Paper Airplane Design, Data, and Discovery blog post offers just that. It guides students in making and flying paper airplanes to travel as far and straight as possible to teach students about the MYP Design Cycle.

MYP Design Assessment Criteria Modified

This post gives teachers a revised approach to the MYP Design Assessment Criteria. It discusses changes to help learning like reordering achievement levels, using color coding, and adapting the grading scale. The modifications aim to enhance student understanding and achievement in design thinking, focusing on empathizing with audiences, brainstorming, planning, and evaluating solutions. These ideas are constructive for middle school teachers looking to assess and guide students in design projects effectively. Each PDF document is one page long.

STEM Teaching Tools Summary

In this blog post, I’ve compiled an extensive collection of free STEM Teaching Tools for my fellow educators, perfect for upper elementary through high school students. On VistaThink, you’ll find a variety of educational materials, including PDFs, Google documents, activity sheets, and project guides, all aimed at making teaching in STEM, STEAM, and MYP Design more engaging and effective.

These resources are designed to suit different learning levels and emphasize low-budget, DIY strategies to spark creativity and practical problem-solving in the classroom. I slowly and regularly update the site with fresh content, so watch for new tools!

If these resources help your teaching journey, I’d be psyched if you could support my work and buy me a cup of coffee (donation).

I’m excited to share these tools with you, hoping they’ll inspire your students to see the wonder in everyday materials and discover the joy of learning in STEM, STEAM, and MYP Design!

The Power of Storytelling in STEM

This post includes six free, ready-to-use STEM storytelling resources for educators, including GRASPS scenarios and printable activities. Jump to the six free STEM storytelling resources or keep reading to learn how storytelling can make science, technology, engineering, and math more relatable and engaging.

The power of storytelling in STEM lies in its ability to spark curiosity, build connections, and inspire students to explore STEM subjects with enthusiasm.

While many busy teachers struggle with time constraints, they also face the challenge of creating captivating STEM lessons that meet the necessary standards. Similarly, students who find STEM subjects complicated or intimidating may need assistance forming a meaningful connection with the material.

The Power of Storytelling in STEM. Four-part STEM icon (Science, Technology, Engineering, and Math) with a storybook and two lightning bolts.
How The Power of Storytelling in STEM Boosts Student Understanding

Fortunately, there is a powerful tool that educators can use to make STEM more accessible and engaging for all learners, particularly at the elementary level: The Power of Storytelling in STEM.

This blog post will explore how stories can be leveraged to teach STEM topics effectively. By combining narratives with STEM concepts, educators can create engaging lessons that enable students to connect with the material on a deeper level. I tend to focus on upper elementary and lower middle school students, but you can use these resources for other grade levels as well.

So, what exactly is the power of storytelling in STEM? How can educators harness this resource to create effective and engaging lessons? Let’s dive in and explore how stories can enhance STEM education.

Using GRASPS to Harness The Power of Storytelling in STEM

The GRASPS model, developed by Jay McTighe and Grant Wiggins, is a framework for creating student-centered, inquiry-based learning experiences.

Their best-selling book, Understanding By Design (commonly referred to as UbD), covers the philosophy behind the GRASPS model. The authors advocate for the design of meaningful and authentic learning experiences for students.

In a STEM-based GRASPS, students create something (usually a product) to solve a problem for a client/audience. Designing and creating physical solutions can make learning more tangible and applicable to real-world situations.

The GRASPS acronym stands for:

  • Goal: What is the problem to be solved?
  • Role: What role will students assume in this STEM learning experience? Who are they?
  • Audience: Who will students be solving this problem for?
  • Situation: What is the context or scenario for this learning experience?
  • Product/Performance: What will students create to solve the problem?
  • Standards and Criteria for Success: What are the critical design specifications of a successful solution?

The GRASPS is a valuable tool for educators to connect the vital elements of a context and create a compelling story for a STEM project or activity. This model helps teachers frame a scenario as a brief story in which students are the main characters with a problem-solving purpose!

The Power of Storytelling in STEM. GRASPS scenario: Goal, Role, Audience, Situation, Product, and Standards for Success.
GRASPS Scenario: Goal, Role, Audience, Situation, Product, and Standards for Success.

Engaging Students with The Power of Storytelling in STEM

Encouraging students to visualize themselves as the main characters in a story can work wonders in terms of enhancing their interest and comprehension. By immersing themselves in the narrative, students can more easily relate to the material and more deeply engage with the subject matter. This technique can create a more enjoyable and effective learning experience. The longer the lesson, the greater the GRASPS’s importance in initiating and maintaining buy-in. A GRASPS provides a clear framework to guide students through a successful STEM project or activity.

Writing a GRASPS scenario can be a solid starting point for teachers when developing a unit. It can help organize resources and ensure the lesson aligns with the intended learning outcomes. The brief nature of the GRASPS makes it a time-efficient tool for creating lessons as well.

GRASPS Performance Task Examples

There are many GRASPS resources online to draw inspiration. Author and educator Jay McTighe shares math and social studies examples for educators to create project-based learning activities. The sentence starter statements he shares for each part of the GRASPS offer teachers ways to get their thinking going when writing a scenario.

The Product in GRASPS

Suppose you need to figure out what students could make to solve a STEM problem (i.e., the Product). This PDF resource also offers 80-ish ideas separated into three categories: written, oral, and visual.

An actual physical product is an excellent option to strengthen engagement and show evidence of STEM learning. Physical manifestations of learning through the creation of products can reveal hidden skills and easily showcase thinking for stakeholders. For example, during a special event at school where parents visit the classroom, presenting an actual physical product like an aluminum foil boat or a paper helicopter can be an exciting way to engage visitors. These authentic creations show parents what students have learned in STEM, highlighting their skills and creativity.

GRASPS Model Visual Example

Presenting the GRASPS to your students can be done in many ways. When I taught MYP Design, I wrote the document to be at most one page and chunked the text by each component of the GRASPS. Text formatting, such as bold or more prominent font, can help reading comprehension by emphasizing essential words or ideas, making them easier to find and remember. Providing the GRASPS in physical and digital formats makes it easier for students to use and get into the scenarios.

I like to print the GRASPS on paper and then glue them onto corrugated cardboard. One document per student table provides easy access. The cardboard feel can make the scenario more tangible, official, and important. Plus, it’s cheap and takes little time to set up.

Instructional Graphics

Creating a digital presentation with clear and simple graphics for each part of the GRASPS is very helpful for buy-in and comprehension. For English Language Learners (ELLs), visuals can be especially beneficial in reducing language barriers, aiding in understanding new concepts, and providing a more inclusive STEM story learning experience.

Here are two GRASPS examples as digital presentations with visuals:

Incorporating multimedia elements like pictures and videos makes learning more engaging and enjoyable. I prefer the minimum amount of visuals to boost engagement and interest. It’s worth noting that Mayer’s multimedia theory states adding too many pictures or videos to teaching materials can make learning more challenging. That is, too much to look at and process makes it difficult for students to retain information. Mayer and Moreno’s (2003) research shows that removing unnecessary visuals helps students understand better.

While creating visuals may take more time, the process of designing them can also clarify an educator’s thinking about the lesson and result in more effective teaching. I’m currently using The Noun Project for line art, and it’s been simple and solid for creating visuals for my instructional materials. They offer educators a discount as well!

GRASPS Success Criteria

The power of storytelling in STEM requires that students engage in meaningful tasks. In contrast, traditional learning and assessment focus on content coverage and recall.

Alison Yang makes a great point about leveraging the power of the GRASPS. She contrasts what not to do with what should be done with regard to the success criteria in the GRASPS.

Success criteria should focus on what the student should do to meet the goal in their role as described in the GRASPS. It should not reference the assessment that you may be using for feedback and grades.

The GRASPS Helps with Metacognition

Alison Yang also emphasizes the GRASPS’s power in developing metacognition. By grappling with a STEM-related problem, students better understand what is required of them, thereby reflecting on their strengths and reducing confusion. Focusing on another’s needs while acting in a specific role naturally promotes self-assessment while getting at the best possible solution.

Solving problems for others opens doors for empathy. Empathy involves the ability to understand the thoughts and feelings of others. Metacognition consists of the ability to understand one’s own thoughts and feelings. Empathy and metacognition may be two sides of the same coin! Utilizing STEM-related tools like the GRASPS framework to cultivate metacognition and empathy can foster a caring and inclusive classroom environment.

Books and STEM Activities

In upper elementary and lower middle schools, chapter book studies often involve a combination of individual reading, group discussions, and written assignments. Chapter book studies are typically done in an English language arts class.

The power of storytelling in STEM can be achieved through fictional stories that explore scientific concepts or real-life examples that showcase the practical applications of engineering. Regardless, in almost any story, you can find a problem to be solved where a STEM-based solution applies. The University of British Columbia cites multiple examples of the power of storytelling in STEM, especially for girls.

Engineering in STEM

As a balance to the language arts learning in stories, STEM is a great fit. I prefer to focus on the engineering part of STEM. At its heart, engineering is problem-solving. It is the driver to leverage science, math, and even technology to develop solutions by designing and building things that work efficiently and effectively. Since engineering naturally incorporates the other STEM areas well, try focusing on the power of storytelling in STEM as an engineering problem.

GRASPS Focus on the Audience to improve their lives by solving the problem
Focus on the Audience, Improve their Situation, Solve their Problem

But not just any engineering problem. Engineer a solution to focus on the A in the GRASPS–the audience. Make the audience’s life better by choosing a meaningful problem to solve for them. Choose a relevant story or narrative that resonates with the students and has a relatable character facing a challenge or problem that can be addressed through STEM. The story should evoke empathy and a desire to improve the character’s life.

STEM Story Example: Engaging Education

There are lots of classic stories that meaningfully connect with students and STEM. For example, Charlotte’s Web by E.B. White is considered a classic because of its timeless themes, universal appeal, and beautifully written prose. The illustrations are also simple, understated, and easily capture the characters’ emotions and interactions.

STEM Activities for Charlotte’s Web

Spoiler alert here, just in case! Toward the end of the story, Charlotte’s wish for her baby spiders, when they fly off into the world, is for them to lead long and happy lives. Before she dies, Charlotte spins an egg sac and lays her eggs, and when the eggs hatch, her offspring begin to spin their own webs.

As they mature, Charlotte’s baby spiders begin to balloon, or float away, on their webs to start their own lives. Before they go, Charlotte tells Wilbur, the pig, to make sure they’re okay and reminds him to be a friend to them.

Charlotte's Web Spider Parachute STEM Activity
Charlotte’s Web Baby Spider Parachute

There are many STEM examples of spider parachute activities online to recreate this touching and bittersweet event in the story. Tissue paper, coffee filters, and plastic bags can serve as parachutes. Thread, ribbon, or string fasten the parachute to the baby spider or holder.

Paper cups or cardboard egg container sections can hold a plastic or paper spider and provide a balancing mass. Paper spiders can be attached directly to the parachute cords (if massed appropriately). The baby spider load plays a critical role in regulating the descent speed and stability of the parachute system. Even a paper wad can do the trick. In fact, many variables are involved in the nature of the descent of a parachute!

However, more clarity is needed to determine what is a successful design. Creating a functioning parachute may be sufficient for a successful engineering design for lower grades. What would be the standards and criteria for a successfully engineered parachute for older students?

Solving STEM Problems Through The Power of Storytelling

Here’s a GRASPS example that leverages the power of storytelling in STEM with a focus on Charlotte’s baby spiders. It’s written for upper elementary students. The success of the engineering design is determined quantitatively, and students are incentivized with an emotional hook.

  • Goal – Help Wilbur fulfill his promise to Charlotte! Design and build parachutes to safely transport the baby spiders away from Charlotte and deliver them directly to Wilbur.
  • Role – You are part of the Zuckerman Farm Wellness Team! Your essential mission is to keep everyone safe and happy on the farm.
  • Audience – Your audience is Charlotte’s baby spiders, who must skillfully float away from their mom and securely reach their final destination, Wilbur himself.
  • Situation – As a dedicated Zuckerman Farm Wellness Team member, you are tasked to help Charlotte’s babies safely leave their mother. Like Charlotte, you want to ensure her baby spiders have a safe and successful journey as they balloon away to begin their new lives. Your task is to design and build parachutes to safely transport the baby spiders away from Charlotte and deliver them directly to Wilbur, the pig.
  • Product – You will create a functional parachute prototype capable of descending gently through the air while securely carrying a baby spider. It should provide a controlled and accurate drop, landing as close as possible to Wilbur.
  • Standards and Criteria for Success
    • Accuracy: The baby spiders shall land as close as possible to Wilbur, the pig.
    • Safety: The baby spiders shall remain secure and unharmed throughout their flight and landing.
    • Consistency: The parachute shall work the same way every time it is used.

GRASPS Details

For this engineering problem, help students gather data as they test the parachutes. Visual descriptors such as close, medium, and far allow younger students to communicate results. Measuring the distance from the parachute’s landing spot to Wilbur is more precise. Try to control variables–a consistent drop height above the target helps acquire accurate results. After multiple flight trials, you can summarize the flight data with mean, median, and mode to best determine accuracy.

Consistency is vital in engineering because it helps us trust that things will always work the same way. When something is consistent, we can rely on it to do its job correctly and safely. We want our audience to trust our designs! Students can build trust in their parachute prototypes with multiple tests. For example, one successful flight out of ten would not be a successful design. A parachute that lands close to Wilbur the pig over and over would be a successful design.

Free Resources to Unlock The Power of Storytelling in STEM

To unlock the full power of storytelling in STEM with the cherished classic tale of Charlotte’s Web, check out these free STEM resources for teachers! After you build your baby spider parachutes, place Wilbur on the floor and aim the babies for his loving heart.

Most of these teacher STEM resources come in PDF format for easy printing and minimal ink use. Also, a Google Slides version of the GRASPS scenario is available for you to customize according to the needs of your students. So, dive in, and embark on this thrilling adventure with these free printable STEM activities to save the baby spiders!

  • GRASPS Scenario with Graphics (PDF)
  • GRASPS Scenario with Graphics (Google Slides; makes a copy)
  • 20 Small Baby Spiders (PDF)
  • 12 Medium Baby Spiders (PDF)
  • 4 Large Baby Spiders (PDF)
  • Wilber the Pig, Heart Target (PDF)

Wrapping Up the Power of Storytelling in STEM

I hope you found this blog post on the power of storytelling in STEM using Charlotte’s Web as an example informative and inspiring! Storytelling has the incredible ability to engage and captivate young minds. Combined with STEM concepts, it becomes a powerful tool for teaching and nurturing curiosity. Using a beloved story like Charlotte’s Web can unlock the imagination and make complex topics more relatable and accessible to children. Keep exploring the possibilities of incorporating storytelling into your STEM lessons or activities!

Strands D.1 and D.2 in MYP Design

Managing all sixteen strands of the design cycle can be challenging for both new and experienced MYP Design teachers. Evaluating the effectiveness of students’ design solutions is a critical aspect of Criterion D. Strands D.1 and D.2 in MYP Design play a vital role at the end of the design cycle. They provide students with a roadmap for testing and analyzing the success of a design solution.

MYP Design Criterion D Evaluating Strand D.1 and Strand D.2
MYP Design Criterion D Evaluating – Strand D.1 & Strand D.2

Strand D.1, the testing plan, should describe the methods for testing based on the design specifications created in Criterion B. This plan involves evaluating specifications through internal testing, interviewing clients and users, observing users interacting with the product, and more. Strand D.2 summarizes the test data and determines the product’s success, which then informs ideas for improvement in Strand D.3.

If you want to help your students create successful solutions in MYP Design, it’s helpful to understand the significance of Strands D.1 and D.2. By learning how to use them effectively in your classroom; you can guide your students through the design process and help them succeed. Your students will better understand the importance of testing and analyzing their designs, making them better designers.

Generating Hypotheses

Generating hypotheses before testing is valuable for engaging students in an MYP unit that spans multiple weeks. It may seem like an extra thing to do, but it can lead to increased motivation as you begin to close out Criterion D.

Quantifiable hypotheses are easier to collect, summarize, and contrast with the final testing results. Differences in what students predict regarding testing outcomes and actual results can foster discussions leading to deeper engagement. Sharing these differences as part of the problem research in Criterion A may also build better buy-in during Criterion D.

By actively participating in the inquiry process, students also develop a deeper understanding of the concepts studied as they connect theoretical knowledge to real-world scenarios.

Design Testing Methods – Strand D.1

Strand D.1, in MYP Design, focuses on testing methods to measure the success of a student’s design solution. The MYP Design Guide states that Year 1 students should outline simple and relevant testing methods to generate data for the highest achievement level. By Year 5, to achieve the top marks, the student should describe “detailed and relevant testing methods, which generate accurate data, to measure the success of the solution.”

There are five classifications of testing methods for Criterion D:

  • expert appraisal
  • field trial
  • performance testing
  • user observation
  • user trials

For example, consider an engineering MYP Design unit, such as designing a helicopter to fall straight and slowly. Performance testing would be the most suitable test compared to other types of tests for several reasons.

MYP Design Criterion D Evaluating. Testing to Determine the Success of the Solution
MYP Design Criterion D – Testing to Determine the Success of the Solution

Performance Testing

Performance testing generates quantifiable data, which is crucial when designing a helicopter prototype that needs to stay aloft for as long as possible and descend as straight down as possible. Time and distance can easily be measured objectively to show performance metrics.

These data can be used to compare different designs and make informed decisions about which helicopter design is best suited for the goal of the unit as defined by the GRASPS. Easily measurable testing data should be a factor in organizing your MYP Design units for the year. That is, units that require performance testing that yield easily quantifiable data should start the school year.

Secondly, performance testing can create the conditions the paper helicopter may experience in flight. This setup helps to ensure that the design is appropriate for the intended use as a prototype. For instance, wind conditions could be simulated (if that were part of the GRASPS scenario) to see how the paper helicopter performs under varying wind speeds and directions.

Performance testing provides an objective evaluation of the design. Subjective opinions or biases do not influence the test results but indicate how the design performs under the design specifications generated in Criterion B.

Lastly, performance testing allows for an iterative design process, where the results obtained from the test can be used to make changes and improvements to the design. I love this part about units that lend themselves to performance testing. These data are usually easy to communicate and share with future classes as part of Criterion A‘s research material.

Other MYP Design Testing Methods

Expert appraisal requires an assessment of a design by an expert in the field to provide feedback and suggestions for improvement. This requirement may seem complicated; however, parents or siblings could be experts. Some research is necessary! One way around this is to role-play as an expert. Check out my MYP Digital Design post for ideas.

Field trials need a real-world test of a design in its intended environment to authentically gather data and feedback on its performance. Beginning Year 1, designers may still need to gain the skills to create and market a product for this type of test. An MVP is the most basic version of a product that could be developed and released to a potential market, with just enough features to meet the needs of the client/audience. It can generate rich feedback to improve the product’s next iteration.

User observation involves systematically observing actual users interacting with a design to identify usability issues and potential areas for improvement. Upcycling to make a perfect gift and gathering user satisfaction over time requires user observation.

Finally, user trials consist of a controlled test (or tests) of a design with actual users to gather data and feedback on its usability, effectiveness, and user satisfaction.

Evaluate the Success of the Solution – Strand D.2

Strand D.2 in Criterion D MYP Design requires students to critically evaluate the success of their solution based on authentic product testing. This evaluation involves testing the product against each design specification established in Criterion B.

This task is easier said than done! A final highlight of the unit tends to be the testing–putting the solution in play to see how well the problem was solved. What if the design has many design specifications? Objectively evaluating each could be unrealistic. Also, you’re deep into the design cycle at this point in Criterion D. Student stamina for learning might be diminishing.

Methods of Evaluation

One method to evaluate the success of the solution is to have students select preset written descriptors to categorize each specification based on their best perspective on how well it was met. Clear prewritten statements to choose from are also beneficial for English Language Language Learners (ELLs). Here are examples from engineering a paper water tank:

  • Exact – Your team’s tank exactly met the design specification.
  • Close – Your team’s tank mostly met the design specification.
  • Middle – Your team’s tank met some of the design specification.
  • Far – Your team’s tank met none or very little of the design specification.
  • NA – You are unsure how your team’s tank met the design specification.

Ranking design specifications using a numeric scale can sustain student engagement, connect learning to Criterion B’s design specifications, and honor the design process without overdoing it.

For example, when upcycling plastics to create a gift, students can use a ranking scale (5 = met perfectly, 1 = did not meet at all) or a short written comment to evaluate their product against each specification. The goal/problem introduced in the GRASPS should be a focus among the design specifications and may warrant a written justification.

Data collected from the evaluation of the solution against the design specifications should be archived. They can be used as credible and authoritative research material for future classes. The data can be used in Strand A.2 to identify and prioritize research.

Fail Forward

Testing data of a solution, even if it shows failure according to design specifications, can serve as student exemplars for future classes. Student-generated results data offer authentic insights into the design process and potential areas of improvement. Analyzing successes and failures can lead to the development of new design criteria, which can improve the product. In addition, when we analyze both successes and failures, it can provide future students with a better understanding of the design process and help them avoid making the same mistakes.

Strands D.1 and D.2 in MYP Design Summary

Criterion D is a fundamental aspect of the MYP Design Cycle. Within this criterion, Strands D.1 and D.2 are crucial for evaluating the effectiveness of a student’s design solution. Strand D.1 outlines the methods for testing the design solution. This strand should include evaluating a solution’s functional requirements through the testing methods referenced in the MYP Design Guide. On the other hand, Strand D.2 focuses on summarizing the data gathered through testing and using it to determine the product’s overall success.

Understanding these strands is crucial to guide students in creating successful design solutions. Managing all 16 strands of the design cycle can be challenging! Strands D.1 and D.2 in MYP Design provide a blueprint to students for evaluating the effectiveness of a design solution. Adding depth to these strands with hypotheses and connections to other criteria enhances each student’s MYP Design experience.

MYP Digital Design

MYP digital design comes in many forms. Website design, game design, and coding are some examples. This MYP digital design unit evolved from working with Year 1 (sixth-grade) students at the American School of Lima in Peru, South America from 2015 to 2019.

MYP Digital Design. Robots in Lima Cultura Chica Poster (Art Inspired by Bidkar Wilson Yapo Pomahuali) for MYP Digital Design
Robots in Lima Cultura Chicha Poster Art Inspired by Bidkar Wilson Yapo Pomahuali

The rich cultures of Peru inspired our unit! With this MYP digital design example, students wrapped up their design year by exploring:

  • the role of artificial intelligence
  • spatial thinking
  • culture
  • color theory
  • empathy
  • typography

We called our unit Robots in Action. This MYP digital design lesson offers educators interdisciplinary (IDU) opportunities to provide students with a more holistic and meaningful learning experience.

Use and modify these free design resources with a focus on your student’s communities. A link back to VistaThink is always appreciated!

What is MYP Design?

MYP Design is part of the International Baccalaureate® (IB) education program. MYP stands for Middle Years Program and serves students in grades six through ten. In MYP Design, students learn to apply practical and creative thinking skills to solve a wide range of design problems. Teachers have lots of choices for design units in the MYP. This paradox of choice of topics can be both helpful and overwhelming!

MYP Design is a form of project-based learning. In both approaches to learning, students work on a project over an extended period. The interdisciplinary experience allows students to apply knowledge and skills from different subject areas. MYP Design and project-based learning emphasize student-centered learning, collaboration, and real-world problem-solving.

The MYP’s global focus naturally encourages real-world problem-solving in MYP Design to be more culturally responsive. Compared to traditional project-based learning, MYP Design will incorporate cultural perspectives, practices, and values into the curriculum. MYP Design units promote diversity and equity and the underrepresentation of marginalized groups, such as women and Indigenous peoples. This Robots in Action unit asks students to think about who has the greatest need in their city and to try to help that group.

What is Digital Design in MYP?

Digital design, like physical design, uses the MYP Design Cycle to guide students through a comprehensive problem-solving process. Students learning design create computer-generated digital products that target a problem for specified client/target audience. Experiences with design technology facilitate the development of design literacy.

What is the MYP Design Cycle?

Sometimes called the IB Design Cycle, the MYP Design Cycle guides students through a comprehensive problem-solving process. The sequential steps empower students to develop the best solution for their client/audience.

MYP Design Cycle Outline with Criteria A, B, C, and D

MYP digital design with 3D Tinkercad robots is fun and engaging, allowing kids to go off-script and show off their digital design skills. The unit involves lots of creative conceptualization and technical complexity. It would not be a unit to start MYP Design with Year 1 students and functions better to close out the year. Even with more experienced MYP Design students, beginning the school year with a more well-defined approach to the design process is best. For example, a more straightforward engineering unit would be better for an introduction into MYP Design.

GRASPS Model Example

The Wiggins and McTighe GRASPS model outlines the essential elements of the unit while adding authenticity to the experience:

  • Goal – You will design a robot prototype with 3D software. The intended function of the final robot is to help people in the neighborhoods of Lima, Peru. You will also create a presentation about the robot and its service capabilities within a Lima community.
  • Role – You are a futurist and visual designer hired by the city of Lima to create a culturally relevant and empathetic robot prototype to help people in Lima, Peru. Some examples of the areas of service are care for older adults, social buddy, K-12 education, community building, law enforcement, medical services, transportation services, health and wellness, infrastructure maintenance, traffic management, search & rescue, entertainment, job training, etc.
  • Audience – Your immediate client is the city government of Lima. Your eventual audience are the residents of a Lima neighborhood.
  • Situation – The city of Lima’s mission is to help its citizens thrive, and robots are part of the plan. Regardless of people’s perceptions, modern robots are coming to Lima! But to do what? How will they help people? Will they function as aides, companions, friends, co-workers, lawyers, authority figures, schoolmates, counselors, or… something or someone else? You will design Lima’s first robot prototype to work with a small or large population of people and create informational material that explains the robot’s role and function in the community.
  • Product – You will create a digital 3D robot prototype and a corresponding presentation to explain its essential functions.
  • Standards for Success – Your digital robot prototype shall:
    • look humanoid
    • look like its primary purpose (e.g., senior care worker, pet care provider, social companion, etc.)
    • incorporate aspects of Peru’s Cultura Chicha for community integration
    • base its service function(s) on empathy

The browser-based application Tinkercad is used to design the digital 3D robots. Toward the end of the unit, we printed models that were accurately sized and configured.

3D Tinkercad Digital Robot Sreenshots with Peru’s Vibrant Cultura Chica Colors
3D Tinkercad Digital Robot with Peru’s Vibrant Cultura Chicha Colors

Students used Google Slides to present their prototypes in an elevator pitch/PechaKucha style. By this point in the school year, students knew the basics of Adobe Photoshop to help with some of the graphic design. However, Photoshop is optional for creating the visuals for the presentations in Criterion C.

What is La Cultura Chicha?

Peru’s Cultura Chicha is represented in music and art with a rich history and an evolving, modern expression. Lesley University in Massachusetts shares an in-depth and knowledgeable article about Cultura Chicha. I love this quote from the author because it inspires the spirit of this MYP digital design lesson:

Even though the separation of classes still heavily defines Lima’s society today, it is both Chicha music and Chicha art that has manifested itself as being wholly “Peruvian,” while maintaining its status as the aural and visual representation of the working class.

Lesley University

Chicha music is the fusion of Afro-Peruvian music and cumbia. It comes from the working class in Peru and is very popular. The traditional sound is created by guitars, drums, and accordions. This music has become more mainstream in Peru because it has been embraced by many new artists.

During sketching and Criterion C build time, we would enjoy music from El Chacalón y la Nueva Crema. El Chacalón (Lorenzo Palacios Quispe) rose from poverty in the 1980s to become a famous Peruvian cumbia singer and songwriter.

One of the main reasons that this music has become so popular is because it’s seen as a way to express oneself freely. The lyrics are often about love and poverty, which are topics that people can relate to easily. The neon fluorescent vibe of Chicha art with its big, bold typography is also a way for people to express themselves visually (and easily) without being too explicit or politically charged.

Cultura Chicha Style Posters on the Street in Chiclayo, Peru

Working with Tinkercad in MYP Digital Design

MYP digital design is a natural fit with 3D modeling! Students created their robots with Tinkercad, a free, web-based software used to create 3D designs. The app has an intuitive interface that is easy to learn and use. A mouse helps with navigation, creating, and editing. Trackpad navigation is more difficult.

Tinkercad tutorials are available online for beginners who are new to the software. There are also in-depth tutorials on how to use the software for more advanced designs. Students can create almost anything they want with this software. Keychains, jewelry, and even modern jet models are options. Tinkercad includes a 3D modeling software library of shapes and an online community of model contributors.

Teachers can set up classes and invite students to join via a class code. Students log in to Tinkercad with their Google accounts. Tinkercad also integrates with Google Classroom. If you’re looking for standards alignment, the lesson plans offered by Tinkercad integrate with ISTE, NGSS, and Common Core.

Custom Colors in Tinkercad

Coloring Models

Tinkercad’s custom color choices can produce precise Cultura Chicha colors. There are many free online apps to extract hex values from the array of Chicha images online. Canva is fast, requiring no login, but only yields four colors. Copying the hex value right from the swatch is a nice feature.

Adobe Color is also free, and no login is required. Go to the Extract Theme menu option, then upload an image to extract its colors. After I uploaded a screenshot of a Cultura Chicha poster from Google Street View, the app pulled five colors, and copying hex values was super intuitive. Moving around the color-pick-up circles over the image to generate new color choices and playing with moods can inspire the palette.

Color Palette Generated from Lima, Peru Chica Art Poster Using the Web App Adobe Color
Color Palette Generated from a Lima, Peru Chicha Art Poster Using Adobe Color

MYP Digital Design Unit Plan

I prefer a unit plan with the basic elements to focus on the essentials for students. Your IB MYP Coordinator may require a more comprehensive array of lesson components. The IB’s Evaluating MYP Unit Planners guide outlines the elements of a unit planner for the MYP if you need more details.

Although not an official component of an MYP Design Unit Plan, start with the GRASPS, and let the student questions come. Once students are familiar with the nature of the lesson, work your way into MYP Design Criterion A – Inquiring and Analyzing.

Presenting and discussing the Statement of Inquiry and Inquiry Questions adds authenticity to the purpose of your student’s efforts in the unit. For some units, inquiry questions may fit naturally into Criterion A, and may deserve a revisit in Criterion D.

Key Concept

  • Communities and Systems

Related Concepts

  • Innovation, Function, Perspective

Global Context

  • Personal and Cultural Expression

Statement of Inquiry

  • The function of a system relates to the environment in which it operates.

Inquiry Questions

  • Factual Question – What different jobs can robots do?
  • Factual Question – What major parts do most robots have?
  • Conceptual Question – How does the form/shape of a robot relate to its function?
  • Conceptual Question – How does the form/shape of a robot relate to its environment?
  • Debatable Question – Why do robots need to help humans in empathetic ways?

Criterion A – Inquiring and Analyzing

MYP Digital Design. Robots in Action. Criterion A - Inquiring and Analyzing
MYP Digital Design – Robots in Action – Criterion A

During Criterion A, students practiced sketching, which helps with the Criterion B requirements. Sketching can be physical (e.g., pencil) or digital. For MYP digital design with Tinkercad, students should practice making 3D objects. Adding, moving, resizing, aligning, and subtracting basic shapes are essential skills. So spend about one-third of the class during Criterion A sketching in Tinkercad. If that is too much time just for Tinkercad, allow for pencil sketching of humans. I tended to put focus on the human face and head.

Much of Strand A.1 – Explain and Justify the Need restates the GRASPS. Criterion A, at least for Year 1 students, can be unappealing if research-heavy. Making the experience hands-on helps build interest and engagement. For this MYP Digital design example, hands-on could mean chatting with a bot.

Chat Bots for Kids

ChatGPT can write original works, computer code, and music. It’s got lots of potential to be helpful. However, is it too helpful for schools? Note: When I signed up with a personal Google account in 2023, it required a phone number. It can also report that it’s at capacity, so plan ahead when using it in a lesson.

Engadget reported in January 2023 that NYC schools had blocked ChatGPT for fear that it would facilitate cheating and limit critical thinking. In contrast, high school teacher David Cutler summed up our lives as educators with AI: We need to guide students to use AI ethically and effectively, and we’re just getting started…

Free Chat Bot

In my classes, I was using the free Mitsuku chatbot with my students for research (pre generative AI time period). Mitsuku won the now-defunct Loebner Prize multiple times. This award was given to the computer program considered the most human-like. Unfortunately, the site was Flash-based and is no longer supported.

Regardless, here’s an example of a chat I saved with Mitsuku about robots that you can use as a resource with your students:

Kuki is the new name for Mitsuku. A sign-on is required (e.g., Google). It appears to be free, and Kuki sometimes says she’s free (no cost) for chatting.

Mitsuku/Kuki can be frustrating with her playfulness and slick ability to respond without answering questions. Some students reacted strongly to Mitsuku/Kuki’s nature, and a few provoked the AI with their off-topic queries.

Chat example with Mitsuku/Kuki.
Short Chat Example with Kuki

Capturing and reflecting on the chat can help document the interaction, minimize unwanted questions, and put the experience in perspective. Teachers can moderate a conversation with an AI on an interactive whiteboard for a safer and still engaging approach to research. Students could suggest questions via a classroom discussion or Google document, and these can be fed into the chat before class. For example, when asked to list five important roles for empathy-based robots in Lima Peru, ChatGPT replied:

  1. Providing support and care for older adults in nursing homes or assisted living communities
  2. Providing therapy and emotional support for individuals with mental health conditions
  3. Helping with language learning and language translation
  4. Assisting children with support needs in educational settings
  5. Providing companionship for people who are isolated or lonely

Documented practice with Tinkercad can connect to Strand A.3 – Analyze Existing Products and makes Criterion A more hands-on. You could also make this Tinkercad practice work as a stand-alone activity. Discuss what Tinkercad tools and techniques were helpful after the exercise.

Strand A.4 – Develop a Design Brief

For the design brief, students should be able to provide a clear and concise restatement of the design problem. I found it helpful for beginning designers to restate in the brief what they came up with in A.1 – Explain and Justify the Need. For this Robots in Action unit, I had them draft an email from their perspective as a futurist and visual designer. The email explained what they intended to create, the purpose of the design, and who it would serve.

Resources for MYP Digital Design

During Criterion A, present the MYP Digital Design resources used in the unit. A curated collection of websites is better for younger students to focus their research (as opposed to unstructured Internet research).

I updated these resources for this blog post; however, the external links can change! Let me know if any links are broken. The Google Docs will force a copy to you. Most of the documents are one page in length:

The student digital design criterion documents are organized via tables. The white areas (cells) are where students enter their responses.

Criterion B – Developing Ideas

MYP Digital Design. Robots in Action. Criterion B - Inquiring and Developing Ideas
MYP Digital Design – Robots in Action – Criterion B

In Criterion B, students develop ideas based on their research and analysis in Criterion A to solve the problem as stated in the GRASPS. Ideas may emerge as far out-of-the-box or unrealistic at first. Regardless, I prefer this inspired development of ideas–especially for Year 1 students–to start Criterion B before developing design specifications. This arrangement keeps kids engaged, honors their thinking, and grows more design options. The traditional MYP Design Cycle starts with design specifications first.

The design specifications should be in tune with the Standards for Success stated in the GRASPS. All of the specifications should be addressed by the solution. Students wrap up Criterion B using an appropriate visual medium to express their best idea to their intended audience. Pencil sketching is a solid option.

Criterion B Robot Prototype – Student Pencil Sketches

Because this unit requires quite a bit of hypothetical thinking, the design specifications are challenging to test. Regardless, the design specifications should provide rigor and be comprehensive.

Students complete Strand B.3 – Present the Chosen Design by evaluating the best idea against the design specifications for the Robots in Action unit. Having students pair up and verbalize their justifications may be helpful before documenting them in the Criterion B Document.

In Strand B.4 – Develop Planning/Drawing Diagrams, student sketch three 2D views of their best robot idea (i.e., orthographic projections). Rather than split up each 2D view into its own space on the criterion document (current version), you may want one photo of all three 2D views. With 2D views together, students can show the length, width, and height alignment of the robot prototype.

Finish Criterion B – Developing Ideas with diagrams that outline the main details of the robot prototype. If possible, shoot for three orthographic drawings (top, front, and side) and an isometric drawing (3D).

Here are the Criterion B documents for students:

  • Criterion B – Developing Ideas Student Document (PDF) (Google Doc)
  • Robot Prototype Dimensions (PDF)
  • Robot Promotional Poster Example with Photoshop (PDF)
  • Robot Promotional Poster Example with Google Draw (PDF)

Criterion C – Creating the Solution

MYP Digital Design Unit - Robots in Action - Criterion C - Creating the Solution
MYP Digital Design – Robots in Action – Criterion C

During Criterion C, students build their robot prototype in Tinkercad and create their presentations. The process starts with formal planning. According to the MYP Design Guide, students officially “Construct a logical plan, which describes the efficient use of time and resources, sufficient for peers to be able to follow to create the solution.”

For the Robots in Action unit, rather than make a detailed step-by-step plan, students write a brief paragraph about how they will build their robot prototype in Tinkercad. I made this strand briefer because we had already completed three MYP Design units in the school year. I wanted students to have enough energy and interest to create both the robot and the presentation (and give the presentation). This planning strand (C.1) referenced the robot rather than the presentation because the robot was more technical and better justified a building plan.

Students can demonstrate excellent technical skills by communicating how well their robot prototype met the design specifications listed in Criterion B. A focus on the GRASPS (e.g., humanoid look, Cultura Chicha colors) helps narrow down the specifications. Regarding the presentation, justifying sound, visual design principles (e.g., C.R.A.P. Model) would also demonstrate excellent skills.

Build and Document

Typically during the product build, students document the process with photographs or screenshots. Documentation helps greatly with justifying changes made to the plan, especially for younger designers earlier in the school year who have less practice with Criterion C and MYP Design.

For Strand C.3 – Follow the Plan to Create the Solution, the presentation with Tinkercad screenshots of the robot in various slides serves as the solution. There should be enough images of the robot in the presentation to fully show the robot’s essential features.

For this robot unit, in Strand C.4 – C.4 – Justify Changes Made to the Plan, one could give students the option of describing changes between the robot plan and the actual plan, or focusing on the presentation changes. Technically, since C.1 was about the robot, C.4 should be about the robot, which is what I have tended to do. 

Here are the Criterion C documents for students:

Criterion D – Evaluating

MYP Digital Design Unit - Robots in Action - Criterion D - Evaluating
MYP Digital Design – Robots in Action – Criterion D

Criterion D aims to provide students with opportunities to evaluate their work critically and reflect on their experience with the design process. Students learn to reflect on their designs’ strengths and weaknesses through this criterion. They can use this knowledge to improve their work in future design projects.

Ideally, students develop a sense of responsibility and grow their awareness of their design’s impact on society and the environment. Criterion D outcomes can also provide meaningful research content for Criterion A.

Before starting Criterion D, a review of the GRASPS adds focus to the purpose of the activity. A brief discussion about concepts and inquiry can strengthen the connection to the bigger picture as well.

Strand D.1 – Design Testing Methods

The detailed and relevant testing methods used to measure the success of the robot prototype solution come in the form of feedback from the audience. According to the GRASPS, this audience acts as evaluators from Lima, Peru’s city government.

Students presented their designs to each other and, if possible, to adult guests such as parents, other teachers, and administration. The presentations added authenticity to the student learning experience and energized Criterion D, which sometimes felt like a requirement box to be checked at this point in the MYP Design Cycle. Printed Tinkercad robots were fantastic props that benefited the presentations but were not required.

The presentations were done in an elevator pitch, PechaKucha style using the ten slides from a template. Concise feedback forms were set up for evaluators with a positive focus. I usually had four presentations at once in my classroom (for a class of about 20 students). Any more got too noisy.

Logistics

It’s helpful to make a schedule so that each student presents about the same number of times. The number of evaluations should also be about the same unless you have additional guests. Table group sizes can affect the number of sessions as well.

MYP Digital Design Unit - Robots in Action - Criterion D - Presentation Logistics
MYP Digital Design – Robots in Action – Criterion D Presentation Logistics

Lots of short presentations with constantly mixing groups can maximize the variety and amount of feedback. However, presentation stations should be arranged to minimize people’s movement, limiting transition noise and possible disorder.

For a class of about twenty students, I chunked my presentation groups by their table letters, where two to three students sat at a table. The rounds were about five minutes each, and I scheduled more than needed. If a presenter-evaluator/audience group finished early, they stayed in their area (and could present again).

Student presenters collected the evaluator feedback forms, photographed them, and placed the images in their Criterion D document.

D.2 – Evaluate the Success of the Solution

In Strand D.2, students reviewed and categorized the evaluators’ feedback as positive or constructive. Positive feedback regarding the success of the solution against the design specifications could include responses such as:

  • Recognition of the robot’s design and functionality meeting the design specifications.
  • Positive remarks on the clarity and engagement of the presentation visuals in explaining the robot’s features and purpose.
  • Appreciation of the humanoid appearance and user-friendliness of the Tinkercad robot prototype made from the basic shapes. 

Examples of constructive feedback regarding the success of the solution against the design specifications could include the following:

  • Suggestions for additional features or functionality for the robot to better meet the community’s needs.
  • Although the presentation followed the C.R.A.P. Model of visual design, certain elements could have been further optimized for enhanced visual appeal and clarity.
  • The presentation could have provided more in-depth information on how Peru’s Cultura Chicha influenced the robot’s design and how this would facilitate community integration and engagement.
MYP Design VistaThink Robots in Action 3D Printed Peruvian Empathy Robot with a Moche Nose Ornament and a Moche Pottery Head Piece - Photos from Various Angles
3D Printed Peruvian Empathy Robot with a Moche Nose Ornament and Moche Pottery Head Piece

D.3 – Explain How the Solution Could be Improved

In Strand D.3, students communicated ways to improve their presentation or robot. Some examples of changes that could be made based on identified weaknesses, limitations, and the student’s point of view:

  • Improving the presentation by enhancing adherence to the C.R.A.P. Model. Specifically, Contrast, Repetition, Alignment, and Proximity of visual elements could be further optimized to ensure greater clarity and visual appeal to the client/audience.
  • Enhancing the robot’s humanoid appearance by incorporating different shapes and design features beyond Tinkercad’s basic shapes. This suggestion could involve further experimentation with other forms and design elements to create a more realistic and human-like appearance.
  • Boosting the robot’s empathy role by incorporating additional sensors to better respond to its user’s emotional and physical needs. This change could involve conducting further research on the client/audience’s specific needs and integrating the findings into the robot’s development process.
  • Improving the robot’s integration into the community by incorporating more design features that reflect the culture and traditions of the Lima neighborhood. This revision could involve researching the community’s cultural context and preferences to ensure the robot prototype is relevant and engaging.

D.4 – Explain the Impact of the Solution

Strand D.4 completes the design cycle by evaluating the solution’s impact on the client/target audience.

At this point, after almost six weeks, students may lack the stamina to finish strong. Plus, this MYP digital design unit is done at the end of the school year when distractions and interruptions to school routines are ever-present.

Short, engaging videos about robots can strengthen Strand D.4’s appeal. Since videos about robots are generally more interesting than videos about presentations, we focused only on robots. Also, connecting back to the inquiry questions can boost engagement and bolster authentic learning in the unit.

So, the evaluation of the impact of the solution on the client/audience may look like this question:

In the short animated movie Light (3:23), examine how the robot helps the human in empathetic ways. Now, imagine your robot as fully functional and working in Lima, Peru. Which robot is more effective at helping in empathetic ways, your robot or this robot?

Here’s another example of supporting Strand D.4 – Explain the Impact of the Solution with a short video about a robot and its environment:

In the short movie Wall-E, but it’s just Mo (2:41), examine how the physical form of the robot MO relates to the environment in which it operates. Now, imagine your robot as fully functional and working in Lima, Peru. Which robot would have a stronger connection between its form and the environment where it operates, your robot or MO?

The Criterion D documents for the Robots in Action unit are:

  • Criterion D – Evaluation Student Document (PDF) (Google Doc)
  • Criterion D Evaluator Notes (4 per page; PDF) (Google Doc)
  • Presentation Logistics Example for 20 Students (PDF) (Google Doc)
  • Evaluation Data Help – What is an Outlier? (PDF)

MYP Digital Design Summary

MYP digital design offers a range of exciting possibilities for educators to engage students in creative and technical learning. One fascinating way to explore MYP digital design is by incorporating cultural elements, which can help students understand and appreciate diverse perspectives.

This blog post offers educators a comprehensive example of an MYP digital design unit inspired by the rich cultures of Peru. Students explore artificial intelligence, spatial thinking, culture, color theory, empathy, and typography by creating a 3D robot prototype that integrates aspects of Peru’s Cultura Chicha for community integration.

This unit is designed to be engaging and fun, allowing students to showcase their creativity and design skills. While it may not be suitable to begin MYP Design, especially with Year 1 students, it can be a great way to close out the year.

Educators can leverage MYP digital design to teach empathy and cultural understanding while developing technical skills. Feel free to modify these lesson documents to connect with cultures that interest your students. Contact me with your ideas and experiences using these resources! A link back to VistaThink is always appreciated.

MYP Digital Design Free Resources

Here are all of the Robots in Action unit documents in this post in one place! Let me know how you are using these free MYP digital design resources:

  • GRASPS (PDF) (Google Doc)
  • MYP Digital Design Help Resources (PDF) (Google Doc)
  • Typography and Cultura Chicha Fonts (PDF) (Google Doc)
  • Cultura Chicha Colors (PDF) (Google Doc)
  • Mitsuku Chatbot Example Conversation (PDF)
  • Concepts and Inquiry Statements and Questions (PDF) (Google Doc)
  • Criterion A – Inquiring and Analyzing Student Document (PDF) (Google Doc)
  • Criterion B – Developing Ideas Student Document (PDF) (Google Doc)
  • Robot Prototype Dimensions (PDF)
  • Robot Promotional Poster Example with Photoshop (PDF)
  • Robot Promotional Poster Example with Google Draw (PDF)
  • Criterion C – Creating the Solution Student Document (PDF) (Google Doc)
  • Student Presentation Template (PDF) (Google Slides)
  • Criterion D – Evaluation Student Document (PDF) (Google Doc)
  • Criterion D Evaluator Notes (4 per page; PDF) (Google Doc)
  • Presentation Logistics Example for 20 Students (PDF) (Google Doc)
  • Evaluation Data Help – What is an Outlier? (PDF)

Long Term STEM Projects

My goal with this post is to add some clarity to the array of STEM tools and resources online. Specifically, long-term stem projects may be underrepresented, underutilized, and within your reach! Read on for some of the elements and benefits of long-term STEM projects.

Long Term STEM Projects can be Planned in Phases

What is STEM?

STEM refers to Science, Technology, Engineering, and Math. STEM education takes place at every grade level and can tend to focus on math and science. Learning with STEM offers students rich hands-on experiences in authentic, real-world scenarios. Long-term STEM Projects require a fuller commitment by teachers and students and provide in-depth learning opportunities.

There are fantastic STEM ideas, activities, challenges, and projects online. Many of these resources facilitate inquiry-based learning, offer high engagement, and spark interest. Many are also free! Nearly all STEM lessons are project-based, and many follow a design process or cycle.

STEM challenges work great for short, very highly engaging hands-on experiences. STEM projects may require some planning and time to reach completion.

What is Considered a Long Term Project?

Projects that require substantial research or planning could be considered long-term projects. For example, if students were to make a web page of their best artwork, planning would be needed to determine the artifacts to showcase, the user navigation flow, and the layout of the web pages.

Long-term projects also require some research on the front end to get going. A teacher might create a stock market game for her students in a business class. The class must first research companies before investing. An upcycling project might require a study of the types of plastics to target to remove from the waste stream.

In STEM, long-term projects can be science focused. For example, growing sugar crystals or investigating how salt affects plant growth requires substantial time. These long-term projects involve a bit of set-and-forget and gathering data along the way.

Characteristics of Long Term STEM Projects

Long-term STEM projects share many characteristics of STEM challenges, activities, and projects. However, with a deeper commitment, more time is needed to engage students with all that STEM can offer. More time means teachers can cultivate a richer learning experience for their students. Consider the following when planning a long-term STEM project for your students!

Make it STEAM

More time means more opportunities to offer STEAM learning. STEAM includes STEM learning with a coherent and meaningful art-integrated experience. STEAM, like STEM, is essential to develop 21st-century skills such as creativity and critical thinking. For engineering-related projects, I like to have students create 2D and 3D pencil sketches of their best idea for the solution to a problem.

Craft a Driving Question

What are driving questions? Driving questions dig into real-world issues, are open-ended and complex, and relate concepts across disciplines. The driving question for a long-term STEM project can spark profound connections between science, technology, engineering, and math. Statements of inquiry and essential questions also power sustained inquiry and learning in long-term STEM projects.

Teachers can author driving questions based on subject-area standards and real-world connections. Driving questions can come about organically from your students’ interests in the world around them. For example, if students become curious about how waste is managed at your school, use an upcycling lesson with the following driving question: How should systems be sustainable to minimize harmful human impact on the environment?

Use Interdisciplinary Opportunities with PBL

Is it even possible to teach STEM without incorporating aspects of project-based learning (PBL)? What about problem-based learning? John Larmer describes problem-based learning as falling into the category of problem-based learning. Both types of learning can be called “PBL”!
STEM learning is a natural fit with hands-on problem-solving projects. Interdisciplinary learning leverages reading, writing, math, and 21st-century skills to make student learning relevant while getting to the best idea to create the solution.

Differentiate Team Roles

Teamwork and collaboration fit well with STEM challenges, activities, and projects. Long-term STEM projects promote collaborative teamwork and offer students a variety of team roles. The steps in a design process or cycle also open up opportunities to vary team roles to suit the needs of the task based on a student’s interests and strengths.

Connect to Stories and Culture

STEM combined with stories can help add authenticity to the lesson, especially for younger students. For example, the familiar tale of the Three Little Pigs can be creatively adapted to create an engineering tradeoff design problem. The GRASPS model can synthesize the essentials of a story for a STEM PBL learning unit.

Specific Four-step Design Process by VistaThink
Four-step Design Cycle

Follow the Design Process

I’ve mentioned the design process a few times already. What is the design process, and how is it used? The design process (sometimes referred to as the engineering design process or engineering design cycle) is a sequence of logical steps to solve a problem.

Generally, the design process can range from four to twelve steps. The process is sometimes called a cycle because the last step, which is an evaluation of the design’s success, can inform the research, which is the first step of the cycle. The general steps of the design process are:

Explore each phase or step in the process in smaller substeps. By breaking each step into smaller parts or substeps, you can create a multi-week, in-depth, long-term STEM project with abundant opportunities for interdisciplinary learning.

A. Analyze a Need

  • A.1. Ask and Empathize – Explore the who, what, and why of the problem
  • A.2. Investigate and Research the Problem
  • A.3. Define the Problem

B. Develop Ideas

  • B.1. Brainstorm
  • B.2. Specify Requirements
  • B.3. Represent the Best Idea

C. Create a Prototype

  • C.1. Plan the Building Steps
  • C.2. Create the Prototype
  • C.3. Justify Plan Changes

D. Test and Evaluate

  • D.1. Test the Prototype
  • D.2. Evaluate the Results
  • D.3. Reflect on the Results

Leverage Formative Assessment

STEM challenges can, of course, be fun. Really fun! They can also be abrupt and short. Certainly, some discussion happens when the challenge concludes. For example, after a STEM challenge that’s a contest, the teacher would determine and declare a winner. The shorter the STEM activity, the less opportunity for formative assessment.

Why use formative assessment? Formative feedback facilitates a low-risk, high-impact way to communicate with students about their performance. Specific and meaningful feedback can add authenticity to the project’s purpose. Formative assessment will uncover misconceptions, improve how you teach STEM, and show that you, the teacher, care about your students learning.

Try to give a formative assessment at each step of the design process according to a rubric that provides precise feedback on the desired task (e.g., developing ideas). Feedback via analytic or development rubrics also provides diagnostic information for the teacher to adjust instruction accordingly.

Relate Writing to STEM

Why is writing important in STEM? Communication is essential in all subject areas and professional fields. Writing is a natural fit with long-term projects. In the research phase, persuasive writing aims to justify the need for the STEM solution: Why does the problem need to be solved? Deepen the meaning of the question by embedding it in an authentic scenario–the GRASPS can help.

Use informative writing to explain the building and testing steps. Argument writing is supported in the evaluation phase of the STEM design cycle when justifying the success of the solution based on evidence from the testing.

Explore and Embrace Failure

Failure will be part of any STEM unit where a solution is tested against one, some, or all of the design specifications. By exploring the facets of failure, students can see it as more of a nuanced tutor rather than a black-and-white indicator of their intelligence.

Failure can also be defined in more than one way. For example, I taught a pasta bridge unit during my first year in MYP Design. The problem was to build a pasta bridge as light, as strong, and as long as possible. We found out during testing that failure was incremental. Sometimes, we heard the sound of snapping pasta before seeing any changes in the bridges. Could that snapping-pasta event be characterized as a type of failure? Other bridges bent to the point where no reasonable vehicle could pass over them. Is a bent bridge a failed bridge?

I taught the unit once, and if I were to teach it again, the definition of a successful solution (which is predicated on failure) would have to be redefined. By spending more time exploring the aspects of failure, teachers and students cultivate a growth mindset and build a knowledge base for future research. STEM failures, especially those developed from thoughtful procedural steps, are treasures to be showcased and studied.

Build Grit

A commitment to a long-term STEM project communicates to stakeholders the value STEM offers in developing many skill areas (e.g., 21st-century skills). Sequencing STEM learning through design steps builds a commitment to the deliberate nature of the problem-solving process.

MYP Design units can take about six weeks to complete. When I started teaching it with sixth graders (their first official class with a formal design process), many assumed we would be building the design right away! After their first unit, they were introduced to the purposeful roles of targeted research, developing precise design specifications, and creating a detailed step-by-step building plan. Student dedication to each design step builds grit, a fundamental problem-solving, and life skill.

Through the STEM PBL design process, students constantly revisit and examine the problem over time. Each “visit” to the problem is an opportunity to understand the problem better. This perseverance in reviewing the issue helps students be proficient problem solvers.

Commercial Recycling Containers

Promote Cradle to Cradle Design

What is cradle-to-cradle design? The goal of cradle-to-cradle design is to minimize waste in the design process. Looking back, in the pasta bridge unit, my partner and I gave each student group too much pasta for each bridge. We could have had just as much quality learning with less waste.

The design process should be emphasized as the design cycle. In many cases, STEM resources flow from step to step. EPEA refers to expired products serving as “technical nutrients” (cool term) for future products.

In the K-12 classroom, cradle-to-cradle design can be emphasized in many ways and across different subject areas. For example, for the paper helicopter experiment, print the templates on used paper. For the paper water tank engineering problem, we included a design specification that helped students be mindful of how to manage the water after testing.

Engaging STEM projects can be done with minimal resources. When creating an engineering trade-off problem, such as how to build the tallest free-standing paper tower, will half a sheet of office paper suffice, or does it have to be a whole sheet? Does it have to be a new paper? Cradle-to-cradle design involves hacking away at the resources used in the STEM design cycle to get the most benefit with the least waste.

To the greatest extent possible, photograph or screenshot STEM designs and video the tests during the building and testing/evaluation phases. Curate these media to share with future classes to add value and credibility to the research step. Examining successful and unsuccessful designs can honor the spirit of cradle-to-cradle design.

Getting Started with Long Term STEM Projects

If you’re new to long-term STEM projects, start small. No need to do too much at once, especially if you’re not typically teaching STEM or STEAM. Writing is a natural fit and adds purpose to the project. What are you writing about in language arts? STEM writing prompts can bring science and math to life.

What’s helped me a lot has been to start planning by structuring the project in phases. You can sequence STEM learning most easily by chunking the instruction and activities into the steps of the design cycle:

  • A. Analyze a Need (Research a Problem)
  • B. Develop Ideas
  • C. Create a Prototype
  • D. Test and Evaluate

For example, paper airplane design offers a low-cost and easy STEM project for elementary or middle school. In this example, students spent three class periods of 45 minutes each going through each step of an entire design cycle, trying to make an airplane fly far and straight. With regard to STEM, we applied skills from each area to solve the problem:

  • Science – controlling variables
  • Technology – tracking flight data with Google Sheets
  • Engineering – exploring different shapes (triangular vs. rectangular) to meet the goal
  • Math – calculating maximum, minimums, and averages

Before starting the first phase of researching the need, set up the scenario using the GRASPS model format to structure the problem-based learning intuitively. Check out this GRASPS for paper helicopter design. Writing a GRASPS first is a great way to start planning for a long-term STEM project.

Use what you know. You can develop meaningful STEM learning experiences with materials you have in your classroom. You’ll feel more prepared by organizing your thinking, STEM lesson resources, and your students’ learning through distinct design steps. Curriculum standards can help focus your thinking, and students’ “why” questions might inspire a problem to be explored through STEM or STEAM.

Summary of Long Term STEM Projects

The benefits of long-term STEM projects teach children real-world skills such as critical thinking and problem-solving. Hands-on problem-solving experiences that bridge multiple subjects help students see the bigger picture to strengthen their ability to leverage resources to create solutions. How are you going to extend STEM learning to help your students?

Upcycling Ideas for Students

Upcycling ideas for students offer a fun and meaningful project-based approach for students to learn about their community and the environment. Opportunities to upcycle can easily be found at school or home and are an excellent fit for student creativity. The products that students can create by upcycling are essentially limitless.

Upcycling Ideas for Students - Old Yellow Rubber Boots Upcycled to be Flower Pots
Old Yellow Rubber Boots Upcycled to be Flower Pots

What is Upcycling?

Upcycling is a process of transforming traditional waste materials or useless products into new products of improved quality or for better environmental value. Collecting items from local communities and turning them into something new can be very rewarding for students. As humans produce more products in a shorter amount of time, more trash is also being produced, making reusable materials easy to acquire. Upcycling can even be a great way to save money on purchases because people who upcycle add value to something that would have otherwise been thrown away.

People often throw away items that are still usable, such as old clothes, used toys, and even unwanted furniture. Students can upcycle trash into treasures by giving materials a new purpose or a fresh look—many DIY ideas online showcase unique art pieces and helpful products made from used materials.

Upcycling Lessons in the Classroom

Upcycling lessons in the classroom are an easy way for students to learn about the big picture of society. By adding value with readily available materials, students understand and help the environment. Studying manufacturing production and waste stream processes can help students learn to make connections and discover cause-and-effect relationships. Upcycling can even become a routine classroom practice and an enjoyable family hobby at home.

Upcycling Projects for Students

Upcycling projects for elementary students and upcycling projects for middle schoolers share similarities and differences. The older the student, the greater the autonomy they may want to have in choosing the creative aspects of their project. For example, you may have older students complete a green audit independently as part of their research toward developing an upcycled product.

For a more focused and possibly a bit more contrived approach to starting an upcycled classroom project, create a scenario for students. Younger students especially will benefit from the specific focus a clear scenario offers. The GRASPS Model by Understanding by Design (UbD) authors Grant Wiggins and Jay McTighe, clearly outlines the critical components of the problem.

Upcycling Materials

It’s probably easier to scan your school for upcyclable materials than for students to bring them from home. It depends on your school and community. The materials should be clean and non-toxic. Storage before and after creating the gift is a factor, so be mindful of the required space.

Here’s a non-exhaustive list of possible materials:

  • magazines
  • cereal boxes
  • toilet paper rolls (icky, maybe, but the symmetry is nice)
  • paper towel rolls
  • plastic water bottle caps
  • plastic water bottles
  • plastic pill bottles (watch out for labels with prescriptions)
  • plastic lids
  • plastic bags (for weaving)
  • packing boxes (Apple products come in slick packaging)
Sorting multiple bottle caps by type and color for reuse.
Sorting Multiple Bottle Caps by Type and Color for Reuse

Goal, Role, Audience, Situation, Product, and Standards for Success

The GRASPS acronym stands for Goal, Role, Audience, Situation, Product, and Standards for Success. Here is an example GRASPS scenario written for younger students:

Goal
Your goal is to create a thoughtful handmade gift from used materials.

Role
You are a designer. Your specialty is making treasure from trash.

Audience
The target audience is a person at school.

Situation
Creating a lovely gift from used materials for someone special will brighten their day and help the environment.

Product
You will create a thoughtful, handmade gift from used materials (e.g., trash, recyclables) for a person at school.

Standards for Success
The upcycled gift shall be:

  1. mainly made from harmless school trash or recyclables
  2. interesting for the person who receives it
  3. sturdy and safe to use
  4. smaller than a shoebox

Upcycling Ideas for Students – GRASPS (PDF)

Detailed Problem-based Learning Scenario Example

A more elaborate GRASPS scenario can be used for older students and for a long-term, problem-based STEM or STEAM project. Consider adding each element to its own presentation slide (example) with an illustration for greater visual impact. Here’s another, more detailed GRASPS than can help you get started with upcycling ideas for students:

Goal
Your goal is to design and create a high-value and appealing gift (such as a game, musical instrument, or sculpture) for a [name of school] community member. The gift shall be created with school-generated, used materials (preferably locally-available plastic) that would be otherwise harmful if discarded in a landfill or ocean.

Role
You are a student designer with a sustainability mindset who develops socially responsible solutions. Your specialty is upcycling used resources (e.g., trash, recyclables) into appealing products that are highly valued by the school community over a long period of time.

Audience
Your upcycled product shall be presented as a gift to a specific member of the [name of school] community (e.g., teacher, administration, support staff, or parent).

Situation
By creating a high-value and appealing gift from discarded local materials that have traditionally little value (and may even be harmful in specific environments), you develop the skills to create socially responsible solutions consistently and in the future.

Product
You will create an appealing product from used resources (e.g., trash, recyclables) as a gift for the target audience.

Standards for Success
The upcycled product shall be:

  1. made mostly from school-generated trash or recyclables (preferably difficult-to-recycle plastics)
  2. appealing to the target [name of school] community member for at least one school year
  3. obvious how it is to be used and appreciated
  4. well-crafted and sturdy–must not fall apart with regular use for at least one year
  5. completely safe to use and handle from PreK to adult
  6. easily storable on a typical bookshelf or closet shelf when not in use

Notes About the Learning Scenario

Consider adding some language from your school’s mission into the scenario to deepen connections to learning. Some of the vocabulary may need to be taught as well (e.g., “sustainability,” “mindset”). Promoting empathy through the GRASPS for the audience is always a good idea.

Upcycled Cardboard Tube Pen Holder and a Love Heart of Corks

The Standards for Success reference key design specifications that should be as specific and measurable as possible, but it’s not always easy. For example, the intent of “appealing to the target [name of school] community member for at least one school year” is to make sure the student designer engages in a sincere study of the school community member’s preferences. But how do you measure this easily? Students could survey the gift recipients after a year (or designated time period); however, this task requires long-term planning and commitment that may not be possible.

Upcycling Research

Once the scenario is established, students can explore the big picture of upcycling. That is, the nature of the lesson will center around and grapple with this essential question:


How should systems be sustainable to minimize harmful human impact on the environment?

To provide access to the question and provoke inquiry, students can explore these inquiry questions in order of complexity:

  • Factual – How does plastic help people? How does plastic harm our environment?
  • Conceptual – Why do people create trash? Why do people use plastic? Why do some communities reduce, reuse, and/or recycle plastic while others don’t?
  • Debatable – How does the action of an individual (or a group of individuals) make a positive impact on our environment?

During this inquiry, students are encouraged to become more aware of the interrelatedness of people, products, and society.

To build background knowledge, students need to conduct research. A curated set of manageable and intuitive materials will help students navigate the knowledge necessary to develop an effective solution to meet the goal outlined in the GRASPS.

I have really enjoyed starting the research to promote upcycling Ideas for students with this short and awe-inspiring video about the Recycled Orchestra from Asuncion, Paraguay:

Personal Anecdote

This video always touches me. I taught at American School of Asunción when I lived in Paraguay, about 20 years ago. Once a week on Sundays, I used to bike to Cerro Lambaré, which overlooked the Cateura landfill. I’m grateful for my view of the home of the Recycled Orchestra!

Beyond Reading and Writing

My experience with this research phase is that students do not care for it compared to the building-the-product phase. They tend to want to get through it to build their gift!

Therefore, try activities that can balance reading with other forms of engagement in this part of the lesson. For example, to conclude the research, have the students choose one of the three areas to explore and then report back to the class their findings:

  • Do a waste-stream investigation around the school through observations and interviews with adults involved with trash management (e.g., custodial staff)
  • Interview possible upcycled gift recipients around school about their general likes and dislikes
  • Experiment with different types of glue and materials to determine which combination provides the most significant strength option (bonding materials securely is a real need)

Have students develop another relevant, teacher-approved investigation category. Optimally, if time allows, try to have every student complete multiple activities at their preferred level. For example, a shy student may not want to interview an adult but could be the note-taker for the group.

Developing Ideas for Upcycling

At this point in the lesson, students should be informed about the problem, committed to their purpose, and eager to generate ideas. Have students brainstorm as many ideas as possible and develop quick annotated sketches. Hang up the sketches around the room, do a gallery walk to inspire more ideas, and take notes from the best ideas. A revisit to the upcycled gift ideas provided in Upcycling Research Web Resources can also help generate upcycling ideas for students.

Develop Design Specifications

After brainstorming ideas, students should define the design specifications to make the best upcycled gift possible. These short statements are requirements that students will try to follow when creating their upcycled gifts. It is essential to assure students that not meeting some or all of the design specifications does not mean a failing grade. Regardless, efforts should be made to write well-intentioned and precise specifications to address the goal in the GRASPS.

The Standards for Success from the GRASPS are essentially the core design specifications for the upcycled product design. Ideally, the upcycled product is testable in terms of the design specifications, which would be done during the evaluation phase of the lesson.

This list of upcycling design specifications is an example activity sheet for students to complete to develop the requirements for their upcycled gift. One specification is already completed as an example.

Other Upcycling Design Specifications to Consider

Regarding environmental impact, the materials that biodegrade the most slowly (plastics) are a better choice than those that don’t (cardboard). Massing the materials that go into the gift (plastics vs. paper-based products) provides specific detail to measure the success of the first design specification (“What shall the gift be made of? Try to use 100% non-new plastics.”). The design specification about sturdiness assumes that more than one material will be used to build the gift. The size specifications exist to avoid large (e.g., furniture-sized) products that are too cumbersome to give and keep as gifts.

Sketch the Upcycled Gift Idea

The final part of the developing ideas phase is for students to sketch and annotate their best idea at this point. Sketching product ideas are a great way to bring authenticity into the process and facilitate learning STEM content. Sketches can be pencil or digital (e.g., Google Draw, Tinkercad). They can also be isometric (3D), orthographic projection (2D, top, front, side), or a combination of multiple sketches.

Building the Upcycled Gift

My experience in the upcycling design process has been that students prefer to work alone because they do not want to compromise their creative choices. However, to accommodate personalities and preferences, allow students to work in groups of two or three to build their upcycled gift.

A complete unit on upcycling may require a more procedural approach to this building phase. For example, in MYP Design, before students build their best idea of their upcycled gift, they write precise steps on how to do so. These steps should be clear for a peer to follow. It’s helpful to document each building step by taking photos with their laptop as they build.

Cutting and assembling are required. So be aware of safety. Some tips I learned with sixth graders during this upcycling building phase are:

  • this hands-on phase of the lesson is very popular
  • storage for upcyclable materials in the classroom should be planned ahead
  • glue is better than tape
  • blue painters tape and electrical tape can provide visual accents
  • a little paint is okay, and a little tape is okay
  • a lot of paint is not okay, and paint on plastic generally doesn’t stick well
  • students love to use tools like a hacksaw
  • students will use work gloves (even though they can be cumbersome)
  • almost no one burns themself with the hot glue gun; regardless, emphasize safety
  • cutting thick materials with sharp objects should be done by a trusted adult
  • the original idea can change during this building phase
  • some simple origami folding can act as a warm-up to help practice precision and craftsmanship

Students would conclude this phase by reviewing their original building plan against the assembly photos, determining any differences, and noting what changes to the plan may have occurred along the way. Design ideas can change mid-build, and it is essential to honor the creative process (and document it too).

Evaluation of the Upcycled Gift

To start this final phase of the design process, the teacher and students will review the GRASPS and the essential question. Basically, as the lesson wraps up, revisit what you are doing and why you are doing it.

In order to monitor and reflect on their own learning, students benefit from exploring how successful their design was in meeting the goal outlined in the GRASPS. Specifically, if time allows, and to the greatest extent possible, an evaluation against each design specification offers a more thorough evaluation.

Students review their design specifications and determine how well their product met each one. Students can use a ranking scale (e.g., 5 = met perfectly, 1 = did not meet at all) or a short written comment to evaluate their product against each specification.

If you want to go even deeper into the design specifications, evaluate the specifications themselves. Two questions for class and peer discussion are:

  • Which specifications were most helpful in designing a successful product?
  • Which specifications were least helpful in designing a successful product?

The final part of the evaluation phase would be for each student to answer one of the following questions (or a teacher-approved question):

  • Based on what you know now, how can your product be improved to best meet the goal in the GRASPS?
  • How should systems be sustainable to minimize harmful human impact on the environment?
  • How does the action of an individual (or a group of individuals) make a positive impact on our environment?

These reflective summary questions can be answered in any of the following ways (or via another teacher-approved method). Here are some ideas:

  • Write a reflective paragraph (60-120 words)
  • Present an oral report (0:45 to 2:00 minutes)
  • Present a visual report with slides (3-5 slides)
  • Create a video reflection (0:45 to 2:00 minutes)
Student Writing a Reflective Paragraph. Photo by Tirachard Kumtanom @ pexels.com
Student Writing a Reflective Paragraph

Upcycling Ideas for Students Summary

What will you do to engage deeply with upcycling? How will you try to promote awareness about seeing value where others do not?

This post intended to show how students benefit from a scenario that supports a problem-based approach to authentic learning with a focus on the environment and others. Reasonably sized, well-planned, upcycled products reduce the waste stream and can serve as thoughtful gifts that promote empathy in the student designer.

In terms of affective learning, students’ feelings and attitudes can be honored by providing them choices as far as who would receive their upcycled product as a gift. Critical thinking can be fostered by observing, analyzing, inferring, and communicating through the four phases of the problem-solving design process (research, ideation, creating, and evaluation).

Design Phases and Collaboration

Each design phase can support students in their purpose of solving the problem of the upcycled gift. The scenario outline via the GRASPS model and the research phase of the problem-solving process are especially effective in helping students understand the facts, concepts, and vocabulary related to the lesson.

Collaboration becomes part of the process by allowing students to take on active roles (e.g., interview people) and have options to work together for some parts of the process. For example, students collaborate when they share their ideas during the brainstorming session in the developing ideas phase.

Through upcycling and gift giving, students learn that they have the power to improve and design their world by serving others!

Engineering Design Process Example – Part 2: Create and Evaluate

This post is Part 2 of our complete Engineering Design Process Example for STEM classrooms. If you haven’t completed Part 1, start there! It covers defining the problem and developing ideas using the GRASPS model.

C – Create a Prototype

Engineering Design Process - Step C - Create a Prototype
The Third Step in the Engineering Design Process – Step C – Create a Prototype

Let the fun begin! In this third step of the engineering design cycle, students create their aluminum watercraft prototype to solve the problem defined in the GRASPS. This C – Create a Prototype step is usually the favorite because students make their actual well-planned designs. The research, ideas, and creativity come together in this step!
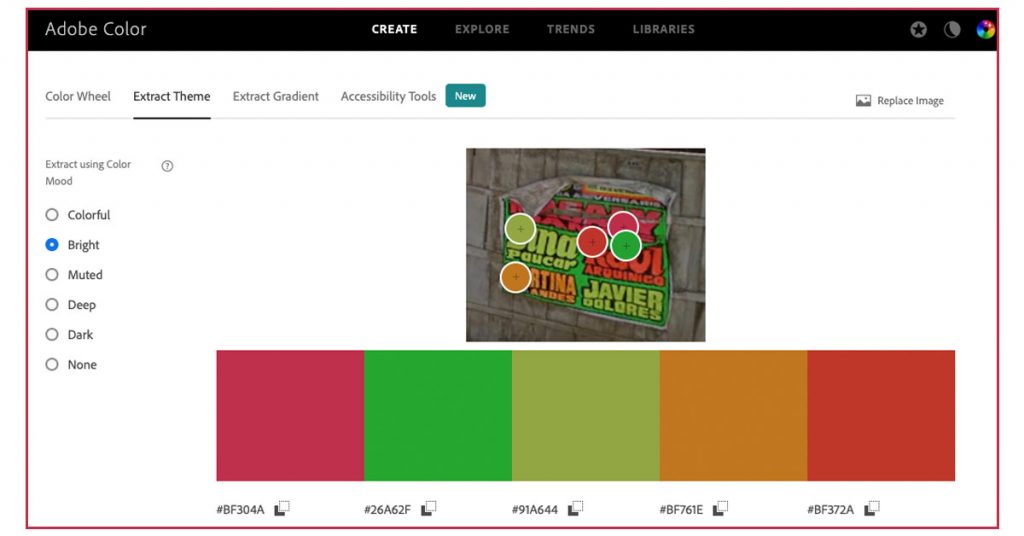
In general, students first make a plan to build their watercraft. They then try to follow the plan and possibly modify it as they build their prototype. Finally, students document changes to their plan to conclude this step.
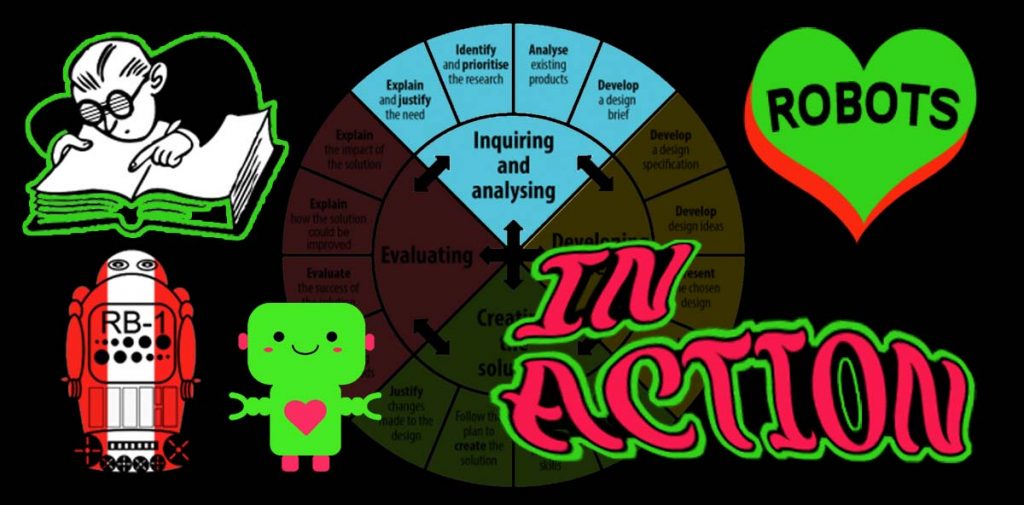
C.1 – Plan the Build (and Maybe the Test)

Students create a logical plan to build a prototype of their best idea to solve the problem stated in the GRASPS. Their role as the expert boatbuilder specializing in aluminum watercrafts does not change the fact that step-by-step, concise informational/explanatory writing is required.

The language of the plan could be a coherent mix of text, symbols, images, and/or sketches. Sketchnoting (i.e. visual note-taking) is a fun option that requires some practice.

Plan the Test for the Engineering Design Process Example

If you want the test data to be as accurate as possible, presenting a non-negotiable testing plan might be the way to go–or at least specify a couple of critical steps. For example, pennies should be placed carefully, one by one, in the watercraft prototype, not dropped. For virtual students, testing physical designs as a group is not possible.

If the prototype is a cooperative project and student roles for testing need to be determined, students can write a testing plan as well.

Look over parts C.1.2 and C.1.3 of the Water Tank Engineering MYP lesson for ideas about documenting the building and testing plans.

C.2 – Create and Document the Process

Five-inch Square of Aluminum Foil for Watercraft Prototype
The First Steps – Five-inch Square of Aluminum Foil for Watercraft Prototype

This is it! Here, students build their aluminum watercraft prototypes by hand, based on their best idea to meet the goal in the GRASPS. Their design usually shares characteristics of what they sketched in substep B.3 – Represent the Best Idea. How the prototype is built may match up with the building instructions in C.1 – Plan the Build as well, but not always.

Hands and Plans

For these aluminum watercraft prototypes, I would avoid using 3D objects as forms to shape the design. For example, if you have a boat model in your classroom, do not let a student wrap their five-inch square of foil around the model’s hull to create their prototype.

I feel that students should use their hands and maybe some tools (scissors, ruler). It promotes deeper thinking and encourages a greater variety of designs. You may see quite a few square boxes. That’s okay–everyone is starting with a square of aluminum foil. Just look out for flat-out copying, which in my experience is rare.

I have noticed that most students do not consult their building plan as they create their product. This tendency is probably because upper elementary-to-middle school-age students simply want to build at this point!

The Middle Steps – Half-finished Square-based Aluminum Foil Watercraft Prototype

Everyday Materials and Reasonable Change

I prefer working with everyday materials in STEM, so the product designs I’ve done with my students wind up being not very technical. Regardless, creating a documented plan makes sense to be as prepared as possible–to support the mindset for strategic building and provide specific references to understand any changes.

I would encourage reasonable change that keeps the problem to be solved in mind. Students’ ideas develop all the time throughout the design cycle–even during the actual build. Unforeseen problems will arise at times. So plans change. Therefore, in addition to a specific building plan, photos need to be taken. This visual evidence documents accurately how the watercraft was made.

The Final Aluminum Foil Watercraft Prototype

Some students prefer to video the build to document the process. Some will create screenshots of parts of the video too. I prefer to see photos because it’s a quicker way to review the actual building steps to provide any feedback.

Create sequence categories and request two to three photos per category as evidence. This chunking helps kids remember to take photos. Example categories for photo documentation of the build are:

  • The Preparation [materials, resources, and group member(s)]
  • The First Steps
  • The Middle Steps
  • The Finishing Steps
  • The Final Watercraft (include a ruler for reference)

C.3 – Justify Changes to the Plan

Why should the building plan be as specific as possible? Well, for one thing, it makes documenting changes much easier. In engineering, architecture, and construction, changes to actual plans happen and are documented as change orders.

Vague, incomplete, and/or brief plans created in C.1 – Plan the Build, may limit a student’s ability to accurately identify and justify changes. Precise plans, although sometimes inaccurate, provide a clearer reference from which to identify and justify changes.

Photos Don’t Lie

An incomplete collection of photo evidence may also limit a student’s ability to accurately justify changes to a plan. In my experience, an inadequately written plan hinders detailed change justifications more than an incomplete set of building photos.

If a student declares that there were no changes to their building plan, ask them to be picky. For example, estimating the time needed per step in the plan can help students identify and justify changes.

Summary of Step C – Create a Prototype

Students have prepared sufficiently to create a well-informed design to solve the problem as described in the GRASPS for the engineering design process example. They first create a logical plan, carry it out by building their prototype, and document the execution. Students conclude this third step of the engineering design process with a description of the changes between the planning steps and the actual building steps.

D – Test and Evaluate

Engineering Design Process - Step D - Test and Evaluate
The Fourth Step in the Engineering Design Process – Step D – Test and Evaluate

At this point, the deliberate and thorough nature of the engineering design process, with teacher feedback, should have yielded many well-reasoned aluminum watercraft prototypes. Regardless, some designs may fail earlier than expected due to testing error and/or some unforeseen design flaw.

Reassure students that a failing watercraft (e.g., one that sank with fewer pennies than average) does not equate to a failing grade. A failing grade would arise from not sufficiently explaining the engineering failure. So, talk about failure and F.A.I.L. (First Attempt At Learning) with your students before you test.

Three Aluminum Watercraft Prototypes Ready to Test

At the beginning of step A – Analyze a Need was probably the last time students referenced the PBL scenario. Therefore, go over the GRASPS to refamiliarize students with their role and the goal. 

Also, invite each student to hypothesize the pennies-at-failure number for their prototype. Record these estimates! One way is for students to enter these quantities in a Google Form with a short explanation—one or two sentences. Later, share with students the form’s estimates for part D.2 Evaluate the Results along with the test data gathered in D.1 – Test the Prototype.

D.1 – Test the Prototype

Try to capture as much data as possible consistently. How you go about this depends on the grade level and how precise you want to be. Control variables and record as much as you can measure. With abundant and valid data, students will have lots of opportunities to look for cause-and-effect connections.

The Physical Set Up to Test the Prototype

An easy physical test setup is a laptop next to a transparent bowl of water and about 70-100 pennies at the ready. The watercrafts should, of course, float on their own before any pennies are placed in them.

Aluminum Watercraft Prototypes - Physical Test Set Up with MacBook Pro
Physical Test Set-Up with MacBook Pro and Photobooth

For one test, I used an older Apple MacBook Pro A1278 with PhotoBooth to record the event. I thought to tape a thread across ten pennies (I assumed a negligible additional weight of the tape and thread) to both speed up the test while ensuring gentle penny placement into the prototype.

The plastic tape held up after four dunks in the water. The spinning thread of pennies added a little challenge to precise and careful placement. There was some thread tangling too, but it was not bad.

EDP Example - 5-inch Aluminum Watercraft Prototype Test with Ten Pennies on a Thread
Five-inch Aluminum Watercraft Prototype Test with Ten Pennies on a Thread as Cargo

An SLR digital camera was used for another test. Three different camera angles were explored with the help of a stack of books to video the tests.

Aluminum Watercraft Prototypes - Physical Test Set Up with SLR Canon Camera
Physical Test Set-Up with SLR Canon Camera and a Stack of Books

Why Video the Test?

Regardless of the type of failure (e.g., abrupt or gradual), it is helpful to video the test. In contrast to the building steps (which can be examined thoroughly via photos), failure can be better analyzed via a video of the test.

The Documentation to Test the Prototype

All watercraft are tested until failure. Failure when testing the paper water tanks was more nuanced than with the aluminum watercraft prototypes. So, what is failure in this case? The complete sinking of the aluminum watercraft equates to failure and ends the test.

To identify the craft and look for cause-and-effect relationships, a complete set of questions to evaluate the success of the solution could look like this:

  • Name/owner of the watercraft?
  • Number of pennies at failure?
  • Was the entire five-inch square of foil used (it was supposed to be)?
  • Were there leaks before failure? Y or N
  • How many layers of foil were used to make the watercraft?
  • Was the foil cut or torn? Y or N
  • Which 2D shape best describes the watercraft’s base?
  • What is the side-to-base relationship (e.g., perpendicular)?
  • Maximum height of the craft?
  • Minimum height of the craft?
  • Area of the watercraft’s base?

These questions are in tune with the design specifications developed in substep B.2 – Specify Requirements.

Students record their tank’s characteristics and data on a digital or paper testing document and then pass that information to a Google Form to analyze all the class data in D.2 – Evaluate the Results.

EDP Example - 5-inch Aluminum Watercraft Prototype Test with 36 Pennies at Failure
Five-inch Aluminum Watercraft Prototype Test with 36 Pennies at Failure.

If the students are writing the testing steps in part C – Create a Prototype, some non-negotiable testing steps are needed to get good data: E.g., Place pennies one by one gently in the watercraft. Also, place each penny strategically to balance the watercraft: The highest point of the floating craft should receive the next penny.

Engage the Observers in the Engineering Design Process

While you’re testing the watercraft of one student or group, what are the other students doing? They should be recording observational notes of the test. These notes can be shared with the testing student or group. Although these notes may be subjective compared to the penny-count-at-failure data, they should be used in the evaluation to offer an additional perspective. Plus, if you’re conducting the test in a face-to-face context, it keeps observers focused and helps with classroom management.

D.2 – Evaluate the Results

General questions to help students evaluate the results are:

  • What problems did you overcome in designing and testing your prototype?
  • What went well for your prototype?
  • Which design features were common in the unsuccessful prototypes?
  • Which design features were common in the successful prototypes?
  • What would the pigs say about the results from your class?
  • Which pig would benefit the most from a successful prototype? Why?

These questions address the success of the design and the satisfaction of the client pigs.

Engineering Design Process Example - Connection Between the Design Specifications and Evaluating the Results
Try to Evaluate the Results in Terms of the Design Specifications

You can also have students go through every design specification and evaluate how much the prototype met (or did not meet) each one. However, this type of analysis could become tedious if there are many specifications. An alternative would be to reflect on the degree to which each design specification was addressed.

Looking at Data from the Engineering Design Process Example

In EDP, the achievement of the goal is not always easy to evaluate. Quantitative goals offer clarity and provide beginners a distinct view of a successful design. In this introductory example with the aluminum watercraft, students can sort, explore, and mine these test data to look for patterns and cause-and-effect possibilities.

EDP Example - 5-inch Aluminum Watercraft Tested Prototypes
Five-inch Aluminum Watercraft Prototypes with Penny Quantity at Failure

Students in upper grades with more advanced math skills can explore statistical connections. Some areas are statistical variability, central tendency, data distributions, and bivariate data patterns.

Data from Four Aluminum Watercraft Prototypes for the Three Little Pigs (Dimensions are in Inches)

Not Looking at Data

Going beyond the quantitative analyses and into opinion-based questions invites all students into the discussion. Revisiting the GRASPS with open-ended questions about how the pig clients would interpret the test results can stimulate deeper insights and strengthen the authenticity of the PBL as well.

Improve the GRASPS

At this point in the engineering design process, students have been working multiple weeks. After the testing—a high point in the lesson—student enthusiasm to see the evaluation through to the end may be waning. Try to reenergize students with the fact that their efforts will help future boatbuilders better solve the problem. A discussion about the hypotheses versus the test results can bring more life to the evaluation as well.

Prior test data should inform the GRASPS and be a research resource in substep A.2 – Investigate and Research the Problem. As such, students can leverage these results to reference the success of their prototypes. For each class, there may be an altruistic or empathetic interest in finishing the testing and evaluation strong so that others may benefit from their work.

Lastly, of course, there is competition. Many kids will want to compete for the greatest penny amount within their class, across sections, and against results from past years. Encourage it so long as students can be civil about it. You can also have students compete with regard to who guessed closest to their hypothesis for their prototype.

D.3 – Reflect to Improve the Design

Engineering Design Process Example for Students - Reflect to Improve the Design
Reflect to Improve the Design of the Aluminum Watercraft Prototype

Welcome to the final part of the engineering design process example! Beware that student responses can be shorter than expected here–they probably have worked many weeks. Assigning a few easy-to-answer questions can help draw out responses and keep the students focused. However, open-ended questions are essential to get to the heart of the impact of the design for the audience. Some examples:

  • Short Answer: Based on the test data available, what would be a good goal for you (in the number of pennies) to create a successful watercraft for the pigs?
  • Expanded Answer: How would you improve your prototype to support more pennies before failure? Try to include the design specifications to describe these improvements.

In general, students should identify which prototype characteristics should be modified to better achieve the goal. Using the design specifications for guidance will help. Students could also create an annotated 3D sketch of an improved design based on what they learned in D.2 – Evaluate the Results.

Summary of Step D – Test and Evaluate

In this final step, students test their prototypes and then evaluate the results against the design specifications defined in substep B.2 – Specify Requirements. They conclude the engineering design cycle with a reflection about how to improve their design. The evaluation data and reflections can serve as future research material for substep A.2 – Investigate and Research the Problem.

Now Repeat the Engineering Design Process?

Yes, but not right away. If you have gone deep into each of the EDP’s 12 substeps and spent many weeks exploring the problem, then take a break. Simple high-interest STEM challenges and/or quick design videos might be good choices at this point.

Even if you teach an abbreviated watercraft lesson as a 30-minute STEM activity, wait to repeat the process. Example: If you started your school year with this EDP lesson, then repeat it at the beginning of the following semester after the winter break. The repeated process should touch on each of the four EDP steps and could last about three or four classes.

Engineering Design Process Example Summary

Engineering design process lessons based on the problem-focused GRASPS model offer students authentic learning experiences. Novice and veteran teachers can easily teach STEM through EDP to their virtual and brick-and-mortar students using everyday materials to create a rich, PBL (project-based learning) adventure.

The aluminum watercraft prototype problem is a very low-budget engineering design process example and an easy way to introduce EDP. It can also be a commitment to a long-term stem project if you decide to go deep into the subsets of the engineering design process! Whether you’re looking for engineering design challenges for elementary or middle school students, there are many resources in this post to help your students leverage STEM for meaningful learning.

Science Olympiad events combined with familiar and engaging stories are two readily available resources to build rich content for EDP lessons. Once familiar with the engineering design process cycle, teachers can integrate resources available to them and connect standards to teach STEM through EDP and PBL.

EDP STEM Lesson Plans and Files (pdf files)

That completes our example of the engineering design process! Students now have experience planning, building, testing, and improving a prototype. Low-budget style!

Whether you’re teaching STEM virtually or in person, these steps provide a complete and authentic learning journey through PBL and EDP.